Posted in Stampin" Blends Alcohol Markers

Peace this Christmas

It seems we often get caught up in the flurry of activity associated with the Holidays and forget to take time to feel the “Light and Peace” of Christmas.

This card is very easy to make and reminds us to receive the “Light and Peace” Christmas can bring to us. Making Christmas cards for others really helps me feel peaceful and by sending the cards to my loved ones, I feel I am sharing a little Light.

For this card I used the Stampin’ Up! Light and Peace stamp set.

Measurements: Whisper White cardstock: 8 1/2 x 5 1/2 inch card base with a scoreline at 4 1/4 inches, 3 3/4 x 2 3/4 inches, and 3 x 2 inches; Night of Navy cardstock: 5 3/8 x 4 1/8 inches and 3 3/4 x 2 3/4 inches; Copper Foil: 3 1/4 x 2 1/4 inches; and the Brightly Gleaming Specialty Designer Series Paper (DSP): 5 1/4 x 4 inches.

Additional supplies: Memento ink, Clear Blocks C and H, Every Day Label Punch, Paper Snips, Take Your Pick tool, Stampin’ Blends (Light Petal Pink, Light and Dark Balmy Blue and Dark Daffodil Delight), Bone Folder, Tombow Multipurpose Liquid Glue, Stampin’ Dimensionals and Star Designer Elements.

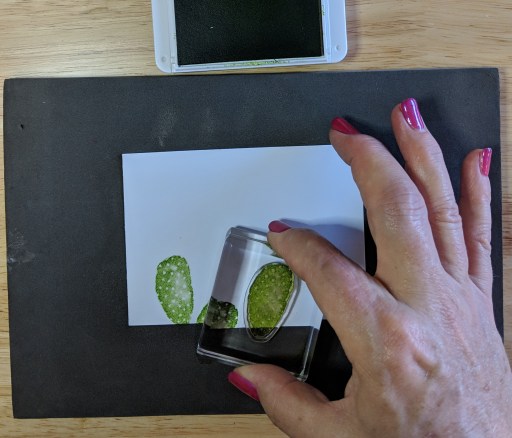
Place the angel and the sentiment “May this Christmas bring you Light and Peace” on the clear blocks. The angel will be stamped onto the 3 x 2 inch piece of Whisper White, and the sentiment on the 3 3/4 x 2 3/4 inch piece of Whisper White.

Stamp the sentiment in Memento ink onto the bottom half of the 3 3/4 x 2 3/4 inch piece of Whisper White. Oops! I didn’t apply even pressure so the “C” did not stamp. Not to worry.

Just flip the paper and stamp on the other side. When you punch the sentiment out it will be fine.

Now stamp the angel in Memento ink onto the 3 x 2 inch piece of Whisper White. Boy! It isn’t my day. This extra mark from the edge of the stamp is called a Halo. This can happen if you rock the stamp instead of pushing straight down and up. Also, some stamps just make a halo even if your stamping technique is good.

When I get a halo, I usually will trim off the excess rubber to decrease the chance of it happening again. Just take your paper snips and trim a small amount away.

I will try it again now. Viola! No halo!

Use the Everyday Label Punch to punch out the sentiment.

Use the Everyday Label Punch to punch a label from the 3 3/4 x 2 3/4 inch piece of Night of Navy.

Here are the Stampin’ Blends you will need.

I choose Dark Daffodil Delight for the hair. If you prefer brown hair, use Crumb Cake, Soft Suede or Early Espresso.

I used the Dark Petal Pink for the skin color. An alternative could be Light Crumb Cake.

I used the Dark Balmy Blue to make the shadow first.

Using a circular motion, add the Light Balmy Blue and blend the Dark Balmy Blue.

You can emphasize the shadow by applying more of the Dark Balmy Blue.

Here is the completed Angel.

Adhere the Angel to the 3 1/4 x 2 1/4 inch piece of Copper Foil.

Adhere the 2 labels together with the Night of Navy label slightly to the lower right behind the sentiment.

Adhere the Brightly Gleaming DSP to the 5 3/8 x 4 1/8 inch piece Night of Navy cardstock.

Use the Bone Folder to fold the 8 1/2 x 5 1/2 inch Whisper White cardstock card base at the 4 1/4 inch scoreline.

Adhere the Brightly Gleaming DSP and Night of Navy card stock piece to the front of the card base. Add the Angel to the upper left-hand corner.

Apply Stampin’ Dimensionals to the back of the sentiment piece. I cut my Dimensionals in half but always use a full Dimensional in the center.

Add the sentiment to the lower right-hand corner of the card front.

And now for some bling! These are the Star Designer Elements found in the Brightly Gleaming Suite in the 2019 Holiday Catalog. Aren’t they wonderful?!

The easiest way to transfer the stars from the package sheet to the card is to use the Take Your Pick Tool. I am using a retired Piercing Tool because I don’t have the Take Your Pick tool yet. Slide the pick under the adhesive of the star and transfer to the proper place on the card. Use your finger to slide the star off and adhere it to the card.

Usually using an odd number of elements is more pleasing to the eye. I also tend to place the elements in a triangular orientation.

And viola! You have a beautiful card to help bring “Light and Peace” to someone you love!

I am an Independent Stampin’ Up! Demonstrator. I try to keep this blog on the Beginner Stamper level. If you need any supplies from Stampin’ Up!, I would be honored and grateful if you would choose me to be your demonstrator. Just select the Shop Now button on the top of the blog and you will be taken to my Stampin’ Up! web page. On there you can select the Shop button and see the online catalog. Send me an email if you need any assistance.

Stampin’ Up! products used: Stamp Set: Light and Peace #150516; Paper: Whisper White #100730, Night of Navy #100867, Copper Foil #142020 and Brightly Gleaming DSP #150429; Ink: Memento #132708; Punch: Everyday Label #144668; Stampin’ Blends: Light Petal Pink #146866, Dark Daffodil Delight #144585 and Balmy Blue Combo #148544; Clear Blocks: C #118486 and H #118490; Embellishments: Star Designer Elements #150430; Adhesives: Tombow Multipurpose Liquid Glue #110755 and Stampin’ Dimensionals #104430; Paper Snips, Bone Folder and Take Your Pick tool.

Posted in Hello, Occasions Catalog 2019

Beautiful Desert

Living in the desert can be very peaceful and colorful. When the cacti bloom and add color to the usually brown desert, it is breath-taking!

Today I am using the Stampin’ Up! stamp set called Flowering Desert. I have had a great deal of fun with this set! I am using the same colors I have used in previous blog posts, Shaded Spruce and Pineapple punch. I have added Granny Apple Green.

Here is today’s card. In addition to the cardstock and ink in Shaded Spruce, Granny Apple Green and Pineapple Punch you will need Whisper White cardstock and some adhesive. If you would like pink flowers on top of the cacti, you may use Melon Mambo ink.

I started with Whisper White cardstock cut at 4 1/2 x 3 1/4 inches using the larger cactus ‘leaf’ stamp in Granny Apple Green ink.

I added a couple more leaves allowing space in between for other smaller cactus leaves.

I added more to the cactus with the smaller leaf.

Keep adding more of the small leaves until you like how it looks.

Next I used the Agave leaves stamp in Shaded Spruce ink.

Top the cactus using the Pineapple Punch ink and the larger flower stamp.

To finish the design, I used Pineapple Punch ink to add the flower branch.

I used the Shaded Spruce ink for the sentiment “Hi There!”.

I am now done with the stamping.

Tip: Some of the ink will get on your Pierce Mat. This can easily be removed with a baby wipe or wet washcloth. Another option is to wrap white copy paper around the mat so the extra ink goes on the paper instead of the mat.

In order to assemble the card I cut a piece of Pineapple Punch cardstock at 5 1/4 x 4 inches and adhered it  to the Whisper White card base. The card base measures 8 1/2 x 5 1/2 and is folded in half.

I cut a piece of Shaded Spruce the same size as the stamped piece of Whisper White, 4 1/2 x 3 1/4 inches.

Place the Shaded Spruce piece at a slight angle and adhere to the card.

Adhere the stamped piece horizontally parallel to the Pineapple Punch piece.

And now you have the completed card! Be sure to send it to someone special. It’s always nice to get a handmade card in the mail from a good friend just saying “Hello”!

Here are some other variations. Have fun creating your own. To order any of the supplies listed below, click on the shop now button at the top of the blog and you will be connected to my store. If you have any questions about ordering please contact me. There is a special sale right now called Sale-a-bration which lasts until March 31, 2019. During Sale-a-bration, for every $50 ordered, you my choose a free item from the Sale-a-bration brochure. So, check out my store and get your deal on stamping supplies today!

Products used included: Stamps: Flowering Desert  #148700; Cardstock: Shaded Spruce #146981, Pineapple Punch #146971, Granny Apple Green #146990 and Whisper White #100730; Ink: Shaded Spruce #147088, Pineapple Punch #147141 and Granny Apple Green #147095; Clear Blocks: A, B, C and D; Multipurpose Liquid Glue #110755 If you wish to have pink flowers on top of the cactus’ you may use Melon Mambo ink # 147051.

Posted in Uncategorized

Adhesives and Measurements

Happy 1st Friday of 2019! I hope you have something fun planned for the day. The snow is all but gone and the temperatures are a little warmer here in Bisbee. It’s hard to tolerate 17 degrees Fahrenheit when you are used to putting on a sweater for anything under 80 degrees Fahrenheit!

  I got a little ahead of myself at the end of the last blog. I was supposed to talk about adhesives next, but I said I would talk about measurements. So, today I will do both!

This comparison of adhesives is on page 213 of the Stampin’ Up! Annual Catalog.


The best way to learn about different adhesives and what they are used for is to look at page 213 in the Stampin’ Up! Annual Catalog. I recommend going to https://www.stampinup.com to get a better view of this page. I usually use the Multipurpose Liquid Glue because when I first lay something down, I can “wiggle” it to be straight for a second or so, before the glue sticks. Also, the liquid glue is the strongest adhesive and I like my projects to stay together!

Measurements to Make a Card

Today I will share with you the standard measurements for cards made in the United States. Cardstock is 8 1/2 x 11 inches or 12 x 12 inches. The 12 x 12 inch is generally used for scrapbooking so I will only be talking about the 8 1/2 x 11 inch cardstock here.

First you take one 8 1/2 x 11 inch sheet and cut it in half at the 5 1/2 inch mark along the 11 inch side. This gives you 2 card bases once you fold them in half along the 8 1/2 inch side.

The next step is to make layers.

The black sheet represents the 1st layer and measures 5 1/4 x 4 inches. Each successive layer will measure 1/4 inch less . So the 2nd layer will measure 5 x 3 3/4 inches.

The most simple card has one or two layers.

This cute card with this hoppy frog is an example of a 2 layer card. If you add a colored cardstock and use some colored pencils you can make a card like this:

You can do anything!

This particular stamp set, So Hoppy Together, is free with a $50 purchase from Stampin’ Up! during Sale-a-bration. There are other free products with each $50 purchase. Go to my store and shop the Annual Catalog or the new Occasions Catalog. Then look at the Sale-a-bration brochure for the free product.

If you want to purchase items to make your first card, you will need: a Stampin’ Trimmer (item # 126889), Paper snips (#103579), Whisper White cardstock (#100730), Happiness Blooms cardstock pack (#148802), Multipurpose Liquid glue (#110755) or Snail Adhesive (#104332), clear blocks to put the stamp on, E (#118484) and B (#117147) and Memento Black Ink (#132708). This will allow you to get 2 free products! There are several free stamp sets as well as Butterfly Designer Series paper and foil cardstock.

In the next blog I will discuss the Stampin’ Up! ink and how to go about stamping!