Posted in 2024-2026 Stampin' Up! Annual Catalog, Around the World on Wednesday Blog Hop, Fish, Fun/Fancy fold card, Hello, Lake/Sea/Ocean, Sealife

Around the World On Wednesday Blog Hop-June 2024- The Adventures of Benji with Submarine Life

Hello and welcome! I am Theresa McEntee, creator of Theresa’s Treasures Paper Crafts. Today I have the pleasure of participating in the Blog Hop with Around the World on Wednesday (AWOW) organized by Angie McKenzie for the Adventures of Benji!

On the second Wednesday of each month, the AWOW team put together a thematic hop to give you some inspiration for your own crafting. The Adventures of Benji is this month’s theme.

Today’s hop is special because of Benji. Benji is Angie’s little Shih Tzu. He is her stamping and walking buddy. He is so full of personality! He will want Angie to carry him after a short walk, but he loves to run and play soccer! He also loves cheese, eggs, popcorn and anything with butter.

Angie promised Benji she would take him on a trip around the world- so here he goes!

First he is going to travel to the coast of California from where I am in Bisbee Arizona. He is going by submarine up to British Columbia Canada to visit Lori Wilcox. Hense, the inspiration for my card!

My Project for today

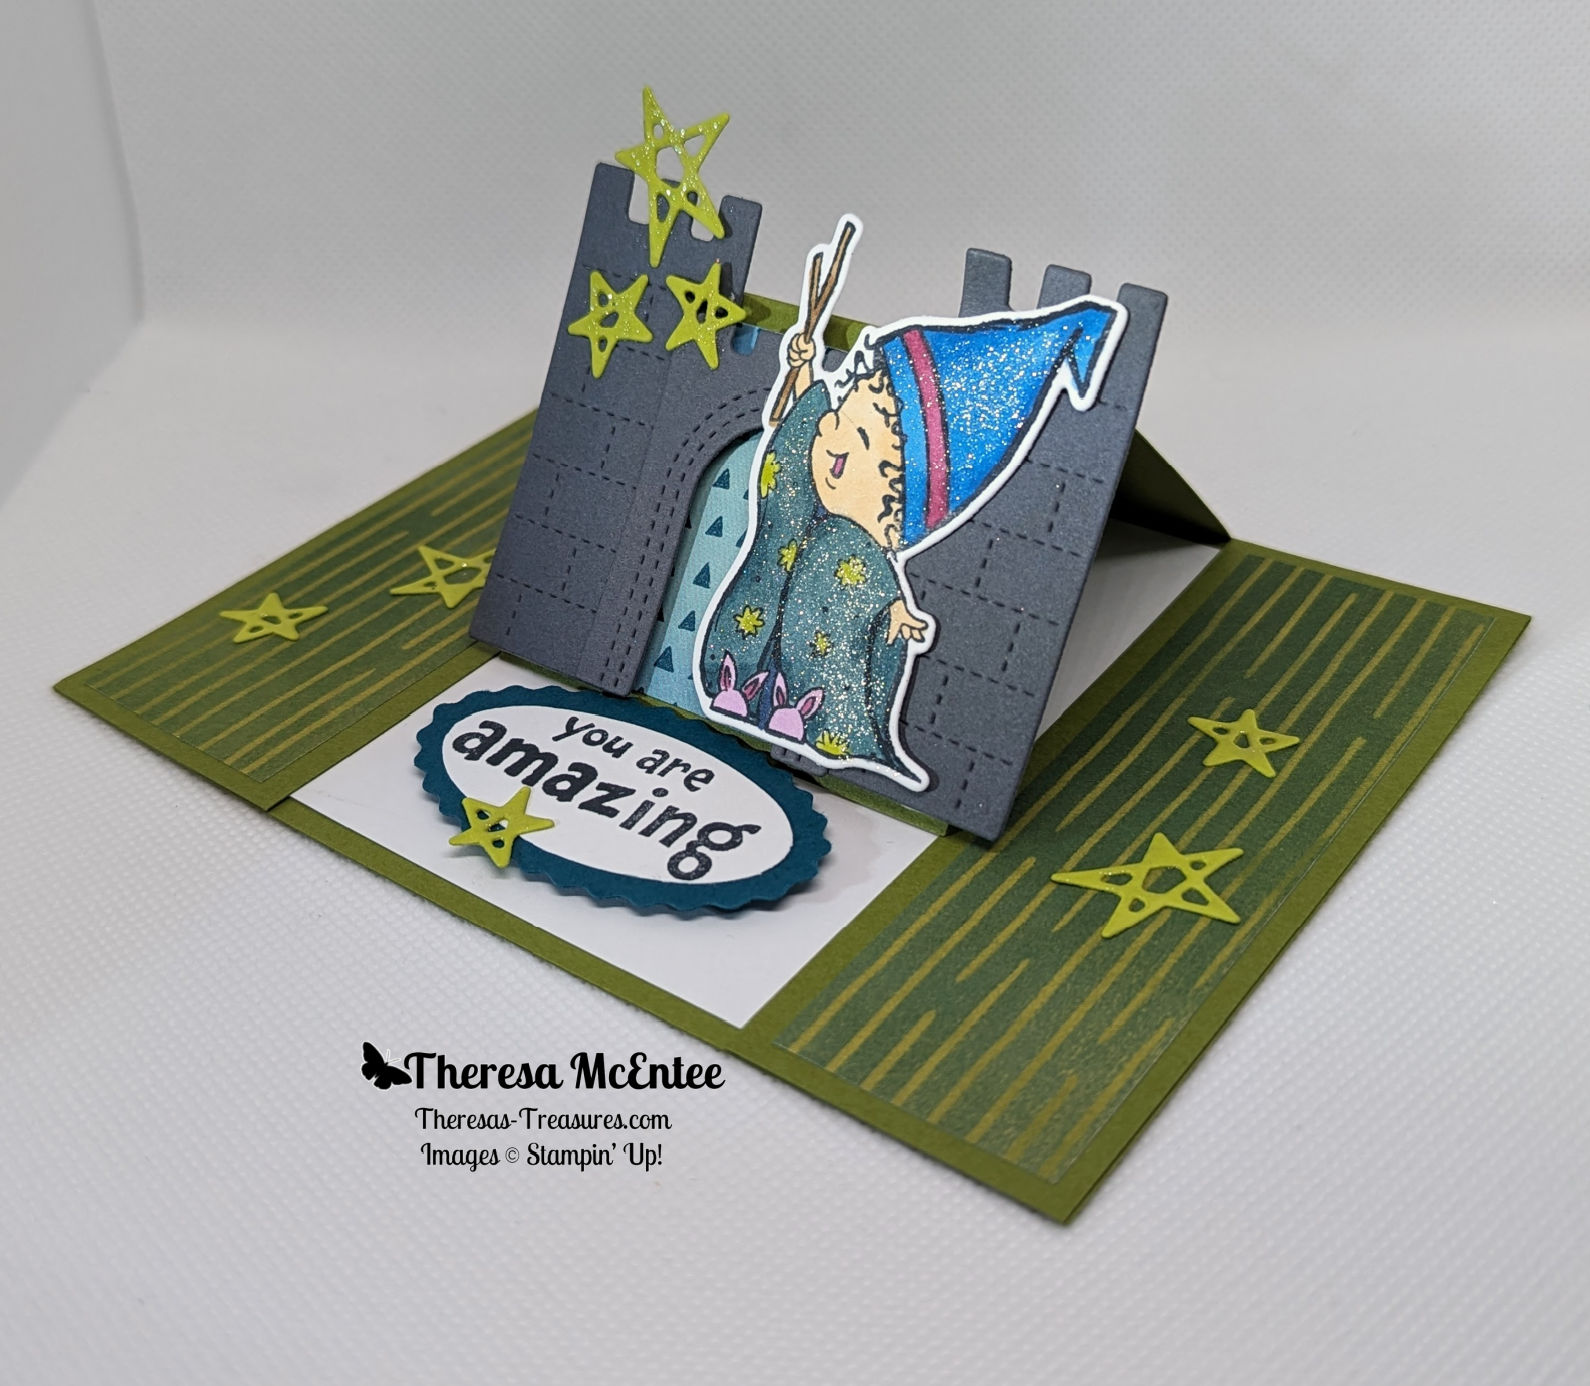
Before Benji could board the sub, the scene needed to be created. The Submarine Life Bundle is the perfect choice as there are many sea creatures so that Benji will have some friends to make along the way! This card has Craig the crab and Ollie the Octopus on the front panel.

On the inside panel are Gertrude the Guppy and her five little fishies- Gary, Geraldine, Glenda, George and Gregory. And don’t forget Sandy the Starfish!

Here is the template for this fun fold card. I hope you enjoyed the card and the story that went along with it!

To add a little Bling! I used the new 2024-26 In Color Shimmer Gems in Shaded Summer.

The AWOW Team

I am so glad you have joined me today in this worldwide hug that stretches all the way from Australia to Alaska across twelve different time zones. Each month this group of creative friends prepare a project for a theme. Below is an image of the whole crew and where they are from around the globe. Benji had quite the Adventure! And such a talented and wonderful group of people! You will want to visit everyone to be sure to see all the amazing projects!

We all love sharing joy with you through projects from our individual parts of the world. I hope that you will be filled with lots of inspiration from Benji’s Adventures. I know I sure was!

See More Inspiring Projects

Leonie Stuart – AU

Rochelle Laird-Smith – AU

Cheryll Miller – AU

Aurélie Fabre – FR

TIna Zinck-MacDonald – CA

Angie McKenzie – US

Chris Smith – US

Theresa McEntee – US

Lori Willcox – CA

Bree Renwick-US

Thank you so much for visiting today. I hope you enjoyed learning more about our projects along with the Adventures of Benji! Have a most wonderful day!

Theresa

Posted in Inspiration in Ink Blog Hop

Sketch Challenge with the Sketched Butterflies Bundle for the Inspirations in Ink May 2024 Blog Hop

Welcome! Thank you for visiting Theresa’s Treasures Paper Crafts! I am Theresa, a Stampin’ Up! Demonstrator in Arizona, USA. Today is the monthly Inspirations in Ink Blog Hop! I am excited to be hopping with other talented demonstrators. Be sure to check out everyone’s Sketch Challenge projects on the Blog Roll Call at the end of this blog.

My Inspirations in Ink Sketch Challenge is done with the Sketched Butterflies Bundle from the 2024-25 Annual Catalog. When you are ready, you may order from my Online Store HERE.

I just love butterflies and the Sketched Butterflies Bundle is a lot of fun! There are several delicate butterfly dies that flutter together so nicely. There is a lovely sentiment wishing a loved one a Beautiful Birthday. The Iridescent Striped Trim and Iridescent Faceted Gems add just the right amount of sparkle!

Supplies

  • Stamp Set: Sketched Butterflies
  • Dies: Sketched Butterflies and Deckled Rectangles
  • Ink: Memento Black Ink & Berry Burst Ink Pad
  • Stampin’ Blends: Lemon Lolly & Pumpkin Pie
  • Paper: Cardstock: Petal Pink, Berry Burst, Lemon Lolly and Basic White; Designer Series Paper: Flowering Zinnias 12″x12″
  • Embellishments: Iridescent Faceted Gems
  • Ribbon: Iridescent Striped 1/2″ Trim

For the inside of the card there is a group of small butterflies you can stamp multiple times. I colored them with the Stampin’ Blends Alcohol Markers in Lemon Lolly and Pumpkin Pie.

Voila!

Thank you so much for visiting today! I hope you enjoyed my project. Please visit all the blogs in the Inspirations In Ink Blog Hop. You will be amazed and inspired by all the fun and creative projects made by the Inspirations In Ink demonstrators using the Sketch Challenge. 

You are currently visiting Theresa McEntee-USA creator of Theresa’s Treasures Paper Crafts.

Blog Roll Call

Clickable Supply List

Product List

Product List
Sketched Butterflies Bundle (English)
$49.50
Deckled Rectangles Dies
$30.00
Tuxedo Black Memento Ink Pad
$8.00
Berry Burst Classic Stampin' Pad
$9.00
Lemon Lolly Stampin’ Blends Combo Pack
$11.00
Pumpkin Pie Stampin' Blends Combo Pack
$11.00
Petal Pink 8-1/2" X 11" Cardstock
$11.50
Berry Burst 8-1/2" X 11" Cardstock
$11.50
Basic White 8 1/2" X 11" Cardstock
$13.00
Flowering Zinnias 12" X 12" (30.5 X 30.5 Cm) Designer Series Paper
$12.50
Iridescent 1/2" (1.3 Cm) Striped Trim
$8.50
Iridescent Faceted Gems
$8.50

Monthly Paper Pumpkin Subscription

Thinking of adding creativity to your life this year? Start out by trying a monthly paper crafting kit! The Paper Pumpkin Monthly Subscription delivers a kit with everything you need to make a project-right to your door! Sign up for a Pre-paid Paper Pumpkin Subscription HERE.

Subscribe to the June 2024 Paper Pumpkin Kit by June 10, 2024! Then order the Add On Die Set #164397.

Have a most wonderful and creative day!

Ciao!

Theresa

Posted in 2024-2026 Stampin' Up! Annual Catalog, Around the World on Wednesday Blog Hop, Designer Series Paper, flowers, Gratitude/ Thanks, Nature, Summer

Around the World On Wednesday Blog Hop-May 2024- Sketch 106 Challenge with Spotlight on Nature

Hello and welcome! I am Theresa McEntee, creator of Theresa’s Treasures Paper Crafts. Today I have the pleasure of participating in the Blog Hop with Around the World on Wednesday (AWOW) organized by Angie McKenzie. 

On the second Wednesday of each month, the AWOW team put together a thematic hop to give you some inspiration for your own crafting. Sketch 106 is this month’s challenge.

I turned the sketch around to fit my idea.

My Project for today

This card was made using the Spotlight on Nature Bundle. The stamp set is just beautiful. The dies are a series of layering circles with different borders.

I wanted to showcase the 2024-2026 In Color Designer Series Paper. For this card, each of the five new In Colors were chosen in a different pattern of the Designer Series Paper. The 2024-26 In Colors are: Pretty in Pink, Peach Pie, Shy Shamrock, Summer Splash and Petunia Pop.

The AWOW Team

I am so glad you have joined me today in this worldwide hug that stretches all the way from Australia to Alaska across twelve different time zones. Each month this group of creative friends prepare a project for a theme. Below is an image of the whole crew and where they are from around the globe. Such a talented and wonderful group of people! You will want to visit everyone to be sure to see all the amazing projects!

We all love sharing joy with you through projects from our individual parts of the world. I hope that you will be filled with lots of inspiration!

See More Inspiring Projects

Jan Clothier – NZ

Leonie Stuart – AU

Rochelle Laird-Smith – AU

Cheryll Miller – AU

Aurélie Fabre – FR

Mikaela Titheridge – US

Angie McKenzie – US

Kelly Taranto – US

Shel Anderson – CA

Sharon Hashimoto Burkert – US

Chris Smith – US

Theresa McEntee – US

Bree Renwick – US

Lori Willcox – CA

Teri West – US

Cheryl Hamilton – US

Thank you so much for visiting today. I hope you enjoyed learning more about our projects. Have a most wonderful day!

Theresa

Posted in 2023-2024 Stampin' Up! Annual Catalog, Around the World on Wednesday Blog Hop, Blending Brushes, Ink, Nature, Outdoors, Techniques

Around the World On Wednesday Blog Hop-April 2024- This or That? with Grassy Grove

Hello and welcome! I am Theresa McEntee, creator of Theresa’s Treasures Paper Crafts. Today I have the pleasure of participating in the Blog Hop with Around the World on Wednesday (AWOW) organized by Angie McKenzie. 

On the second Wednesday of each month, the AWOW team put together a thematic hop to give you some inspiration for your own crafting. This or That? is this month’s theme. My project is Sunrise? or Sunset?

My Project for today

I really enjoy using the Blending Brushes and the vibrant Stampin’ Up! Inks to create the sunrise and sunset scenes.

This card was made using the Grove Dies which coordinate with the Grassy Grove stamp set. The exciting news is that these are crrying over to the 2024-2025 Annual Catalog!

I really struggled with coming up wtih a This or That? for this month’s Around the World on Wednesday Blog Hop. I have always enjoyed playing with the Blending Brushes. I love how you can blend the inks together! Heere are photos of the sunrises and sunsets here in Arizona that I used for inspiration.

The AWOW Team

I am so glad you have joined me today in this worldwide hug that stretches all the way from Australia to Alaska across twelve different time zones. Each month this group of creative friends prepare a project for a theme. Below is an image of the whole crew and where they are from around the globe. Such a talented and wonderful group of people! You will want to visit everyone to be sure to see all the amazing projects!

We all love sharing joy with you through projects from our individual parts of the world. I hope that you will be filled with lots of inspiration!

See More Inspiring Projects

Jan Clothier – NZ

Leonie Stuart – AU

Rochelle Laird-Smith – AU

Cheryll Miller – AU

Danielle Kassing – NL

Aurélie Fabre – FR

Angie McKenzie – US

Kelly Taranto – US

Chris Smith – US

Tricia Butts – US

Theresa McEntee – US

Bree Renwick – US

Lori Willcox – CA

Teri West – US

Cheryl Hamilton – US

Thank you so much for visiting today. I hope you enjoyed learning more about our projects. Have a most wonderful day!

Theresa

Clickable Supply List

Product List
Grove Dies
$39.00
Color & Contour Photopolymer Stamp Set
$21.00
Daffodil Delight Classic Stampin' Pad
$9.00
Pumpkin Pie Classic Stampin' Pad
$9.00
Poppy Parade Classic Stampin' Pad
$9.00
Cajun Craze Classic Stampin' Pad
$9.00
Fresh Freesia Classic Stampin' Pad
$9.00
Melon Mambo Classic Stampin' Pad
$9.00
Blueberry Bushel Classic Stampin' Pad
$9.00
Basic White 8 1/2" X 11" Cardstock
$10.50
Night Of Navy 8-1/2" X 11" Cardstock
$10.00
Early Espresso 8-1/2" X 11" Cardstock
$10.00
Basics Embossing Powders
$18.00
Versamark Pad
$9.50
Heat Tool (Us And Canada)
$31.00
Iridescent Rhinestones Basic Jewels
$7.50
Linen Thread
$5.00
Blending Brushes
$13.00
Small Blending Brushes
$12.00
Posted in 3D Embossing Folder, Designer Series Paper, flowers, Ink & Inspiration Blog Hop, Love/Affection, Online Exclusives, Stampin" Blends Alcohol Markers

Online Exclusive Simply Zinnia for the Ink and Inspiration Sketch 104 Challenge Blog Hop-March 2024

Here is my Online Exclusive Simply Zinnia card for the Sketch 104 Challenge!

Hello fellow stampers! I am Theresa McEntee-author of Theresa’s Treasures Paper Crafts. I am hopping along with the Ink & Inspiration Blog Hop today. You can visit super awesome blogs from around the world! The list to join the hop is at the end of my blog post. Please stop by and see everyone’s projects!

The Ink & Inspiration Challenge this month is a Sketch Challenge. I was already playing around with the Simply Zinnia stamp set. I had stamped a bunch of the large zinnia and colored them with the Stampin’ Blends Alcohol Markers. If you haven’t tried alcohol markers yet, don’t wait any longer. The alcohol markers make coloring so fun and rewarding!

Since I already had several zinnia colored, I arranged them to correspond to the Sketch 104 Challenge. I was thrilled to see how nice they all looked together!

I love the Flowering Zinnia Designer Series Paper and but also wanted to use the Zinnia 3D Embossing Folder. So I decided to emboss the Designer Series Paper. It is very subtle and adds texture to the card.

Measurements

  • Melon Mambo cardstock card base: 5 1/2″ x 8 1/2″ scored at
    4 1/4″
  • Basic White cardstock: 4 1/4″ x 5 1/2″ (for stamping the zinnia & leaves), 4″ x 5 1/4″ (inside) and 1/2″ x 5 1/2″ (for sentiment)
  • Flowering Zinnia Designer Series Paper, Petal Pink polka dot design: 4 1/8 ” x 5 3/8″ (to die cut with the largest Deckled Rectangle Die & emboss with the Zinnia 3D Embossing Folder)
  • NOTE: save the edges when you die cut the Deckled Rectangle to use on the inside of the card

Supplies

  • Stamp Set: Simply Zinnia
  • Dies: Simply Zinnia & Deckled Rectangle
  • Embossing Folder: Zinnia 3D
  • Ink: Blackberry Bliss and Memento Ink Pads
  • Stampin’ Blends: Lemon Lolly, Daffodil Delight, Pumpkin Pie, Flirty Flamingo, Melon Mambo, Lemon Lime Twist, Old Olive & Mossy Meadow
  • Embellishments: Adhesive-Backed Shiny Sequins

Instructions

  1. Fold the Melon Mambo cardstock card base at the 4 1/4″ scoreline and burnish with the Bone Folder. Set aside.
  2. Die cut the Flowering Zinnia Designer Series Paper with the largerst Deckled Rectangle Die. Save the edges to use for the inside of the card.
  3. Run the Deckled Rectangle through the Stampin’ Cut & Emboss Machine with the Zinnia Embossing Folder. Set aside.
  4. Use Memento Ink to stamp the large zinnia three times and the leaves twice onto the 4 1/4″ x 5 1/2″ Basic White cardstock.
  5. TIP: Use the Heat Tool to dry the Memento Ink. Then when you use the Lemon Lolly Stampin’ Blend, the black Memento will not bleed into the Lemon Lolly.
  6. Color the images as desired. I usually start by coloring the shadows with a the dark shade. Then I blend it with a medium shade. And finally I blend everything with the lighter color.
  7. Die cut the zinnias and leaves with the Simply Zinnia Dies. Set aside.
  8. Use Blackberry Bliss Ink to stamp the sentiment onto the
    1/2″ x 5 1/2″ Basic White cardstock. Stamp in the center as you will use the whole piece.
  9. For the inside, use the scrap from cutting the Deckled Rectangle from the Flowering Zinnia Designer Series paper and adhere it to the 4″ x 5 1/4″ Basic White cardstock as shown below.

Assembling the Card

  1. Adhere the inside card piece to the inside of the Melon Mambo cardstock card base.

  1. Adhere the die cut and embossed Flowering Zinnia Designer Series Paper to the front of the card base.
  2. Use Stampin’ Dimensionals to adhere the sentiment to the front of of the card.
  3. Arrange the 3 zinnias on the card front. Adhere the top zinnia flat to the card front. Use 3 thicknesses of Basic White cardstock on the back of the middle zinnia. Then adhere the bottom zinnia with Stampin’ Dimensionals. Tip: place Dimensionals in the center of the back of the zinnia so you can place the leaves more easily.
  4. Adhere the leaves.
  5. Use Wink of Stella on the zinnia for extra sparkle.
  6. Embellish with the Adhesive-Backed Shiny Sequins as desired.

I hope you enjoyed my interpretation of The Sketch 104 Challenge. Be sure to visit each of the blogs below to see more ideas!

Blog Roll Call

Have a most wonderful day!

Theresa

Order Supplies Here:

Product List
Simply Zinnia Bundle (English)
$52.00
Deckled Rectangles Dies
$30.00
Zinnia 3 D Embossing Folder
$11.00
Blackberry Bliss Classic Stampin' Pad
$9.00
Tuxedo Black Memento Ink Pad
$6.50
Lemon Lolly Stampin’ Blends Combo Pack
$10.00
Daffodil Delight Stampin' Blends Combo Pack
$10.00
Pumpkin Pie Stampin' Blends Combo Pack
$10.00
Flirty Flamingo Stampin' Blends Combo Pack
$10.00
Melon Mambo Stampin' Blends Combo Pack
$10.00
Lemon Lime Twist Stampin’ Blends Combo Pack
$10.00
Old Olive Stampin' Blends Combo Pack
$10.00
Mossy Meadow Stampin' Blends Combo Pack
$10.00
Melon Mambo 8-1/2" X 11" Cardstock
$10.00
Basic White 8 1/2" X 11" Cardstock
$10.50
Flowering Zinnias 12" X 12" (30.5 X 30.5 Cm) Designer Series Paper
$12.50
Adhesive Backed Shiny Sequins
$7.50
Clear Wink Of Stella Glitter Brush
$8.00

Promotions

Shop retiring products in the 2023-24 Annual Catalog now and get up to 60% off HERE

Check out the retiring products in the 2024 january to April Mini Catalog HERE.

Posted in Designer Series Paper, Gratitude/ Thanks, Inspiration in Ink Blog Hop, Online Exclusives

Online Exclusive Simply Zinnia Bundle for the Inspirations in Ink March 2024 Blog Hop

I just love this Thank You card made with the Online Exclusives-Simply Zinnia Bundle!

Welcome! Thank you for visiting Theresa’s Treasures Paper Crafts! I am Theresa, a Stampin’ Up! Demonstrator in Arizona, USA. Today is the monthly Inspirations in Ink Blog Hop! I am excited to be hopping with talented demonstrators from around the world. Be sure to check out everyone’s projects using Stampin’ Up! Online Exclusives!

The Simply Zinnia Bundle is one of many Online Exclusives! It is only available in my Online Store. When you are ready, you may order from my Online Store HERE.

I enjoyed using the Stampin’ Blend Alcohol Markers to color the zinnia-which is one of my favorite flowers.

The Flowering Zinnias Designer Series Paper (DSP) is so vibrantly colorful! I wanted to be sure to use the DSP on my card! Too many choices!

Measurements

  • Melon Mambo cardstock card base: 5 1/2″ x 8 1/2″ scored at 4 1/4″
  • Flowering Zinnias DSP:
    • Large Floral with White background: 4 1/4″ x 5 1/4″ (die cut with the 2nd to largest Deckled Rectangle Die)
    • Melon Mambo floral design: 3 1/2″ x 4 3/4″ (die cut with the 3rd to the largest Deckled Rectangle Die)
    • Floral Design with Melon Mambo background: 1 1/4″ x 5 1/2″
  • Basic White cardstock: 2 1/2″ x 5″ (for stamping zinnia and leaf),
    1 1/4″ x 4 1/4″ (for sentiment) and 4″ x 5 1/4″ for inside

Supplies

  • Stamp Set: Simply Zinnia
  • Dies: Simply Zinnia & Deckled Rectangle
  • Ink: Blackberry Bliss & Memento ink pads
  • Stampin’ Blends: Lemon Lolly, Daffodil Delight, Flirty Flamingo, Melon Mambo, Lemon Lime Twist, Old Olive and Mossy Meadow
  • Embellishments: Adhesive-backed Shiny Sequins

Instructions

  1. Fold the Melon Mambo cardstock card base in half and burnish with a Bone Folder. Set aside.
  2. Die cut the DSP and set aside.
  3. Stamp the large zinnia image in Memento Ink onto the 2 1/2″ x 5″ Basic White cardstock. Stamp the leaves. TIP: Let dry or use your Heat Tool to dry the image more quickly so that the black ink doesn’t affect the Lemon Lolly Stampin’ Blend Ink.
  4. Color images as desired. Die cut with the Simply Zinnia Dies.
  5. Stamp the sentiment for the front of the card in Blackberry Bliss Ink onto the 1 1/4″ x 4 1/4″ Basic White cardstock. Use the largest Deckled Rectangle to die cut the edges of the sentiment.
  6. For the inside of the card, stamp the sentiment in Blackberry Bliss Ink. Stamp the trio of zinnias in Memento Ink in the lower right-hand corner. Let dry or use the Heat Tool on the trio. Color with Stampin’ Blends as desired.
  1. Adhere the inside card piece to the inside of the Melon Mambo cardstock card base.
  2. Adhere the DSP with the white background onto the front of the card base. Follow with the Melon Mambo floral DSP. Finish with the Floral strip with the pink background across the middle.
  3. Use Stampin’ Dimensionals to adhere the sentiment, zinnia and leaves.
  4. Add Bling! with the Adhesive-Backed Shiny Sequins as desired.

Voila!

Thank you so much for visiting today! I hope you enjoyed my project. Please visit all the blogs in the Inspirations In Ink Blog Hop. You will be amazed and inspired by all the fun and creative projects made by the Inspirations In Ink demonstrators. 

You are currently visiting Theresa McEntee-USA creator of Theresa’s Treasures Paper Crafts.

Blog Roll Call

Clickable Supply List

Product List
Simply Zinnia Bundle (English)
$52.00
Deckled Rectangles Dies
$30.00
Blackberry Bliss Classic Stampin' Pad
$9.00
Tuxedo Black Memento Ink Pad
$6.50
Lemon Lolly Stampin’ Blends Combo Pack
$10.00
Daffodil Delight Stampin' Blends Combo Pack
$10.00
Flirty Flamingo Stampin' Blends Combo Pack
$10.00
Melon Mambo Stampin' Blends Combo Pack
$10.00
Lemon Lime Twist Stampin’ Blends Combo Pack
$10.00
Old Olive Stampin' Blends Combo Pack
$10.00
Mossy Meadow Stampin' Blends Combo Pack
$10.00
Melon Mambo 8-1/2" X 11" Cardstock
$10.00
Basic White 8 1/2" X 11" Cardstock
$10.50
Flowering Zinnias 12" X 12" (30.5 X 30.5 Cm) Designer Series Paper
$12.50
Adhesive Backed Shiny Sequins
$7.50

Monthly Paper Pumpkin Subscription

Do you want to learn to stamp? Or do you want to build up some supplies while making awesome projects?

Start out by trying a monthly paper crafting kit! The Paper Pumpkin Monthly Subscription delivers a kit with everything you need to make a project-right to your door! Everything you need is included! You even get a ink spot in a different color every month!

Sign up for a Pre-paid Paper Pumpkin Subscription HERE.

Special Add-On Die Set for the April Paper Pumpkin is available in my Online Store HERE!

Have a most wonderful and creative day!

Ciao!

Theresa

Posted in 2024 Stampin' Up! January to April Mini Catalog, Around the World on Wednesday Blog Hop, beginner stamper, Birds, Designer Series Paper, encouragement

Filled with Happiness Good Day Card-Around the World On Wednesday Blog Hop-March 2024-March Blues

Hello and welcome! I am Theresa McEntee, creator of Theresa’s Treasures Paper Crafts. Today I have the pleasure of participating in the Blog Hop with Around the World on Wednesday (AWOW) organized by Angie McKenzie with my Filled with Happiness Good Day Card.

On the second Wednesday of each month, the AWOW team put together a thematic hop to give you some inspiration for your own crafting. March Blues is this month’s theme.

I was really inspired by all of the beautiful blues that Stampin’ Up! has! One of the awesome characteristics of Stampin’ Up products is that they all coordinate. I did not have any trouble finding Designer Series Paper, embellishments or ribbon to go with the March Blues. I was able to color with the Stampin’ Blends to create the Filled with Happiness Good Day Card.

My Project for today

Measurements

  • Misty Moonlight cardstock card base: 5 1/2″ x 8 1/2″ scored at 4 1/4″
  • Night of Navy cardstock: 2 3/8″ x 5 1/2″
  • Poetic Expressions Designer Series Paper: 2 1/4″ x 5 1/2″ and 3/4″ x 4 1/8″
  • Basic White cardstock: two at 3″ x 3 1/2″ and 4″ x 5 1/4″

Supplies

  • Filled with Happiness Stamp
  • Modern Oval Punch
  • Ink: Night of Navy
  • Stampin’ Blends: Pool Party, Boho Blue, Balmy Blue, Night of Navy & Misty Moonlight
  • Balmy Blue & White 1/2″ Variegated Ribbon
  • Iridescent Pastel Gems

Instructions

  1. Stamp the “Good Day” image in Night of Navy Ink onto one of the 3″ x 3 1/2″ Basic White cardstock pieces. Use scissors to cut around the outer border of the sentiment.
  2. On the other 3″ x 3 1/2″ Basic White cardstock piece, stamp the bird image in Night of Navy Ink. Use the Modern Oval Punch to punch the center out.
  3. Color the bird image with the Stampin’ Blends as desired.
  4. Adhere the Poetic Expressions Designer Series Paper to the Night of Navy cardstock. Wrap the Balmy Blue & White 1/2″ Variegated Ribbon around the middle. Adhere to the back with Mini Glue Dots.
  5. Adhere this piece to the middle of the front of the Misty Moonlight cardstock card base.
  6. Make a bow and set aside.
  7. Adhere the “Good Day” sentiment piece to the left side of the card front.
  8. Use Stampin’ Dimensionals to adhere the bird image to the center of the “Good Day” sentiment piece.
  9. Adhere the bow with a Mini Glue Dot.
  10. Embellish with the Iridescent Pastel Gems.

The AWOW Team

I am so glad you have joined me today in this worldwide hug that stretches all the way from Australia to Alaska across twelve different time zones. Each month this group of creative friends prepare a project for a theme. Below is an image of the whole crew and where they are from around the globe. Such a talented and wonderful group of people! You will want to visit everyone to be sure to see all the amazing projects!

We all love sharing joy with you through projects from our individual parts of the world. I hope that you will be filled with lots of inspiration!

See More Inspiring Projects

Jan Clothier – NZ

Leonie Stuart – AU

Rochelle Laird-Smith – AU

Cheryll Miller – AU

Ximena Morales – DE

Aurélie Fabre – FR

Mikaela Titheridge – UK

Annette Ball – CA

Angie McKenzie – US

Kelly Taranto – US

Sharon Hashimoto Burkert – US

Chris Smith – US

Tricia Butts – US

Theresa McEntee – US

Lori Willcox – CA

Cheryl Hamilton – US

Thank you so much for visiting today. I hope you enjoyed learning more about our projects. Have a most wonderful day!

Theresa

Supply List

Product List
Filled With Happiness Photopolymer Stamp Set (English)
$20.00
Modern Oval Punch
$22.00
Night Of Navy Classic Stampin' Pad
$9.00
Pool Party Stampin' Blends Combo Pack
$10.00
Balmy Blue Stampin' Blends Combo Pack
$10.00
Boho Blue Stampin’ Blends Combo Pack
$10.00
Misty Moonlight Stampin' Blends Combo Pack
$10.00
Night Of Navy Stampin' Blends Combo Pack
$10.00
Misty Moonlight 8-1/2" X 11" Cardstock
$10.00
Night Of Navy 8-1/2" X 11" Cardstock
$10.00
Basic White 8 1/2" X 11" Cardstock
$10.50
Poetic Expressions 12" X 12" (30.5 X 30.5 Cm) Designer Series Paper
$12.50
Balmy Blue/White 1/2" (1.3 Cm) Variegated Ribbon
$9.00
Iridescent Pastel Gems
$8.00
Posted in 2024 Stampin' Up! January to April Mini Catalog, beginner stamper, Fun/Fancy fold card, International Project Highlights Gallery

Kiddin’ Around “You Are Amazing” Card for Kylie’s International Blog Highlights Gallery-March 2024

Hello! Welcome to Theresa’s Treasures Paper Crafts. I am Theresa, an Independent Stampin’ Up! Demonstrator in Arizona, USA. I am so excited to be participating in Kylie Bertucci’s International Blog Highlight Gallery with my Kiddin’ Around “You Are Amazing” card. Today I am blogging along with a very creative group of Stampin’ Up! demonstrators from around the world! Please be sure to see all of the inspirational projects by visiting everyone’s blog. You will need to click on the “Vote” button below to see the Gallery.

The theme for this Gallery is “Thank You”.

We often forget those simple words “Thank you”. However, it is also important to let those who have helped you, supported you or inspired you, know just how amazing you think they are! One way to share your feelings is to send a handmade card. Discover the joy in making and sending a handmade card for yourself!

This Kiddin’ Around “You Are Amazing” Card showcases the Kiddin’ Around Bundle in the 2024 Stampin’ Up! Mini Catalog. Today I used both the stamp set and the dies, as well as the Just Kiddin’ 12″ x 12″ Designer Series Paper.

Current Host Code: K3Q7NG2M

Measurements

  • Old Olive cardstock card base: 5 1/2″ x 8 1/2″ scored at 4 1/4″
  • Basic White cardstock: 3 1/4″ x 4″, 2 1/2″ x 3″ (to stamp the child) and 1 1/2″ x 3″ (for sentiment)
  • Basic Gray cardstock: 3″ x 4″ (to diecut the castle pieces)
  • Lemon Lime Twist cardstock: 1 1/2″ x 9″ (to diecut the stars)
  • Pretty Peacock cardstock: 1 1/2″ x 3″
  • Just Kiddin’ 12″ x 12″ Designer Series Paper: two at 1 1/2″ x 4″ (Olive Green/Lemon Lime Twist “grass” pattern and 1 3/4″ x 2 1/4″ (ombre blue with mini triangles pattern for the “sky”)

Supplies

  • Kiddin’ Around Bundle
  • Double Oval Punch
  • Paper Trimmer
  • Stampin’ Cut & Emboss Machine
  • Ink: Memento Ink Pad
  • Stampin’ Blends Alcohol Markers: Azure Afternoon, Berry Burst, Fresh Freesia, Lemon-Lime Twist, Pecan Pie, Pretty Peacock and 800/light Medium Deep.

Instructions

Prepping the Card Base

  1. Fold the 5 1/2″ x 8 1/2″ Old Olive cardstock card base at the 4 1/4″ score line.
  2. With the 5 1/2″ side on top, cut at 1 1/2″ down to the 4 1/4″ fold. Then make another cut down to the fold at 4″.
  3. With the 8 1/2″ side on top, score at 2″ between the 1 1/2″ and 4″ cuts.
  4. Turn the cardbase so that the 5 1/2″ side is on top with the cut side on top.
  5. In the center of the area below the fold, adhere the Basic White cardstock.
  6. Adhere each of the 1 1/2″ flaps to the cardbase.
  7. Now adhere the two 1 1/4″ x 4″ strips of Olive Green/Lemon Lime Twist Just Kiddin’ Designer Series Paper “grass” to either side of the cardbse.
  8. Fold the center of the card base down and adhere the “sky” below the fold of the front flap.

Prepping the Rest of the Card Pieces

  1. From the Lemon Lime Twist diecut the stars three times so that you have 9 stars.
  2. Die cut two of the castle towers and one arch from the Basic Grey cardstock.
  3. In Memento Ink, stamp the sentiment “you are amazing” onto the 1 1/2″ x 3″ Baisc White cardstock so that you can punch it out with the smaller smooth oval in the Dual Oval Punch.
  4. Punch the sentiment out. Punch a scalloped oval from the Pretty Peacock cardstock.
  5. Also with Memento Ink, stamp the image of the child onto the 2 1/2″ x 3″ Basic White cardstock. Wait until after you color to die cut the image.
  6. Color the image with Stampin’ Blends Alcohol Markers. Colors are as follows: hat-Berry Burst & Azure Afternoon; Face– 800 of the Medium Deep Natural Tones & Berry Burst for the mouth; magic wand- Pecan Pie; gown– Pretty Peacock and Lemon Lime Twist for the stars; Bunny Slippers-Fresh Fresia and Berry Burst for the inner ear.
  7. Die cut the child.

Assembling the Card

  1. Use Stampin’ Dimensionals to adhere one castle tower to each side of the front flap. There is 1/4″ that hangs off the edge.
  2. Apply a Stampin’ Dimensional behind the top of the arch. Apply a thin line of the Multipurpose Liquid Glue along the outer edge behind the left & right sides of the arch. Adhere to the front flap between the towers.
  3. The image of the child is adhered using Stampin’ Dimensionals behind the left side and glue behind the right side.
  4. Adhere the sentiment to the Pretty Peacock cardstock scalloped oval.
  5. Then use Stampin’ Dimensionals to adhere the sentiment to the center of the Basic White cardstock under the front flap.
  6. Adhere the stars as desired.
  7. Embellish with Wink of Stella applied to the gown, hat and the stars.

Add Bling! if desired.

Voila!

I hope you enjoyed my card today using the Kiddin’ Around Bundle.

Visit my Online Store to order what you need to make this card for yourself. Photographic supply list is at the end of this blog.

Current Host Code: K3Q7NG2M

You are currently at Theresa McEntee-Theresa’s Treasures-USA. When you click on the Vote For Me button above you will see the Gallery of creative inspiration from Demonstrators around the world! Remember to visit everyone’s blog by clicking on the photo of their card in the Gallery.

To vote for your favorite cards, click on the small heart in the upper right-hand corner of each photo. You have 5 votes! Enjoy and come visit Theresa’s Treasures again soon!

Clickable Supply List

Product List
Kiddin' Around Bundle (English)
$54.00
Double Oval Punch
$22.00
Tuxedo Black Memento Ink Pad
$6.50
Azure Afternoon Stampin’ Blends Combo Pack
$10.00
Berry Burst Stampin’ Blends Combo Pack
$10.00
Fresh Freesia Stampin' Blends Combo Pack
$10.00
Lemon Lime Twist Stampin’ Blends Combo Pack
$10.00
Pecan Pie Stampin’ Blends Combo Pack
$10.00
Pretty Peacock Stampin' Blends Combo Pack
$9.00
Old Olive 8-1/2" X 11" Cardstock
$10.00
Basic White 8 1/2" X 11" Cardstock
$10.50
Lemon Lime Twist 8-1/2" X 11" Cardstock
$10.00
Basic Gray 8-1/2" X 11" Cardstock
$10.00
Just Kiddin' 12" X 12" (30.5 X 30.5 Cm) Designer Series Paper
$12.50
Clear Wink Of Stella Glitter Brush
$8.00
Paper Trimmer
$26.00
Stampin' Cut & Emboss Machine
$128.00
Stampin' Dimensionals
$4.25
Multipurpose Liquid Glue
$5.50

Thanks again for stopping by! Have a most wonderful and crafty day!

Theresa

Posted in 2024 Stampin' Up! January to April Mini Catalog, Baby Wipe Technique, Hello, Inspiration in Ink Blog Hop, Love/Affection, Nature

Painted Lavender Bundle & Baby Wipe Technique Hello card for the Inspirations in Ink Blog Hop – January 2024

This is my Hello card made with the Painted Lavender Bundle & the Baby Wipe Technique.

Welcome! Thank you for visiting Theresa’s Treasures Paper Crafts! I am Theresa, a Stampin’ Up! Demonstrator in Arizona, USA. Today is the monthly Inspirations in Ink Blog Hop! I am excited to be hopping with talented demonstrators from around the world! Be sure to check out everyone’s Painted Lavender Bundle projects. The Painted Lavender Bundle is in the 2024 January to April Mini Catalog. When you are ready, you may order from my Online Store HERE.

I absolutely love purple, lavender and butterflies! The Painted Lavendar Bundle is part of the Perennial Lavendar Suite which includes all of these elements!

I wanted to use the Baby Wipe Technique to be able to have multiple colors of flowers when I used the lavender flower stamp. I love how it came out!

Measurements

  • Crumb Cake cardstock (cs): 5 1/2″ x 8 1/2″ scored at 4 1/4″
  • Basic White cs: 3 3/4″ x 5″ (to diecut the inside), 4″ x 5 1/4″ (for stamping) and 1″ x 2″ (to stamp and diecut sentiment)
  • Highland Heather Glimmer Sheet: 3 7/8″ x 5 1/8″ and 1″ x 2″ (to diecut with smallest rectangular Perennial Postage Die)
  • Perennial Lavender DSP: 4 1/4″ x 5″ (to diecut with the largest Perennial Postage Die)
  • Fresh Freesia cs: 1 3/4″ x 1 3/4″ (to diecut with square Perennial Postage Die and emboss with the butterfly die)

Supplies

  • Stamp Sets: Painted Lavender & Artistically Inked (sentiment)
  • Dies: Painted Lavendar & Perennial Postage
  • Ink: Fresh Freesia, Highland Heather, Orchid Oasis, Gorgeous Grape & Shaded Spruce
  • Embellishments: Purple Fine Shimmer Gems
  • Ribbon: White Glitter Organza Ribbon and White Bakers Twine

Instructions

Baby Wipe Technique

  • To set up the Baby Wipes place about 5 Baby Wipes folded in half on one side the the Standard Stamp Case.
  • Randomly drop a few drops of each color of ink on the pile of Baby Wipes.
  • Use the lavender flower stamp and tap down on the Baby Wipes in a small circular motion. Stamp onto the Basic White cs. Ink up the stamp in a different area of the Baby Wipe and stamp the bunch of lavender flowers four times (you only need two of the stamped flowers for this card).

  • Use the other bunch of flowers and the Baby Wipe Technique to stamp flowers on the Basic White cs for the inside of the card. Stamp the leaves in Shaded Spruce Ink. Stamp at full strenth in the center, then Stamp Off once when stamping on each side.

Gathering the Pieces

  • Use the 2nd to largest Perennial Postage Die to diecut the stamped Basic White cs for the inside. Adhere the cardpiece to the inside of the Crumb Cake cs card base.
  • Diecut the stamped lavendar flowers with the Painted Lavender Dies.
  • Stamp the stems in Shaded Spruce Ink onto the Basic White cs. Diecut with the Painted Lavender Dies.
  • Use the square Perennial Postage Die to cut from the Fresh Freesia cs. Sponge the edges with a Sponge Dauber and Gorgeous Grape Ink.
  • Use the Stampin’ Write Marker in Gorgeous Grape to apply ink to the butterfly postage stamp die. Carefully lay the die on the Fresh Freesia cs and run throught the Stampin’ Cut & Emboss Machine. Carefully remove the die from the paper.
  • Stamp “Hello” in Gorgeous Grape Ink onto the strip of Basic White cs. Use the smallest rectangular die in the Perennial Postage Dies to diecut the sentiment. Also use the same die on the strip of Highland Heather Glimmer Paper.

Assembling the Card

  • Use the largest Perennial Postage Die to diecut the Perennial Lavendar DSP. Adhere the DSP to the Highland Heather Glimmer Paper. TIP: I used a Deckled Rectangle Die to cut the center form the Highland Heather Glimmer Paper before adhering the DSP to it.
  • Use Stampin’ Dimensionals to adhere the Glimmer Paper/DSP panel to the card front.
  • Adhere one bunch of the lavendar flowers to the card by applying adhesive only to the base. Use the Bone Folder to curl up the edges of the flowers.

  • For the 2nd bunch of lavendar flowers, use Stampin’ Dimensionals on the top and an adhesive at the base. (shown above). Adhere to the top of the other bunch of lavendar flowers but shifted to the left.
  • Now adhere the Fresh Freesia cs postage stamp cardpiece at a slight tilt in the upper right-hand corner.
  • Add the stems to the base of flowers.
  • Next adhere the small Highland Heather Glimmer Paper diecut to the Perennial Lavendar DSP. Use Stampin’ Dimensionals to adhere the “Hello” slightly lower and to the right of the Glimmer Paper.

Embellishment

  • Tie a bow with the White Glitter Organdy Ribbon. Then tie White Bakers Twine around the center of the bow. Tie a bow. Add to the stem of the lavendar bunch on the card front.
  • Use Mini Glue Dots to adhere the butterfly from the Paper Butterfly Accents.
  • Add one of each color of the Purple Fine Shimmer Gems to the body of the butterfly.

Voila!

Thank you so much for visiting today! I hope you enjoyed my project. Please visit all the blogs in the Inspirations In Ink Blog Hop. You will be amazed and inspired by all the fun and creative projects made by the Inspirations In Ink demonstrators. 

You are currently visiting Theresa McEntee-USA creator of Theresa’s Treasures Paper Crafts.

Blog Hop Line Up

Clickable Supply List

Product List
Painted Lavender Bundle
$46.75
Perennial Postage Dies
$33.00
Artistically Inked Cling Stamp Set
$24.00
Fresh Freesia Classic Stampin' Ink Refill
$5.00
Highland Heather Classic Stampin' Ink Refill
$5.00
Gorgeous Grape Classic Stampin' Ink Refill
$5.00
Orchid Oasis Classic Stampin' Ink Refill
$5.00
Shaded Spruce Classic Stampin' Pad
$9.00
Gorgeous Grape Classic Stampin' Pad
$9.00
Regals Stampin' Write Markers
$35.00
Crumb Cake 8-1/2" X 11" Cardstock
$10.00
Fresh Freesia 8 1/2" X 11" Cardstock
$10.00
Basic White 8 1/2" X 11" Cardstock
$10.50
Perennial Lavender 12" X 12" (30.5 X 30.5 Cm) Designer Series Paper
$12.50
Three Color Glimmer 12" X 12" (30.5 X 30.5 Cm) Specialty Paper
$10.50
White 3/8'' (1 Cm) Glittered Organdy Ribbon
$8.50
Baker's Twine Essentials Pack
$11.00
Purple Fine Shimmer Gems
$8.00
Paper Butterfly Accents
$8.00
Clear-Mount Stamp Cases
$9.00

Paper Pumpkin Monthly Kit

Thinking of adding creativity to your life this year? Start out by trying a monthly paper crafting kit! The Paper Pumpkin Monthly Subscription delivers a kit with everything you need to make a project-right to your door! Sign up for a Pre-paid Paper Pumpkin Subscription HERE.

Have a most wonderful and creative day!

Ciao!

Theresa

Posted in 2024 Stampin' Up! January to April Mini Catalog, 3D Embossing Folder, Inspiration in Ink Blog Hop

Painted Lavendar & Hot Air Balloon for the Ink & Inspiration Blog Hop-January 2024

Hello fellow stampers! I am Theresa McEntee-author of Theresa’s Treasures Paper Crafts. I am hopping along with the Ink & Inspiration Blog Hop today. You can visit super awesome blogs from around the world! The list to follow the hop is at the end of my blog post. Please stop by and see everyone’s projects!

The Ink & Inspiration Challenge is both an image and a color challenge. I was inspired by the image because I love spring flowers and look forward to my flower garden blooming each year. I absolutly love all of the colors! They are so vibrant and happy!

I grew up in Albuquerque New Mexico USA which is the Hot Air Balloon Capital of the World! Each year there is a Balloon Fiesta which lasts a whole week. There were over 500 hot air balloons at the 2023 Fiesta, which was attended by over 900,000 visitors! When Stampin’ Up!® brought out the Hot Air Balloon Bundle in the 2024 Mini Catalog- I was ecstatic! I could not wait to use the Hot Air Balloons with the Painted Lavender Bundle for this challenge.

Measurements

  • Azure Afternoon cardstock (cs) card base: 5 1/2″ x 8 1/2″ scored at 4 1/4″
  • Azure Afternoon cs: 4″x 5 1/4″ (1st layer)
  • Highland Heather Glimmer Paper: 3 3/8″ x 4 5/8″
  • Basic White cs: two 3 3/4″ x 5″ (diecut with Perennial Postage Die-one for front & one for inside), 2″ x 4″ (to stamp balloon and diecut clouds) and 1/2″ x 4 1/4″ (sentiment)
  • Melon Mambo cs: 2″ x 2 1/2″ to die cut balloon gandola

Supplies

  • Stamp Sets: Painted Lavender & Hot Air Balloon
  • Dies: Perennial Postage & Hot Air Balloon
  • Embossing Folder: Painted Textures
  • Ink: Poppy Parade, Melon Mambo, Daffodil Delight, Granny Apple Green, Highland Heather and Azure Afternoon
  • Embellishments: Wink of Stella
  • Other: Blending Brush

Instructions

  1. Fold the card base at the score line and burnish with the Bone Folder.
  2. Emboss the 1st layer with the Painted Textures Embossing Folder (EF). Adhere to the front of the card base.
  3. Diecut the 2 Basic White cs panels for the front & inside with the 2nd to largest Perennial Postage Die.
  4. Stamp the 1st part of the balloon envelope with Highland Heather Ink. Stamp the 2nd part with Azure Afternoon Ink. Stamp the sentiment onto the 1/2″ Basic White cs in the middle of the strip with Azure Afternoon Ink.
  5. On one diecut Basic White cs panel, use the Blending Brush with Azure Afternoon Ink to lightly blend a cloudy sky. On the 2nd Basic White cs diecut Basic White cs, blend the ink along the edges.
  1. To finish the 2nd panel for the inside of the card, use Granny Apple Green Ink. Stamp the grass from the Painted Lavender stamp set in the lower right-hand corner, going from tall to short as you move left. Add the tiny flowers in the Highland Heather Ink. Adhere to the inside of the Azure Afternoon cs card base.

  1. Go back to the 1st Basic White diecut for the front of the card.The flowers & grass are from the Painted Lavender stamp set. Stamp the grass in Granny Apple Green Ink on either side of the bottom edge. Then stamp the small tight bunch of flowers in Melon Mambo on either side and in the middle. Stamp the tiny flowers in Highland Heather Ink. Next, stamp the tall thin stalk of flowers in Daffodil Delight Ink to fill in. Finally, stamp the wider stalk of flowers in Poppy Parade Ink.

  1. Adhere to the Highland Heather Glimmer Paper. Tip: I use one of the Deckled Rectangle Dies to cut the center out of the Glimmer Paper diecut. This helps decrease the weight of the card and you have more Glimmer Paper to play with later!

  1. Stick the Stampin’ Dimensionals on the back so that they are attached to both the Glimmer Paper and the Basic White cs. Adhere to the card front.
  2. Adhere 2 of the clouds flat and the 3rd cloud on Dimensionals.
  3. Adhere the 2 pieces of the gondola together. Then adhere it to the balloon envelope.
  4. Use Stampin’ Dimensionals to adhere the balloon to the card front.
  5. Adhere the sentiment to the corner before you trim the edges. This way it will fit nicely.

I hope you give this card a try. I had such fun designing it and putting it together! Hopefully you will have fun too!

Blog Roll Call

Have a most wonderful day!

Theresa

Order Supplies Here:

Product List
Painted Lavender Bundle
$46.75
Hot Air Balloon Bundle (English)
$45.00
Perennial Postage Dies
$33.00
Painted Texture 3 D Embossing Folder
$10.00
Poppy Parade Classic Stampin' Pad
$9.00
Melon Mambo Classic Stampin' Pad
$9.00
Daffodil Delight Classic Stampin' Pad
$9.00
Granny Apple Green Stampin' Pad
$9.00
Highland Heather Classic Stampin' Pad
$9.00
Azure Afternoon Classic Stampin' Pad
$9.00
Azure Afternoon 8 1/2" X 11" Cardstock
$10.00
Three Color Glimmer 12" X 12" (30.5 X 30.5 Cm) Specialty Paper
$10.50
Basic White 8 1/2" X 11" Cardstock
$10.50
Melon Mambo 8-1/2" X 11" Cardstock
$10.00
Clear Wink Of Stella Glitter Brush
$8.00
Blending Brushes
$13.00