Welcome to Theresa’s Treasures today for my Thank You using Friends Are Like Seashells. I am Theresa and I am a Stampin’ Up!® Demonstrator in Arizona, USA. Today I am taking part in Kylie Bertucci’s Monthly International Blog Highlights Gallery. The theme is- Thank You. On this gallery, you can see thank you cards made by folks from all over the world! I hope you enjoy my card and take the time to see everyone else’s creations by visiting the gallery. You can get to the gallery by selecting the “Vote For Me” button at the end of this blog. Please vote for my card while you are at the gallery.
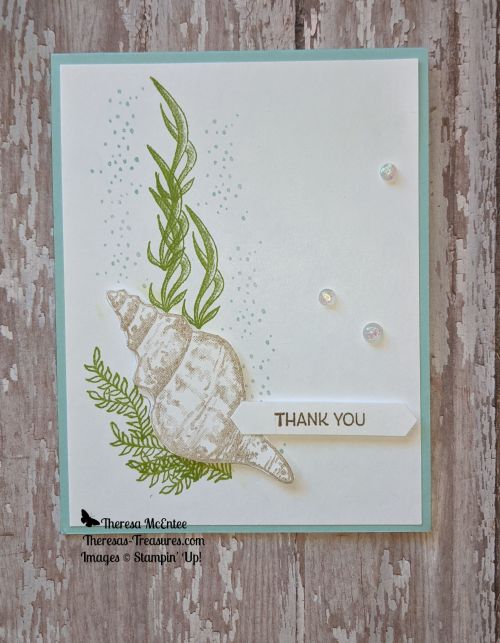
The Stampin’ Up® Friends Are Like Seashells stamp set lends itself to a lot of creative cards. There are 23 different stamps in this set! I have only used 5 of the stamps in the set for this card.
The card base is Pool Party Card Stock (CS). The remaining CS is Basic White. The ink colors are: Pool Party, Granny Apple Green and Soft Suede. The seashell has been Stamped Off once. I embellished the card with Opal Rounds. The sentiment is made with the Classic Label Punch.
Viola! That is all it takes!
Please vote for my card when you visit the Gallery by selecting the “Vote For Me” button below. Thank you!
This wonderful summer Birthday card was inspired by a swap I received. A swap is a card that you make multiple copies of and take to a stamping event with you. There you will meet others who have made swap and you swap cards with them. Unfortunately I have lost the name of who made the swap I was inspired by.
Measurements: Very Vanilla Card Stock (CS): 4 1/4 x 11 inch card base with a score line at 5 1/2 inches, two 4 x 5 1/4 inch, 2 x 4 1/2 inches and 1 x 3 3/4 inches.
I used Memento ink for the stamping and I colored with Stampin’ Blends Alcohol Markers. I used the light and dark Blend of each of the following colors: Pool Party, Purple Posy, Petal Pink, Crumb Cake and Soft Suede.
Using the Memento ink, stamp the sea horse onto the 2 x 4 1/2 inch Very Vanilla CS and the “Happy Birthday” sentiment onto the 1 x 3 3/4 inch strip of Very Vanilla CS.
On one of the 4 x 5 1/4 inch Very Vanilla CS pieces I stamped a row of the conch shell, then added the sand dollars.
Next I stamped the snail shell. I filled in the spaces with the clam shell. I added another conch shell on the very bottom left and top right. This is a slightly organized random pattern in my book! Ha, ha! 🙂
Don’t do this step because it turned out to be a mistake later on but i wanted to share this with you so you won’t make the same mistake. On the inside of the card base I stamped another sea horse and two sand dollars. I recommend that you stamp the sea horse and sand dollars onto the other 4 x 5 1/4 inch Very Vanilla CS piece.
Again do not do this step. Once I used the Stampin’ Blends to color the sea horse and sand dollars, I realized that the markers bled through to the back. Whoa! 😲 The way I fixed it is that I cut the inside panel to be 4 x 5 1/4 inches and made another 4 1/4 x 11 inch Very Vanilla CS card base.
On with the fun. Color the sea horse with the light and dark Soft Suede Blends.
For each of the shells, I decided to add a shadow to the lower right hand side. I did this by first coloring in the shell with the Light Crumb Cake Blend. I then went over the lower right with the Dark Crumb Cake Blend. Lastly I went over the area I wanted shadowed again with the Light Crumb Cake Blend to blend the light and dark together.
I repeated the process with all the shells. The conch shells are colored in Petal Pink. The snail shell is colored in Pool Party and the clam shell in Purple Posy.
Fussy cut the sea horse that is stamped on the 2 x 4 1/2 inch Very Vanilla CS. Place cut up Stampin’ Dimensionals and Mini Stampin’ Dimensionals on the tail and head, leaving the body without Dimensionals.
Adhere the body of the sea horse to the left side of the Happy Birthday sentiment. Cut a banner end on the right end of the sentiment strip.
Adhere the 4 x 5 1/4 inch Very Vanilla CS stamped with the sea horse to the inside of the 4 1/4 x 11 inch Very Vanilla CS card base. Use the Bone Folder on the 5 1/2 inch score line to make a crisp fold.
Adhere the other 4 1/4 x 5 inch Very Vanilla CS stamped with the shells to the card front. Use Stampin’ Dimensionals on the back of the sentiment strip and adhere in place.
Now for some Bling! The Wink of Stella Glitter Brush is perfect for adding a little sparkle to the sea horse.
Viola! You have a fun end of summer Birthday card to send off to someone special. I just love the sparkle!
Thank you for visiting theresas-treasures.com today. I hope you enjoyed this end of summer card. I am looking forward to some cooler temperatures, but here in Arizona it may be quite awhile. Good thing I can craft inside!
Measurements: 12 x 12 inch Pretty Peacock Card Stock(CS) card base: cut to 4 1/4 x 11 inches and scored at 2 3/4 and 5 1/2 inches; 8 1/2 x 11 inch Pretty Peacock CS: 3 1/4 x 4 1/4 inches; Whisper White CS: 3 1/4 x 4 1/4 inches, 2 1/2 x 4 inches and 1 1/4 x 2 inches; Whale of a Time Designer Series Paper (DSP): small fish design: 4 x 5 1/4 inches, sea horse design: 2 1/2 x 4 inches and the underwater scene design: 3 1/8 x 4 1/8 inches.
Stamp the sentiment “it’s your DAY!” from the Itty Bitty Birthday set in Pretty Peacock ink onto the 1 1/4 x 2 inch Whisper White CS. Trim this down to 3/4 x 1 1/4 inches to fit on the front of the card.
Stamp the sentiment “Hoping all your birthday fishes come true” from the Whale Done set in Pretty Peacock ink onto the center of the 2 1/2 x 4 inch Whisper White CS. Add the little school of fish in several places in Pretty Peacock ink.
Stamp the sea turtle and whale in Pretty Peacock ink onto the 3 1/4 x 4 1/4 inch Whisper White CS. Position the whale at the bottom as shown so you can use the Whale Builder Punch.
Use the Stampin’ Blends Alcohol Marker in Light Just Jade to color the sea turtle. Use the Dark Just Jade marker to color the outer edge of the shell and to enhance the shadowed areas.
Use the Light and Dark Balmy Blue Stampin’ Blend Alcohol Marker to color in the middle portion of the whale.
Punch out the whale with the Whale Builder Punch. Fussy cut the sea turtle leaving the same amount of white outline as is on the whale.
Fold the 4 1/4 x 11 inch Pretty Peacock CS card base in half at the 5 1/2 inch score line. Use the Bone Folder to get a crisp fold.
Now fold back the top of the card base. Separate it from the underlying layer to use the Bone Folder. The end result is a “Z” fold.
Adhere the corresponding panels to the Pretty Peacock CS card base as shown.
Apply Stampin’ Dimensionals to the back of the sea turtle, whale, and the trimmed down sentiment.
Adhere under the sea scene design of the Whale of a Time DSP to the 3 1/4 x 4 1/4 inch Pretty Peacock CS. Add the sentiment, turtle, and whale.
To apply the top of the card position it then flip it over and make a light pencil mark. This will help you get the Stampin’ Dimensionals in the right place.
Adhere the front of the card to the top panel of the card base. The Stampin’ Dimensionals will not be showing on the under side.
This is the completed card lying flat on the table.
Viola! You have a splashy card to send off to someone and wish them a Happy Birthday!
Thank you so much for stopping by. I hope you try this card. It is not too difficult once you have made it once or twice.


")

")
")


 Designer Series Paper")

