Hello and Happy Monday! We the made cards in the Stampin’ Up! Kits Collection- The Best Remedy at my Zoom Card Making Class this last Saturday. So much fun and we all ended up with 9 great Get Well cards!
Card #1
The first card has a sweet little skunk with a paired sentiment “Even though this stinks…”. There are two choices for what follows. I chose “I’m here for you”. You could also choose “Feel better soon”. Notice the sparkling flower sequins! I only have one card left. I have already mailed the other two away!
Card #2
There is also an ice-cream-eating mouse! He/she recommends ice cream as a remedy! Which I will wholeheartedly agree with! I made three different versions of this card just by cutting the pink background. I like to figure out how to make alternative cards, limiting myself to what comes in the kit.
Card #3
This adorable little chick has an old-fashioned ice pack on his head. He has a sweet sentiment “A little bird told me you were under the weather”. Check out the shiny sequins over his head! Again, I created three versions of the card. I did this just by placing the dark blue panel in a different position each time.
I highly recommend this kit to beginning and experienced crafters alike. You can put the cards together rather quickly. It is a good idea to have Get Well cards on hand. You never know when a Get Well card will be needed.
Next Zoom Class with Theresa’s Treasures
I am creating the next cards for my December 10, 2022 Zoom Card Making Class. I am using the Kindest Gnomes stamp set and Gnomes Dies. If you would like to join us, please email me for more information at theresastreasures.az@gmail.com. I will also update the information on this blog ASAP. Order soon as there is Thanksgiving Holiday that will slow shipping down as well as the beginning of the Christmas Holiday season.
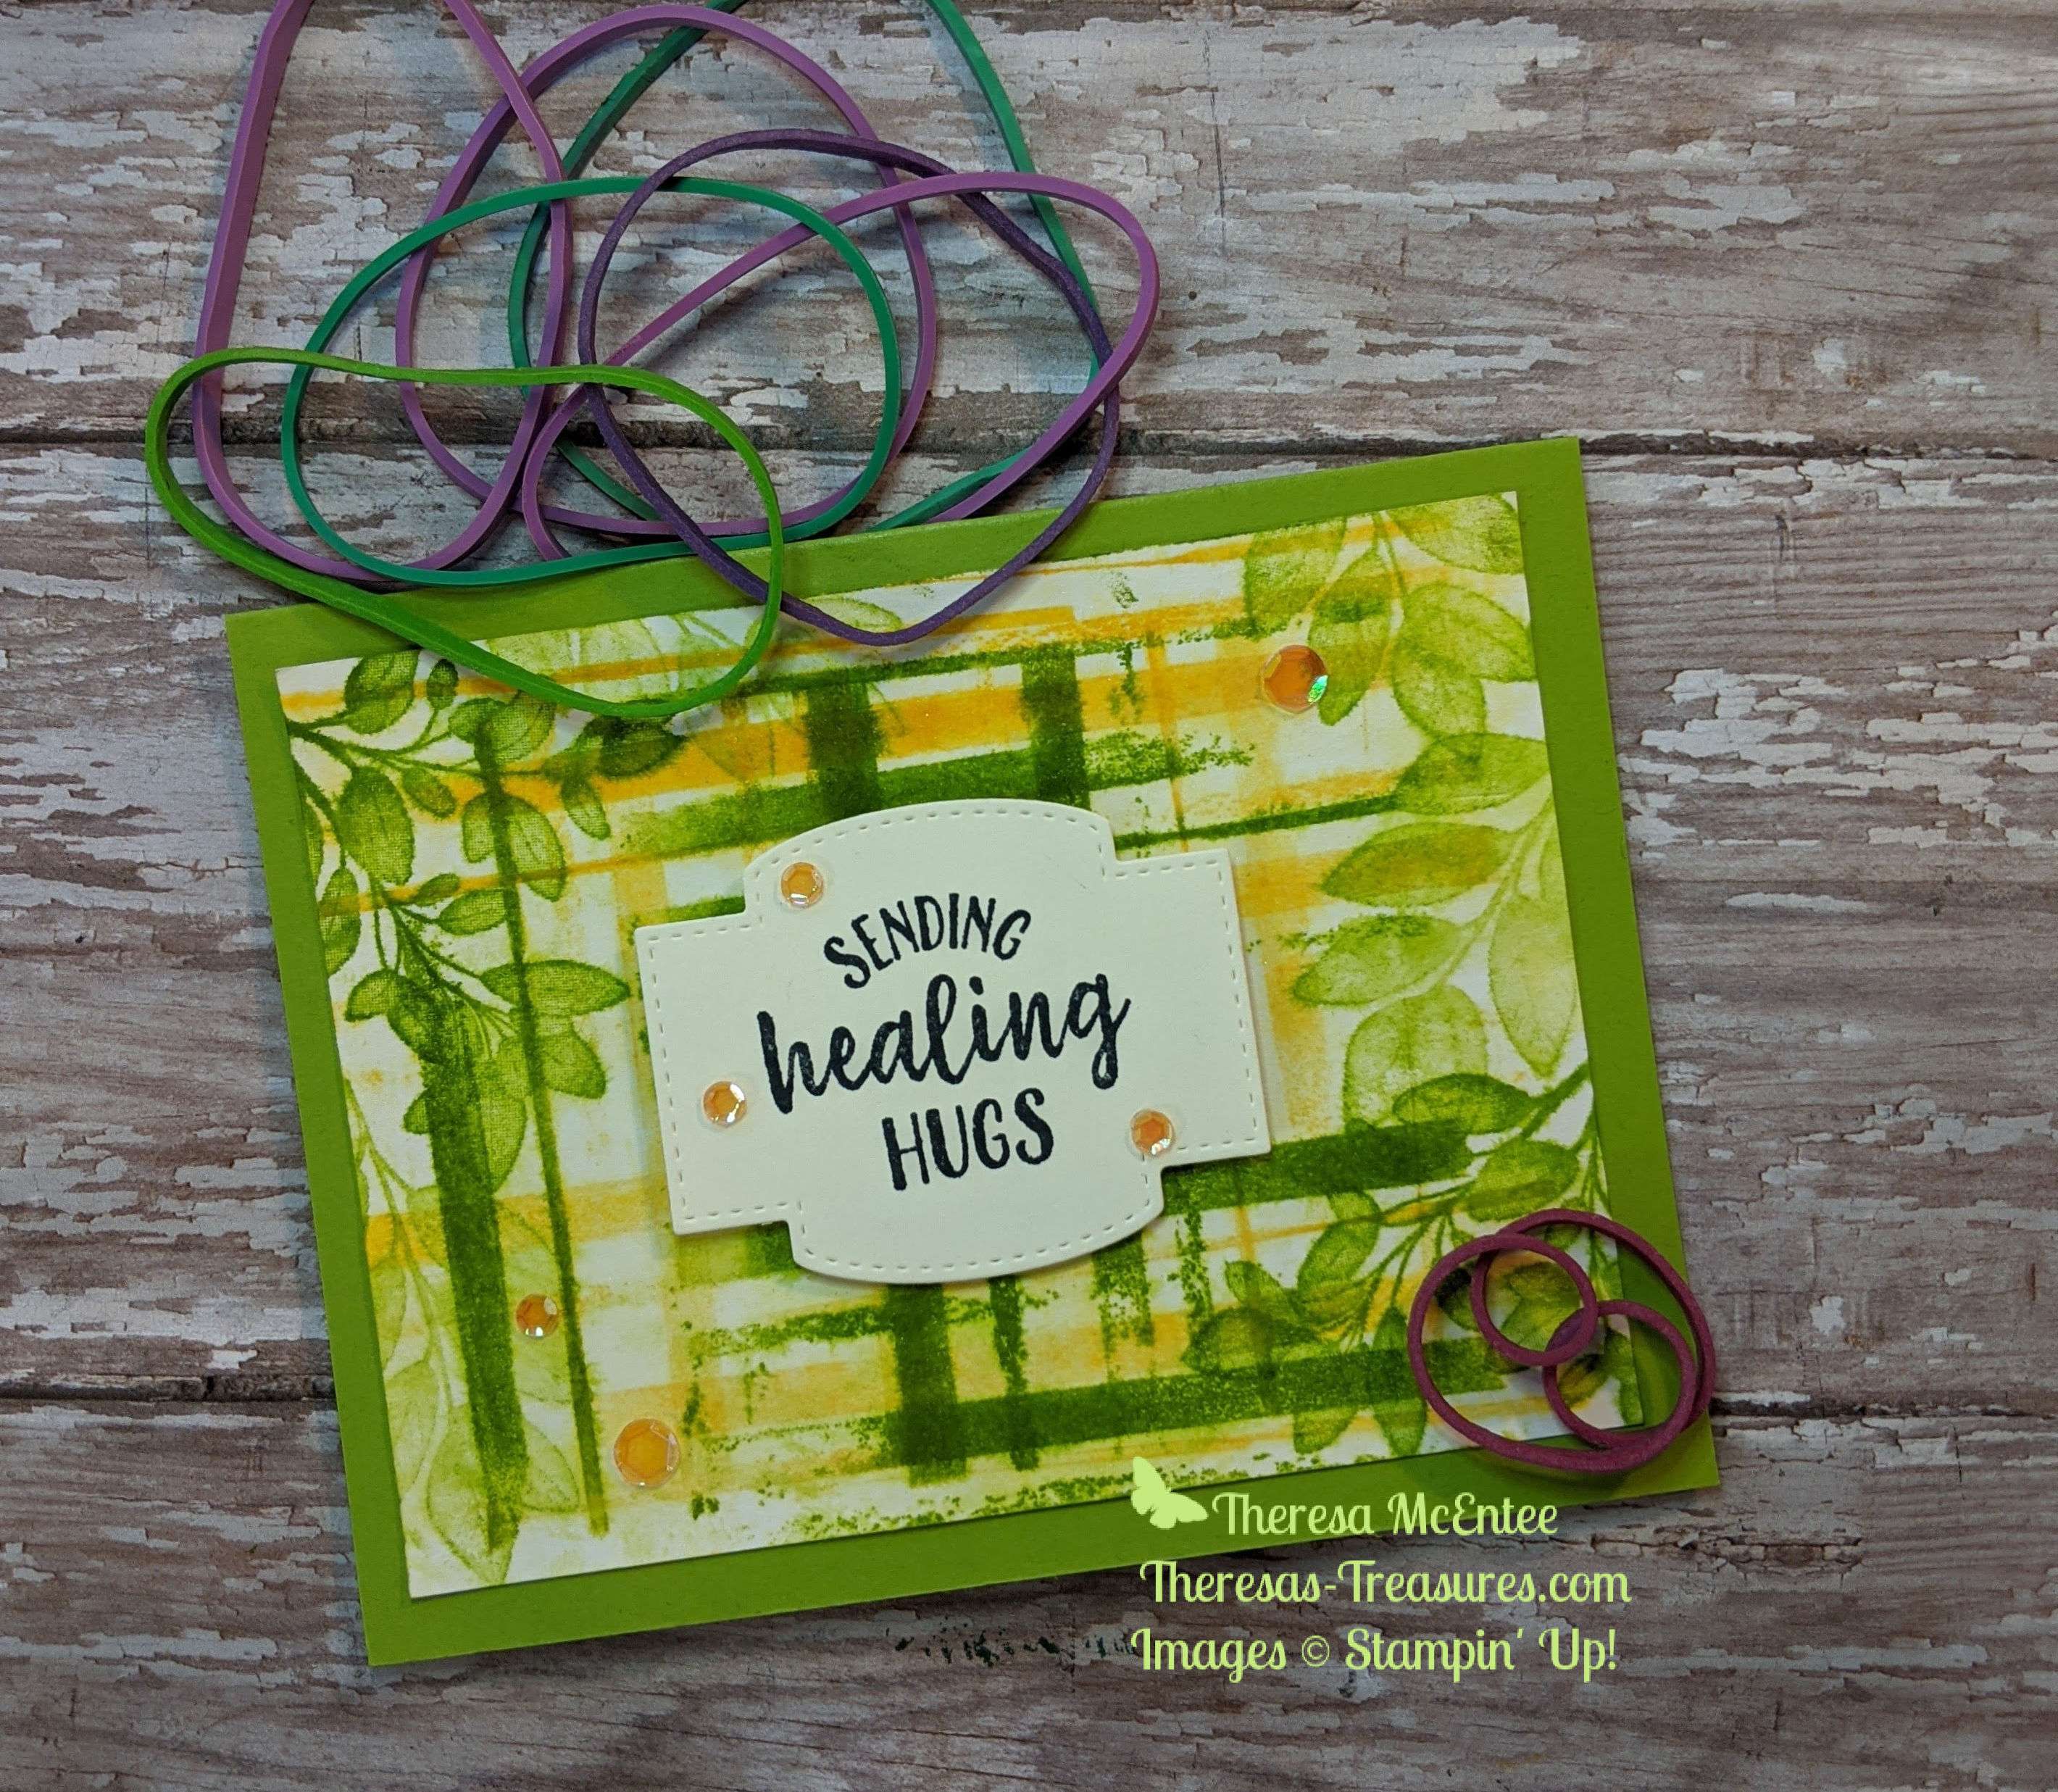
Welcome to my Wacky Wednesday Technique. This Stampin’ Up!® Forever Fern card is really wacky because it is made using rubber bands around a clear block. The things we will do to make a creative background!
I will be using 2 stamp sets today. The Forever Fern stamp set has a lot of great leaf images. The So Sentimental is one of my all time favorites. Sadly it will be retiring. It is only available while supplies last so order yours HERE before it runs out.
Measurements
Measurements: Granny Apple Green Card Stock (CS) card base: 5 1/2 x 8 1/2 inches with a score line at 4 1/4 inches; Very Vanilla CS: 4 x 5 1/2 inches and 3 x 4 inches; and Shimmery White CS: 3 3/4 x 5 inches.
Stamping
Let’s start stamping! Stamp the sentiment “Sending Healing Hugs” onto the 3 x 4 inch Very Vanilla CS with the Memento Tuxedo Black Ink. Use you Stampin’ Cut & Emboss Machine and the Stitched So Sweetly dies to cut out the sentiment. Fortunately, the Stitched So Sweetly Dies are not on the retiring list!
Rubber band Background in Daffodil Delight
In order to try this technique you will need rubber bands of various thicknesses. Wrap the rubber band around an E size Clear Block in a random pattern.
For this step I used Daffodil Delight ink. Use the ink pad to apply ink to the rubber bands. Flip the clear block over onto the 3 3/4 x 5 inch Shimmery White CS.
Remove the clear block and see what you have. I think I would have needed to apply more ink. You can rotate the Shimmery White CS, apply more ink to the rubber bands, and stamp down on the Shimmery White again. I stamped once on the upper half and once on the bottom half.
Next I sprayed my rubber band background with a little water to make it bleed into the paper a little.
While the paper is still damp, use the Granny Apple Green ink and the large leaf image from the Forever Fern stamp set to stamp some leaves around the edges.
Stamp some more of the leaves onto edges of the 4 x 5 1/4 inch Very Vanilla CS. This will be the inside of the card. I Stamped Off once on the smaller leaf image before stamping onto the Very Vanilla CS.
Rubber band background in Granny Apple Green
I decided the background needed a little more added to it so I inked up the rubber band block with the Granny Apple Green ink and added more to the stamped background.
I also sprayed it with a little water again and then used a paper towel to dab it dry.
Open the Granny Apple Green CS card base and adhere the inside of the card to the inside of the card base.
Use the Bone Folder to fold the card base. Next adhere the Rubber Band Background card piece to the card front.
Use Stampin’ Dimensionals to adhere the sentiment to the background.
Bling!
The Artistry Blooms Self Adhesive Sequins are perfect to add some Bling! to this card! I use the Take Your Pick tool to easily move the sequins from the acetate sheet to the card front.
Viola! You have made a totally wacky Rubber Band Background for this get well card!
Thanks for coming by today. I hope you have had a chance to review the Retiring List in my Online Store. Some products are discounted. Check it all out HERE.
It is hard to design a card for a guy when you do want to use a flower. However, the Cardz 4 Guys Challenge #50 for a card with a Good Well Wish made it the perfect time to give it a try. I hope you like what I came up with.
One of the styles I really like is grunge. This grungy background was created with Stampin’ Up! inks in Night of Navy, Balmy Blue, Crumb Cake and Soft Suede. I used some retired sets which are my favs: Gorgeous Grunge and Timeless Textures. There are similar stamps in the current catalog, but I just love these.
These particular rose and leaves are in the current Stampin’ Up! Annual Catalog and the stamp set is called Healing Hugs. This is a Distinktive stamp which to me looks more photographic. I enhanced the rose with the Pacific Point Watercolor Pencil, and the leaves with the Old Olive Watercolor Pencil to make them even more realistic.
Thanks for stopping by and viewing my Cards 4 Guys Challenge #50- Get Well Wishes. You can find out more about this challenge at cardz4guys.com. I have a lot of fun with it!
The colors for the card today were inspired by a recent sunset here in Bisbee Arizona. We often have fiery yellow, orange and red sunsets. This one was a little different being in pink and purple hues.
The beautiful pinks and purples in this card are sure to lift someone’s spirits.
Measurements: Rich Razzleberry Card Stock (CS) card base: 8 1/2 x 5 1/2 inches with a score line at 4 1/4 inches; Whisper White CS: two 5 1/4 x 4 inches and 1/2 x 6 inches. Stampin’ Up! ink colors: Rococo Rose, Rich Razzleberry, Blackberry Bliss, Granny Apple Green, Crumb Cake, Bumble Bee.
I want to show you a trick using a variation of the Masking Technique. With this technique you can use just a part of the stamp. I have the stamp upside down so I can apply the ink and see that it is applied evenly. I applied Rococo Rose ink to the part I did not want to use and stamped it on a sticky note. (Hover over the underlined words for a definition).
I repeated the process for the flower on the bottom left.
Cut very close to the edge on the portion that abuts the rest of the stamp. Tape the images upside down onto the stamp with painters tape. Note: the sticky note images are mirror images of the original stamp. That is why they need to be upside down to match the stamp.
Apply Rococo Rose ink to the stamp including over the sticky paper. Remove the sticky paper carefully so you do not disturb the ink on the rest of the stamp.
Now when you stamp the image onto one of the 5 1/4 x 4 inch Whisper White CS, the flower that was covered with the sticky paper will not stamp onto the paper. Cool, eh?
For the stamp in the upper right-hand corner, I just rotated the stamp to get the image I wanted.
I added some small leaves in Granny Apple Green ink. The smaller flowers are stamped in Rich Razzleberry ink. The center to the large flower is stamped in Crumb Cake ink after Stamping Off once.
The center of the smaller flower is stamped in Bumble Bee ink. I stamped the tiny flowers in Blackberry Bliss ink. I had so much fun creating this bouquet! Note: Initially I Stamped Off the center of the smaller flowers, but then felt it was too light. I went back and stamped at full strength. Try it both ways and you decide which you like.
Stamp the sentiment “Get Well Soon” onto the 1/2 inch Whisper White CS strip and use the Timeless Label Punch as shown to get the rounded ends.
Now for the inside of the card. On the second 5 1/4 x 4 inch Whisper White CS, stamp the large bunch of flowers in Rococo Rose ink down the right side of the CS. Add the leaves in Granny Apple Green ink.
Finish the bouquet using the same ink colors as you did for the card front.
Adhere the card front to the front panel of the 8 1/2 x 5 1/2 inch Rich Razzleberry CS. Be sure to use your Bone Folder to make a crisp fold at the 4 1/4 inch score line. Adhere the inside panel.
I adhered the sentiment to the card front with Stampin’ Dimensionals. However, I decided I did not like it because it was too small. To remove it, I used the Paper Snips to snip each of the Dimensionals and remove the sentiment. Often you can then carefully remove the Dimensionals so that it looks like nothing was ever there.
I stamped the sentiment “Get Well Soon” onto a 1 x 6 inch piece of Whisper White CS and added some of the tiny flowers and leaves.
I adhered the sentiment with Stampin’ Dimensionals. I felt this looked a lot better.
Viola! Here is a nice cheerful Get Well card! This is better than sending flowers because the card will last forever! (Actually, I would still like the flowers too.)
Thanks so much for stopping by today. I hope you are doing well and staying safe.
There is still time to take advantage of Bonus Days! From now until August 3, 2020 your $50 order will earn you a $5 coupon to use on your next order in August! Don’t delay! Shop HERE.
Hello and welcome to my blog today. In the midst of the Coronavirus, I decided to make a Get Well card for the World. There is so much healing that needs to be done right now. I know some of you have been affected more than others. I hope all of you and your families stay safe and well, and if anyone has gotten sick, I hope they recover completely.
I love the Timeless Tulips stamp set by Stampin’ Up!® and felt it was perfect for this card. The bright colors are Poppy Parade and Mango Melody.
Measurements: Poppy Parade cardstock (CS): 8 1/2 x 5 1/2 inches with a score line at 4 1/4 inches; Mango Melody CS: 5 3/8 x 4 1/8 inches; Whisper White CS: 5 1/8 x 3 7/8 inches, 5 x 3 inches and a 3 x 1/2 inch strip. You will also need a Whisper White CS that is 5 1/4 x 4 inches for the inside of the card.
Use the Poppy Parade ink to stamp the sentiment “Get Well Soon” onto the 3 x 1/2 inch strip of Whisper White CS. Use the largest tulip and stamp it in Poppy Parade ink onto the 5 x 3 inch Whisper White on the far right hand side. Tip: This is a Photopolymer stamp and you will get the best image if you stamp onto the Stampin’ Pierce Mat or use your Stampin’ Up! catalog. I cover my Stampin’ Pierce mat in white paper so the ink gets absorbed into the paper. The black cardstock is just to help you see the card piece better.
Now stamp the largest tulip in Poppy Parade ink in the upper left hand quadrant of the 5 1/8 x 3 7/8 inch Whisper White CS.
Add another large tulip on the right hand side in the center. Now use the smaller tulip and stamp it in Poppy Parade just under the large tulip in the upper left hand quadrant.
Using the Mango Melody ink, stamp the large tulip slightly higher and to the right of the one in the left upper quadrant. Stamp the tulip bud in Mango Melody just under the large Poppy Parade tulip on the right.
Stamp another large tulip onto the 5 x 3 inch Whisper White CS next to the Poppy Parade tulip. Stamp the fattest leaf in Granny Apply Green ink to the far left. Tip: Before you stamp an image that will be punched out, look at the punch to determine the placement. More on that later.
Continue to use the Granny Apple Green ink for the stems and leaves. There are two long stems. One leans to the right and the other is more straight. I used the one that leans to the right for the three tulips on the right.
Use the straighter stem on the tulips to the left.
Use the fattest leaf to stamp three leaves in Granny Apple Green ink.
With the Granny Apple Green ink use one of the skinny leaves to stamp a couple of leaves, then use the other skinny leaf to stamp a couple more leaves. This gives a nice variety of leaves and makes the bouquet look full.
Now you will see why I stamped the images the way I did. First punch out the leaf. There should be plenty of space to avoid punching out the Mango Melody tulip.
Punch out the Mange Melody tulip, then the Poppy Parade tulip last.
Apply Stampin’ Dimensionals to the back of each of the tulips and the leaf.
Tip: To make the Stampin’ Dimensionals last a little longer, I cut them in half as shown. This is much faster than cutting each one in half before you use it.
Adhere the Mango Melody tulip, then the Poppy Parade tulip. Next adhere the fat Granny apple Green leaf to the center of the bouquet.
Here is the completed card front.
Fold the 8 1/2 x 5 1/2 inch Poppy Parade cardstock at the 4 1/4 inch score line and use the Bone Folder to make the fold nice and crisp. This is the card base. Adhere the 5 3/8 x 4 1/8 inch Mango Melody CS to the front of the card base.
Adhere the stamped card piece to the card front.
Trim the sentiment a bit on each end. We are going to cut a banner end. The easiest way to make the banner symmetrical is to start with a center cut.
The next cut is from the upper corner to the top of the center cut. Repeat from the other corner.
Cut a banner end on both ends of the sentiment
Apply Stampin’ Dimensionals to the back of the sentiment and adhere it to the card front.
And Viola! You have a beautiful, soothing Get Well card. But wait….
You can step up the card a bit by adding a bow with a Glue Dot. This is the Crushed Curry 3/8 inch Seam Binding Ribbon in the Stampin’ Up! 2019-2020 Annual Catalog. Even though it is a different color than the Mango Melody, it seems to work well. But that is not all…..
There is always Bling! I added some colored rhinestones from the Holiday Rhinestone Basic Jewels to add some sparkle. Any of the 3 versions of this card would send a soothing Get Well Wish to someone who needs it. I am sending out Get Well Wishes to everyone and to Mother Earth as well.
Thank you so much for visiting today. I really enjoyed making this card. I hope you give it a try. The Timeless Tulips stamp set is wonderful to make cards for various occasions- Sympathy, Wedding, Friendship, Love, Birthday, Mother’s Day and Easter to name a few. This is a great stamp to start out with if you are just beginning to stamp at home because of its versatility.
I am an Independent Stampin’ Up!® Demonstrator and am happy to help you be more creative at home. If you need help starting out, please send me an email at theresastreasures.az@gmail.com or message me on Facebook at Facebook.com/theresastreaures.az/
Click on any image below to get to my Online Store and view that product.


")


")
")
")

")


")


")
")


 Crinkled Seam Binding Ribbon")
