Posted in 2021 Stampin' Up! July-December Mini Catalog, Nature, Thanksgiving

Stampin’ Up!® #SimpleStamping Fall Friendship Card

Howdy! Fall is slowly giving way to the Holiday Season. Next week I will begin to show you some Holiday cards. For today I have a lovely fall friendship card made using only stamps, ink and paper. Otherwise known as #SimpleStamping.

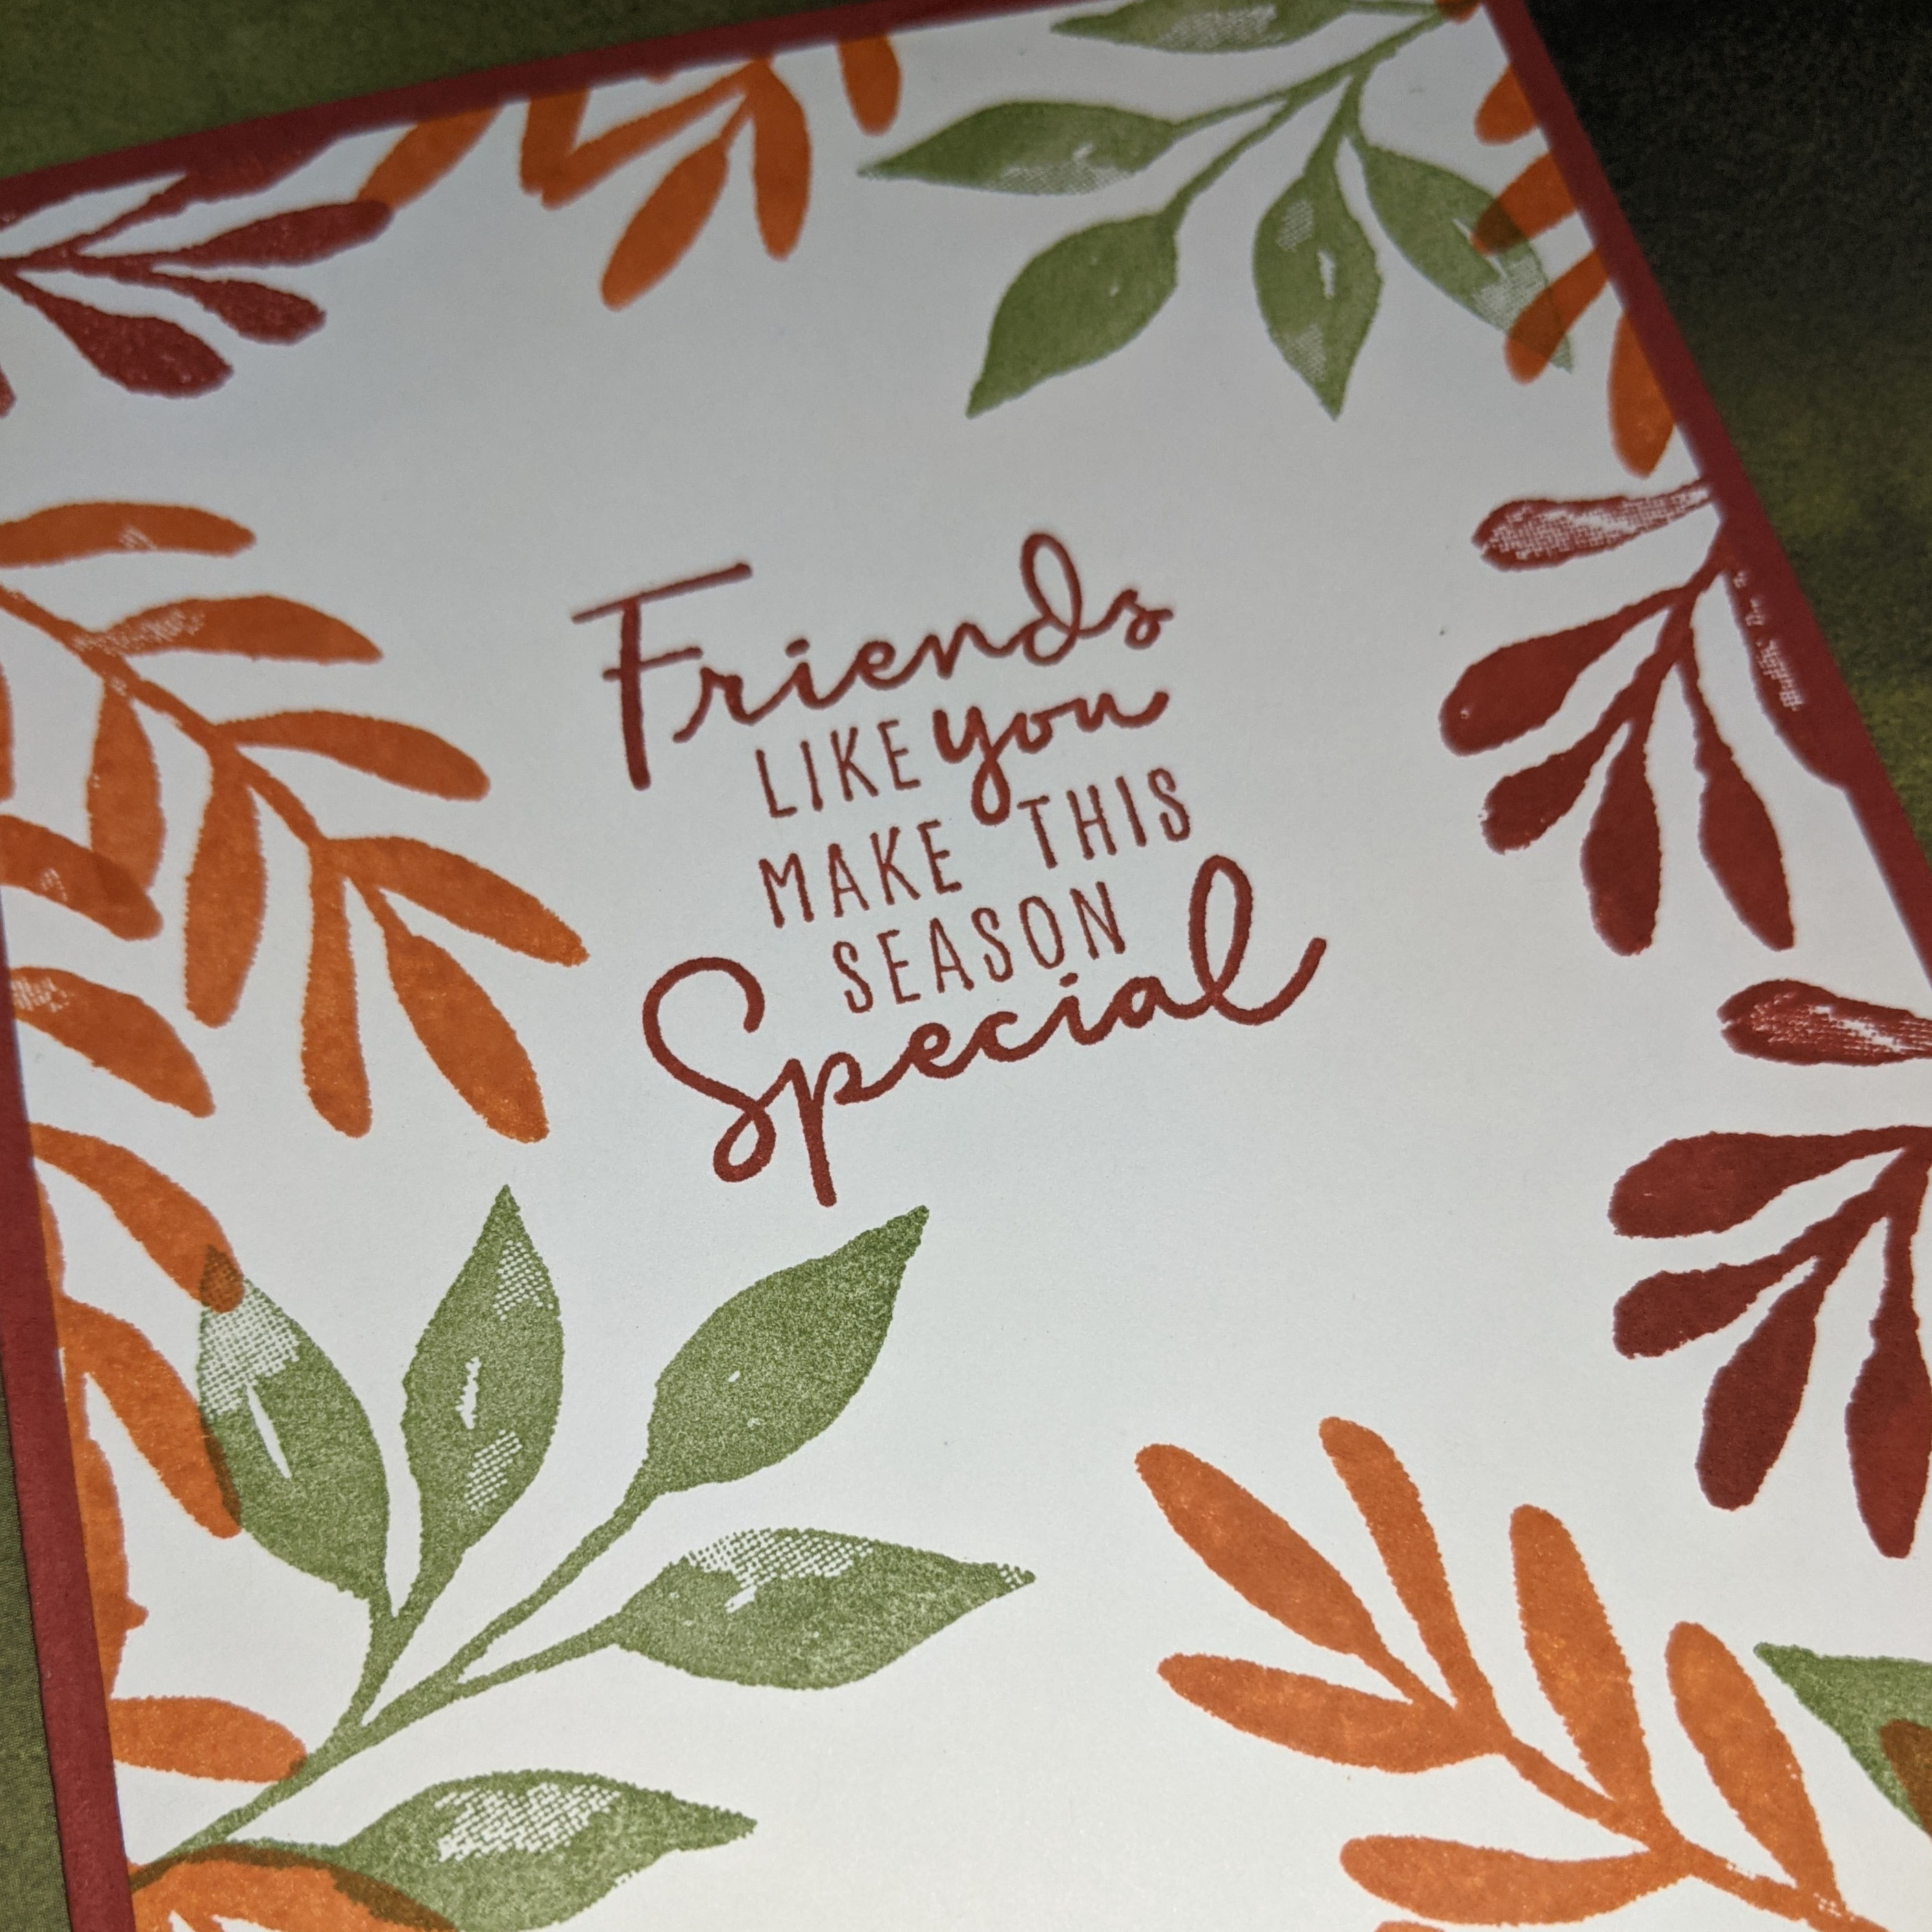
I am actually using the Christmas Season stamp set. But I chose fall colors so I could create a nice fall friendship card. The sentiment is part of the Christmas to Remember stamp set. Stay tuned because I will soon be using the same two stamp sets to create a Christmas card.

Measurements

  • Cajun Craze Card Stock (CS) card base: 8 1/2 x 5 1/2 inches with a score line at 4 1/4 inches.
  • Very Vanilla CS: two 5 1/4 x 4 inches
  • Note: Ink colors: Cajun Craze, Pumpkin Pie and Old Olive.

Stamping

Start out by stamping the sentiment “Friends Like You Make This Season Special” in Cajun Craze ink onto one of the 5 1/4 x 4 inch Very Vanilla CS. Stamp some leaves in Old Olive ink. Then stamp another style of leaf in Pumpkin Pie ink. I started out with 3 of each color in a triangular orientation.

Add a third style of leaf in Cajun Craze ink. Fill in the spaces as desired using any of the 3 styles of leaves and their coordinating color. On the second 5 1/4 x 4 inch Very Vanilla CS stamp in the same manner just along the right-hand side. This will be the inside of the card so you need to leave space for writing.

Assembly

Adhere the first stamped Very Vanilla CS panel to the front of the Cajun Craze CS card base. Adhere the second panel to the inside of the card base.

Voila! You have a gorgeous #SimpleStamping fall friendship card!

Bling! Alert! I added a few of the Champagne Rhinestone Basic Jewels for some extra sparkle around the sentiment! This is a step up from #SimpleStamping.

Thanks so much for stopping by today. Be sure to sign up for my newsletter by scrolling to the bottom of the side bar. I will be sending my first Theresa’s Treasures Paper Crafts Newsletter out soon!

Supplies

To purchase the Stampin’ Up! products needed to make this card yourself, click on any of the photos below and you will go to my Online Store.

Product List

Have a most wonderful day!

Theresa

Posted in 2020-2021 Stampin' Up! Catalog, flowers, Hello, Love/Affection

Simple Stamping with Blossoms in Bloom for a Colorful Hello Card

Hello lovely crafty people. This lovely and colorful card is really very simple to make. There is some fussy cutting, but otherwise this card is made with just stamping.

The Blossoms in Bloom stamp set by Stampin’ Up! is in the 2020-2021 Stampin’ Up! Annual Catalog. This stamp set is so fun to create with! The sentiments in the set allow you to design a variety of cards ranging from Happy Birthday to Get Well, and Hello to Thank You. The Blossoms in Bloom would be a great stamp set for the beginning stamper.

So let’s get stamping!

Measurements: Pacific Point Card Stock (CS): 8 1/2 x 5 1/2 inches with a score line at 4 1/4 inches; Whisper White CS: two 5 1/4 x 4 inches and a scrap strip measuring a least 8 1/2 x 1 1/2 inches. Note: I also needed a 1/2 inch strip of Whisper White to fix a mistake.

First apply the sentiments “HELLO” and “I LIKE YOU A LOT” to a clear block. Stamp the sentiments in Night Of Navy ink at a diagonal onto one of the 5 1/4 x 4 inch Whisper White CS. Tip: Remember to use the Pierce Mat (or a Stampin’ Up Catalog) under the clear Photopolymer stamps.

For the large stamps, I find it easier to apply the ink evenly if I flip the stamp upside down on the table to apply the ink.

Stamp the bunch of blossoms in Pacific Point ink onto the lower right hand corner. Apply more ink and stamp in the upper left hand corner. These blossoms are just so beautiful!

There are two different medium sized five-petaled flowers. Apply them to a clear block. Stamp the flowers in Magenta Madness onto a scrap piece of Whisper White CS until you have 8 flowers. Fussy cut the flowers.

Stamp the center of the Pacific Point flowers in Early Espresso ink. Stamp the center of the Magenta Madness flowers in Bumble Bee ink. Adhere the Magenta Madness flowers to the card with Stampin’ Dimensionals.

Stamp the tiny five-petaled flowers in Balmy Blue ink. I just stamped the tiny five-petaled flowers on randomly.

As I was happily stamping the tiny leaves in Granny Apple Green I dropped the block with the stamp onto my card! Ugh! Not to worry, there is almost always a way to fix a mistake.

I finished stamping the tiny leaves, then took a 1/2 inch strip of Whisper White CS and stamped the sentiments again. I cut the ends to be banner ends and applied the strip with Stampin’ Dimensionals. Mistake fixed! Whew!

Stamp the large blossoms in Pacific Point ink onto the other 5 1/4 x 4 inch Whisper White CS. Stamp onto the lower right hand corner. Add some of the Magenta Madness flowers with Stampin’ Dimensionals.

Randomly stamp some tiny five-petaled flowers in Balmy Blue ink and some tiny leaves in Granny Apple Green ink. Apply the finished inside card piece to the inside of the 8 1/2 x 5 1/2 inch Pacific Point CS card base. Be sure to use a Bone Folder after folding on the 4 1/4 inch score line to make the fold crisp.

Adhere the front card piece to the front of the Pacific Point CS card base.

Viola! You have made a beautiful, colorful bunch of blossoms to send to someone and spread some cheer!

Thank you so much for visiting my blog. I really appreciate you. Please leave a comment and let me know how I am doing. Do you like the cards in general? Is there anything you would like me to blog about? I would love to hear from you!

Product List

Have a very beautiful and creative day!

Theresa

Posted in 2020-2021 Stampin' Up! Catalog, Guys cards

Kylie’s International Blog Highlight-July 2020

Welcome to my Blog today for Kylie’s International Blog Highlight! The card I chose for today is a very masculine card that I created for a Zoom Catalog Kick Off Party I had at the end of June. It was my first attempt at doing an online class and my first Zoom class. Fortunately it went well!

I created this card specifically to highlight the World of Good Specialty Designer Series Paper. The travel designs are so adventurous! Perfect for a masculine card. Also great for expressing gratitude to a special person.

One of the special features on this card is the buckle from the Antique Corners and Slides.

The diagonal cuts are made with the die from the World Map Dies.

The Very Vanilla background was embossed with the Old World Paper 3D Embossing Folder. I sprayed the Very Vanilla Cardstock with a little water before embossing to make the effect even more 3D. The sentiment is highlighted with the Brass Foil Sheet.

I am so grateful to all of you who are creating cards! I get so much inspiration from everyone! I can’t wait to see all the cards and projects in Kylie’s International Blog Highlight this month!

Please vote for my card:

Below are the products I used to create this card.

Product List

Have a most wonderful and inspiring week!

Theresa

Posted in 2020-2021 Stampin' Up! Catalog, Hello, Love/Affection, Nature, Stamping-off technique

Forever Greenery in Blue- SIP Series #2

This is the second in the SIP series. SIP stands for stamps, ink and paper. The three cards in the series are made primarily from SIP-but with a little Bling! added at the end. The Forever Fern stamp set is part of the Forever Greenery Suite in the New 2020-2021 Stampin’ Up! Annual Catalog.

Here are the three cards in the SIP Series. The previous blog is for the card lying down with the sentiment “Love and Laughter Forever After” on it. You can see that card by clicking HERE.

Here is today’s card. This is my “Stamp it, Cut it, and Paste It” card. This great card is really very straightforward to make. The stamping pattern of the leaves is nearly identical to SIP card #1 in the previous blog.

Measurements: Whisper White Card Stock (CS): 11 x 4 1/4 inches with a score line at 5 1/2 inches and 5 x 3 3/4 inches; Misty Moonlight CS: 5 1/4 x 4 inches.

The first step is to cut 1/4 inch off the top of the 5 x 3 3/4 inch Whisper White CS.

Next stamp in Misty Moonlight ink the largest bunch of leaves in the Forever Fern stamp set. Before you put more ink on the stamp, stamp it in the upper right hand corner. This is a different version of the Stamping Off Technique using both the full strength and the Stamped Off image on the same card.

Using the Pretty Peacock ink, stamp once on the lower part of the card next to the first image. Stamp once under the first stamp in the right hand corner, then once above the first stamp.

Stamp the smaller bunch of leaves in Seaside Spray ink using the Stamping Off Technique.

Now that we have “Stamped It” we can “Cut it”. Cut 1 1/2 inches off the top and off the bottom.

Now we can add the sentiment “Hello” in Misty Moonlight ink.

I found it to be the most easy to have everything spaced evenly if I “Pasted it” by putting the bottom panel on first, followed by the top panel, then the center panel.

Fold the 11 x 4 1/4 inch Whisper White CS at the 5 1/2 inch score line and use the Bone Folder to get a crisp fold. Adhere this panel onto front of the Whisper White card base. You could leave the card just as it is, or you could add some Bling!

The Bling! or embellishment I chose for this card is the Artistry Blooms Self-Adhesive Sequins. They come in a rainbow of colors, of which the blue matches this card.

Tip: Transfer the self-adhesive sequins from the acetate sheet to the card with the Take Your Pick tool. Just slide the pick under the adhesive and move it to where you want it on the card. Apply light pressure on the sequin and remove the pick.

And Viola! you have made an elegant “Hello” card! Great to send to new or old friend to just say “Hello”.

Thanks for coming by and looking at my card. I really love how fast and simple it is to make elegant cards with the Forever Fern stamp set. I have also made some cards with greens, pinks and purples. It is a very versatile stamp set!

Would you like a Bundle for FREE? You can get any one stamp set with coordinating dies or any one stamp set with coordinating punch when you join Stampin’ Up! as a demonstrator. You choose your Starter Kit and pay $99 for $125 worth of product. Then you choose your FREE bundle! Next you will have 20% off of future orders as long as you continue to be a Stampin’ Up! Demonstrator. I have had a blast since signing up 4 years ago! I have not only improved my artistic skills, but also my business skills. And I have met so many new friends! Click HERE and then choose the Specials tab on the right. Scroll down and select “sign up now”. If you have any questions, please do not hesitate to comment or send me an email at theresastreasures.az@gmail.com. Thanks!

If you would like to purchase any Stampin’ Up! products in my Online Store just click on any photo below.

Product List

Have a most wonderful day!

Theresa

Posted in Aqua Painters, Mini Catalog 2020, Sponging technique, Stampin' Up! 2019-2020 Annual Catalog, Summer

Sunshine with Floral Essence and Sponging Technique

Today I have a great card for you! This is so simple but so beautiful! I am CASEing (copy and selectively edit) a card from Kathy Clark. We will be doing the Sponging Technique. I made this card especially full of sunshine because I wanted to tell you about the June Paper Pumpkin. Paper Pumpkin is a monthly subscription you can purchase from Stampin’ Up!. You will get an all inclusive kit every month delivered right to your door! It is a great way to start stamping at home and start building your stamping supplies. Every month you get a stamp set and an ink spot! You also get all the supplies needed to complete the project! You have to order a prepaid Paper Pumpkin for 1, 3, 6 or 12 months before June 10, 2020 to get this Box of Sunshine. Go to my store here and use item #137858 for 1 month, #137859 for 3 months, #157860 for 6 months and #137861 for 12 months. You will get a code via email and go to paperpumkin.com to submit your prepaid code. Then the fun can begin!

Now for the card!

I actually made a mistake on this card. I had intended to put a ribbon around the top two layers, but I applied the glue and had to adhere it to the third layer. I did make a second card which I will show at the end that does have the ribbon.

Measurements: Whisper White Card stock (CS): 8 1/2 x 5 1/2 inches with a score line at 4 1/4 inches, 5 x 3 3/4 inches and 4 x 2 inches; Mango Melody: 5 3/8 x 4 1/8 inches; Poppy Parade: 5 1/8 x 3 7/8 inches.

Sponging Technique: You will need three inks: Daffodil Delight, Mango Melody and Poppy Parade. I have a sponge for each color that is marked with a square of the corresponding cardstock. To see more about preparing the sponges review my blog here . We will be sponging on the 5 x 3 3/4 inch Whisper White CS. Start with the Daffodil Delight ink. Use a light circular motion to sponge the color onto the scrap paper then onto your cardstock. Make a horizontal line of Daffodil Delight covering the lower third of the card piece.

Repeat using the Mango Melody ink for the middle third of the card piece. Next use the Poppy Parade ink.

Use the Aqua Painter to flick little water drops onto the sponged card piece. Watch the spots appear!

Stamp the sentiment “All days are beautiful that begin with you” onto the 4 x 2 inch Whisper White CS. Use the 1 1/2 inch Circle Punch to punch out the sentiment. Adhere the sentiment with Stampin’ Dimensionals. Adhere the sponged card piece to the 5 1/8 x 3 7/8 inch Poppy Parade CS. Next adhere the 5 3/8 x 4 1/8 inch Mango Melody CS to the Whisper White CS card base. Be sure to use the Bone Folder when you fold the card base at the 4 1/4 inch score line. Now adhere the sponged card piece to the Mango Melody taking care to center it.

Add some of the Holiday Rhinestone Basic jewels to the front. Viola! you have a very sunshiney card that will brighten anyone’s day!

Here is the second card with the ribbon across the middle. The ribbon is the Whisper White Crinkle Seam Binding Ribbon and it was dyed using the Mango Melody Stampin’ Blend alcohol marker. This card turned out a little darker.

Which card do you prefer? With the ribbon or without? Light or dark? Let me know what your thoughts are.

Thanks for visiting. I am an Independent Stampin’ Up! Demonstrator. If you have questions about starting the monthly Paper Pumpkin subscription, please let me know. Email me at theresastreasures.az@gmail.com or leave a comment here.

Below are all the Stampin’ Up! products I used. Just click on a photo and you will go directly to my Online Store.

Product List
Posted in flowers, Mini Catalog 2020, Sale-A-Bration 2020

Beautifully Braided Friendship Card

Hello and Good Day! Happy Friday! I have a very straight-forward and simple card for you today to let a special friend know how much you appreciate their friendship.

The card is made using the Stampin’ Up! Beautifully Braided stamp set, available in the 2020 Mini Catalog.

Measurements: Blushing Bride card stock (CS): 8 1/2 x 5 1/2 inches scored at 4 1/4 inches for the card base; Mint Macaron CS: 4 1/4 x 3 inches; Whisper White CS: 4 1/8 x 2 7/8 inches and 5 1/2 x 1/4 inches; and the Parisian Blossoms Designer Series Paper (DSP) 5 1/2 x 2 inches.

Ok, let’s get started on making this beautiful card!

Stamp the sentiment “Friendship Refreshes the Soul” in Soft Suede ink onto the Whisper White CS in the bottom right hand corner. Tip: Remember to use the Stampin’ Pierce Mat or a pile of catalogs since these are Photopolymer stamps.

Use the Crumb Cake ink to ink up the Ginkgo flower.

Tip: To apply ink to the large ginkgo flower, I lay the stamp upside down and apply the ink to the top. This way I am able to make sure the whole stamp is covered with an even layer of ink.

Stamp the ginkgo flower next to the sentiment at a slight angle.

This is the most challenging part of this card. In order to get the stamp on straight, lay it on the table and then push the block on top. Use the Mint Macaron ink and stamp the image onto the 5 1/2 x 1/4 inch piece of Whisper White. If you don’t get it the first time, just try again.

I used the Stampin’ Write markers in Blushing Bride and Mint Macaron to color the Ginkgo. Tip: Remember if you apply a second layer, the ink will be much darker. Try to use light brush strokes to get the color even.

I colored the flowers in strokes going along the lines of the flower. I intentionally went over some areas 2 or 3 times to make the flower more 3-D.

Fold the 8 1/2 x 5 1/2 inch piece of Blushing Bride CS at the 4 1/4 inch score line and use the Bone Folder to make the fold crisp. Next, adhere the 5 1/2 x 2 inch strip of the Parisian Blossoms DSP to the left side of the card front.

Adhere the 5 1/2 x 1/4 inch strip of Whisper White CS with the Mint Macaron stamp to the left side of the Parisian Blossoms DSP.

Adhere the Whisper White CS stamped with the Ginkgo onto the 4 1/4 x 3 inch piece of Mint Macaron CS.

Use the Stampin’ Dimensionals on the back of the Ginkgo flower piece. Tip: I cut my Stampin’ Dimensionals in half to make them last longer, but I do use a full Stampin’ Dimensional in the center.

Adhere the Ginkgo piece to the card front slightly to the right and above the center line.

And Viola! You have a lovely card to send to that special friend to let them know just how appreciated they are!

Thank you for joining me today. I hope you enjoyed this card. Remember that during Sale-a-bration, which is until March 31, 2020, you may choose free product when you make a $50 or a $100 order. There are new products from a second release to choose from as well as the products that came out in the first release. Check out the details at my online store here.

Stampin’ Up Products used include: Stamp Set: Beautifully Braided #151637; Paper: Blushing Bride #131198, Whisper White #100730 and Mint Macaron #138337; Ink: Soft Suede #147115, Crumb Cake #147116 and Mint Macaron #147106; Stampin’ Write Markers: Mint Macaron and Blushing Bride in the Subtles Stampin’ Write Marker 10 Pack #147156; Clear Blocks: C #118486, F #118483, and I #118488; Adhesives: Tombow Multipurpose Liquid Glue #110755 and Stampin’ Dimensionals #104430; Stampin’ Pierce Mat #126199; Bone Folder #102300.