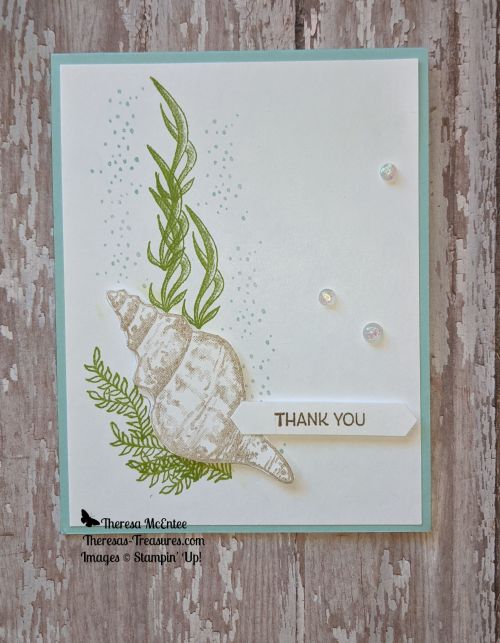
Welcome to Theresa’s Treasures today for my Thank You using Friends Are Like Seashells. I am Theresa and I am a Stampin’ Up!® Demonstrator in Arizona, USA. Today I am taking part in Kylie Bertucci’s Monthly International Blog Highlights Gallery. The theme is- Thank You. On this gallery, you can see thank you cards made by folks from all over the world! I hope you enjoy my card and take the time to see everyone else’s creations by visiting the gallery. You can get to the gallery by selecting the “Vote For Me” button at the end of this blog. Please vote for my card while you are at the gallery.
The Stampin’ Up® Friends Are Like Seashells stamp set lends itself to a lot of creative cards. There are 23 different stamps in this set! I have only used 5 of the stamps in the set for this card.
The card base is Pool Party Card Stock (CS). The remaining CS is Basic White. The ink colors are: Pool Party, Granny Apple Green and Soft Suede. The seashell has been Stamped Off once. I embellished the card with Opal Rounds. The sentiment is made with the Classic Label Punch.
Viola! That is all it takes!
Please vote for my card when you visit the Gallery by selecting the “Vote For Me” button below. Thank you!
Welcome to Wacky Wednesday where I explore different techniques for card making. Today I am showing the Ghost Technique with In Bloom by Stampin’ Up!® I recently learned this technique from Frenchie Martin. It is a bit messy, but a lot of fun!
The Flower And Field Designer Series Paper (DSP) used for this card is FREE during Sale-a-bration, but only for 6 more days! I will have more information about Sale-a-bration at the end of the instructions.
Measurements
Measurements: Basic White Card Stock (CS) card base: 4 1/4 x 11 inches with a score line at 5 1/2 inches; Flirty Flamingo CS: 5 3/8 x 4 1/8 inches and 1 x 4 inches (not shown); Flower & Field DSP: 4 x 5 1/4 inches; Basic White CS: 1 x 4 inches (the Basic White CS piece pictured here is larger than what you need as I changed the card while I was photographing it).
Stamping
The only stamping outside of the Ghost Stamping Technique is the sentiment. Use Memento Black ink to stamp the “Happy Day” from the Itty Bitty Greetings onto the 1 x 4 inch Basic White CS strip.
Ghost Stamping Technique
Clear Embossing
The first step is to prepare the stamps. I selected 3 of the In Bloom flowers and positioned them in the right-hand corner. I used a D size acrylic block to pick up all three stamps.
The second step is to use an Embossing Buddy to decrease the static so that the embossing powder only sticks where you want it to. Stamp the trio of flowers in Versamark onto the Flower & Field DSP in the right lower corner. Note: Stampin’ Up! no longer sells the Embossing Buddy but it is available from most online craft stores.
The third step is to apply the Clear Stampin’ Emboss Powder to the Versamark. Tip: For ease I have poured a few of the little containers of Clear Stampin’ Emboss Powder into a plastic container.
Next use the Heat Tool to melt the Clear Stampin’ Emboss Powder. Be sure to melt the entire image. When you hold it in the light, the entire image should be shiny. If it is dull, apply more heat.
In a similar manner, stamp the butterfly from Butterfly Wishes onto the Flower & Field DSP and apply the Clear Stampin’ Emboss Powder.
Use the Heat Tool again to melt the butterfly image.
Appling the Memento Ink
For the next step, ensure that your Memento ink is well inked. Use a scrap paper under your card piece. Drag the Memento Black ink pad over the top of the Flower & Field DSP and the images stamped in the Versamark and Clear Stampin’ Emboss Powder. You may need to go over it several times to get it dark enough. I like that there is a vague pattern from the Flowers & Field DSP showing through the Memento Black ink.
Use a dry Baby Wipe to rub off the black ink that is on the clear embossed images.
Viola! That is Ghost Stamping!
Putting the Card Together
Prepare the sentiment by using the Classic Label Punch to first punch out the “Happy Day” stamped on the Basic White CS. I punched the sentiment out so it was closer the right end. Punch out a label from the 1 x 4 inch Flirty Flamingo CS.
Next adhere the sentiment to the Flirty Flamingo CS Classic Label with a little of the Flirty Flamingo CS showing on the right end. Trim the sentiment card piece with your Paper Snips.
To assemble the card, first adhere the Ghost Stamping card piece to the 5 3/8 x 4 1/8 inch Flirty Flamingo CS. Use the Bone Folder to make a crisp fold at the 5 1/2 inch score line on the 4 1/4 x 11 inch Basic White CS. Next adhere the Flirty Flamingo/Ghost Stamping card piece to the front of the Basic White CS card base.
Finish the card by adhering the sentiment as shown.
Viola! You have a very unique card to wish someone a Happy Day!
Thanks so much for your visit today. I hope you will give this technique a try.
Sale-a-bration will be ending in 6 days! Remember that for every $50 you order from the 2021 January-June Catalog or the 2020-2021 Annual Catalog, you may choose FREE product from the Sale-a-bration Brochure. I will have a PDF to download for each of these below. The Flower & Field DSP used for today’s card is a FREE product from the brochure. Get you order in soon so that you do not miss out!
Thank you to all of you who place an order. If you order in the next 6 days, I will send you a FREE package of Rhinestones.
Hello fellow stampers and crafters! Today I have a darling little note card made with the versatile Floral Essence Stampin’ Up! stamp set using the Spotlight Technique. These note cards are 4 x 4 inches when complete and could be used at place settings for the Thanksgiving meal (assuming that is possible this year!). Note: This card is CASE’d from Shannon West’s presentation during our recent Onstage Convention.
I am using two exceptional stamp sets: Floral Essence and A Wish For Everything. Why are they exceptional? There are endless possibilities for the beginner stamper to use the flowers in the Floral Essence stamp set, depending on the color of ink and paper chosen. Purple, pink, and yellow for Spring; bolder brighter colors for Summer; and red/green or blue/white for Winter. The colors chosen for today’s card are Fall colors. The words in the “A Wish For Everything” cover, well, just about everything a beginner would need.
Measurements: Cinnamon Cider Card Stock (CS): 4 x 8 inches with a score line at 4 inches; Very Vanilla CS: 3 3/4 x 3 3/4 inches, 2 3/4 x 3 7/8 inches and 1 x 4 inches; In Good Taste Designer Series Paper (DSP): 3 7/8 x 3 7/8 inches.
You will also need: Cinnamon Cider, Bumblebee and Just Jade ink, Champagne Rhinestone Basic Jewels, the Classic Label Punch, the 2-inch Circle Punch and the Metallic Ribbon from the Basket Weave & Metallic Ribbon Combo pack. All products are found in the 2020-21 Stampin’ Up!® Annual Catalog except the Metallic Ribbon which is on page 45 of the 2020 Stampin’ UP!® Aug-Dec Mini Catalog.
Let’s get stamping!
Use the Cinnamon Cider ink to stamp the largest solid flower slightly right of center. Be mindful of the upper border of the flower as you want it to be 1/4 inch from the top. Use the Bumblebee ink to stamp the smaller solid flower on either side as shown. Tip: The Floral Essence stamps are Photopolymer, or see-through stamps. You get the best image if you stamp on something with a little “give” to it. I am using the Stampin’ Pierce mat, covered in white scrap paper. You may also try using your catalog.
Use the Bumblebee ink to stamp the center of the large solid flower. There is a different center stamp for the smaller solid flower. Stamping off Technique: stamp once onto scrap paper before stamping the center of the smaller solid flower onto your card. This will result in the center of the smaller solid flower being a little lighter than the flower itself.
Stamp the stems in Just Jade ink. I did turn the stamp upside down to stamp the stem for the Bumblebee flower to the left. I stamped twice to get the stem for the Bumblebee flower on the right. Add the leaves.
You may fill in the open space by stamping a few leaves using the single leaf stamp.
Use the Cinnamon Cider ink to stamp a large solid flower off to the right side of the 3 3/4 x 3 3/4 inch Very Vanilla CS. This will be the inside of your card, so leave a little space for writing. While you have the Cinnamon Cider handy, stamp the sentiment “Happy Thanksgiving” onto the 1 x 4 inch Very Vanilla CS strip. Note: The sentiment is a Red Rubber stamp. You do not need the extra padding. The image for the red rubber comes out with more clarity when stamped on a hard surface. I just forgot to take the Stampin’ Pierce Mat away.
With Bumblebee ink stamp two more small solid flowers on the inside of the card. Stamp the center of the Cinnamon Cider flower. When stamping the center for the Bumblebee flowers remember to stamp off first. Add the stems and leaves in Just Jade ink.
Spotlight Technique: Use the 2 inch circle punch to punch out the Cinnamon Cider flower. I turned my card 180 degrees and put the punch upside down on the craft table so that I could see what I was punching. I wanted the edge of the circle to be 1/4 inch down from the top of the card piece.
Here is the end result.
Use a Mini Glue Dot to adhere the Metallic Ribbon to the back of the card piece you just punched.
Use a Bone Folder to fold the 4 x 8 inch Cinnamon Cider CS card base at the 4 inch score line. The Bone Folder makes a nice crisp fold. Adhere the inside panel of your card.
Adhere the 3 7/8 x 3 7/8 inch In Good Taste DSP to the card front. Now adhere the punched out card piece.
Apply Stampin’ Dimensionals or strips of the Foam Adhesive Sheets and adhere the punched out circle to the card front to complete the Spotlight Technique. Tip: I have been using the Foam Adhesive Sheets in place of the Stampin’ Dimensionals. I have had a joint fusion in my right index finger. The thumb and index finger no longer come together so it makes peeling off the small hexagonal backing of the Stampin’ Dimensionals a challenge. I found that if I cut the Foam Adhesive Sheets into 1/4 inch strips, I can use those which make peeling the backing off a bit easier.
Use a Mini Glue Dot to adhere the bow, and a Stampin’ Dimensional to adhere the sentiment. This little note card looks great, but I think we need some Bling!
The Champagne Rhinestone Basic Jewels match perfectly! That is one remarkable point regarding Stampin’ Up! products-everything matches! Each color of card stock has coordinating ink. Some colors also have matching ribbon or embellishments! In this case the Cinnamon Cider coordinates with the Metallic Ribbon, the DSP, the Cinnamon Cider ink and the Champagne Rhinestones! Anyhow, I digress. The Take Your Pick tool helps to easily transfer the tiny rhinestones to your card.
Viola! You have a darling little note card to wish someone a Happy Thanksgiving!
Thanks for joining me today. I hope you can find some time to do some crafting. If you ever have any questions, especially if you are hung up on a project, shoot me an email and I will do my best to help you sort it out. My email is: thereastreasures.az@gmail.com.
If you are in need of any product, click on any photo below to go to my online store. Let me know if I can help you narrow down your wish list to a shopping list. The Holidays will be here before you know it. It’s a great time to purchase product to make your cards. You can also get to my online store by clickingHERE.


 Designer Series Paper")


")


 Circle Punch")


