Posted in 2021 Stampin' Up! July-December Mini Catalog, 2021-2022 Stampin' Up! Annual Catalog, Birds, Nature, Shaker Card, Stamparatus, Winter Holiday

Stampin’ Up!® Classic Cloche Dome Christmas Shaker Card

I am on Day 4 of the “12 Days of Christmas Card Making Challenge” with my stamping buddy Christy. Each day my blog will focus on a new holiday card. The challenge is until December 10, 2021. I plan to showcase a different stamp set with each card. This will allow you plenty of time to see the great products that are available in the 2021 Stampin’ Up! July to December Mini Catalog and to order in time to make your own Christmas cards! You can order HERE when you have your list ready!

Today’s card is the Stampin’ Up!® Classic Cloche Dome Christmas Shaker Card. The card shaker is made with the Cloche Dome and the Subtle Shimmer Sequins.

Measurements

Classic Cloche Dome Christmas Shaker Card

  • Real Red Card Stock (CS) card base: 5 1/2 x 8 1/2 inches with a score line at 4 1/4 inches
  • Basic White CS: 4 x 5 1/4 inches and 3 1/2 x 3 3/4 inches
  • Heartwarming Hugs Designer Series Paper (DSP): 4 x 5 1/4 inches
  • One Cloche Shaker Dome #156387 (Order HERE)
  • A more complete supply list is at the end of the blog

The Cloche Dome can be used with two different stamp sets- the Classic Cloche and the Sweets & Treats! Click on either one to go directly to my Online Store and start shopping.

Stamping

First use the Cloche Dies to cut out the space for the dome. Then use Real Red Ink to stamp the sentiment under the dome.

This little image of the birds in the dome is actually a 3-Step Stamp. First- stamp the outline of the birds and branches in Memento ink. Second- use the stamp with just the branches with Garden Green Ink. Third- use the stamp with the body of the birds and stamp in Real Red Ink. (I really struggled to get these to line up. I ended up using the Stamparatus because I could place the 2nd and 3rd stamps more accurately.) Alternatively, you could always color in the image using the Garden Green and Real Red Stampin’ Write Markers.

Stamp the 3-Step Stamp of the bird image on the lower right-hand corner of the 4 x 5 1/4 inch Basic White CS. Add the sentiment in Real Red Ink.

Assembling the Card

Adhere the stamped card piece to the inside of the Real Red CS card base.

Adhere the Heartwarming Hugs DSP to the card front. Then lay but DO NOT ADHERE both of the pieces with the dome. Adhere the dome piece with the birds stamped on it ONLY. Pull the sentiment piece away.

Adding the Dome and Sequins

I like to place a few of the Rhinestone Basic Jewels on the bird card piece. The sequins will fall to the bottom of the plastic dome when the card is upright. Having a few rhinestones allows the sparkle to stay. Now add about a teaspoon of the Subtle Shimmer Sequins onto the center of the bird card piece. (In hindsight, I could have added about 2x the amount of sequins that I did).

Peel the protective cover off of the inside of the Cloche Dome. Carefully place it over the bird card piece and press firmly to adhere.

Now peel the protective cover off of the front of the Cloche Dome. Apply adhesive to the back of the sentiment card piece. Carefully position this piece over the Cloche Dome. Press firmly to adhere.

Add a bow made from the Real Red Double Stitched Satin Ribbon. Voila! The card is finished. Shake it to see how fabulous this shaker card is!

I also have a blog about a Thanksgiving Shaker Card made with the Sweets & Treats stamp set. Check it out HERE.

I really hope you give shaker cards a try. It is such a fun alternative to the standard card!

Specials

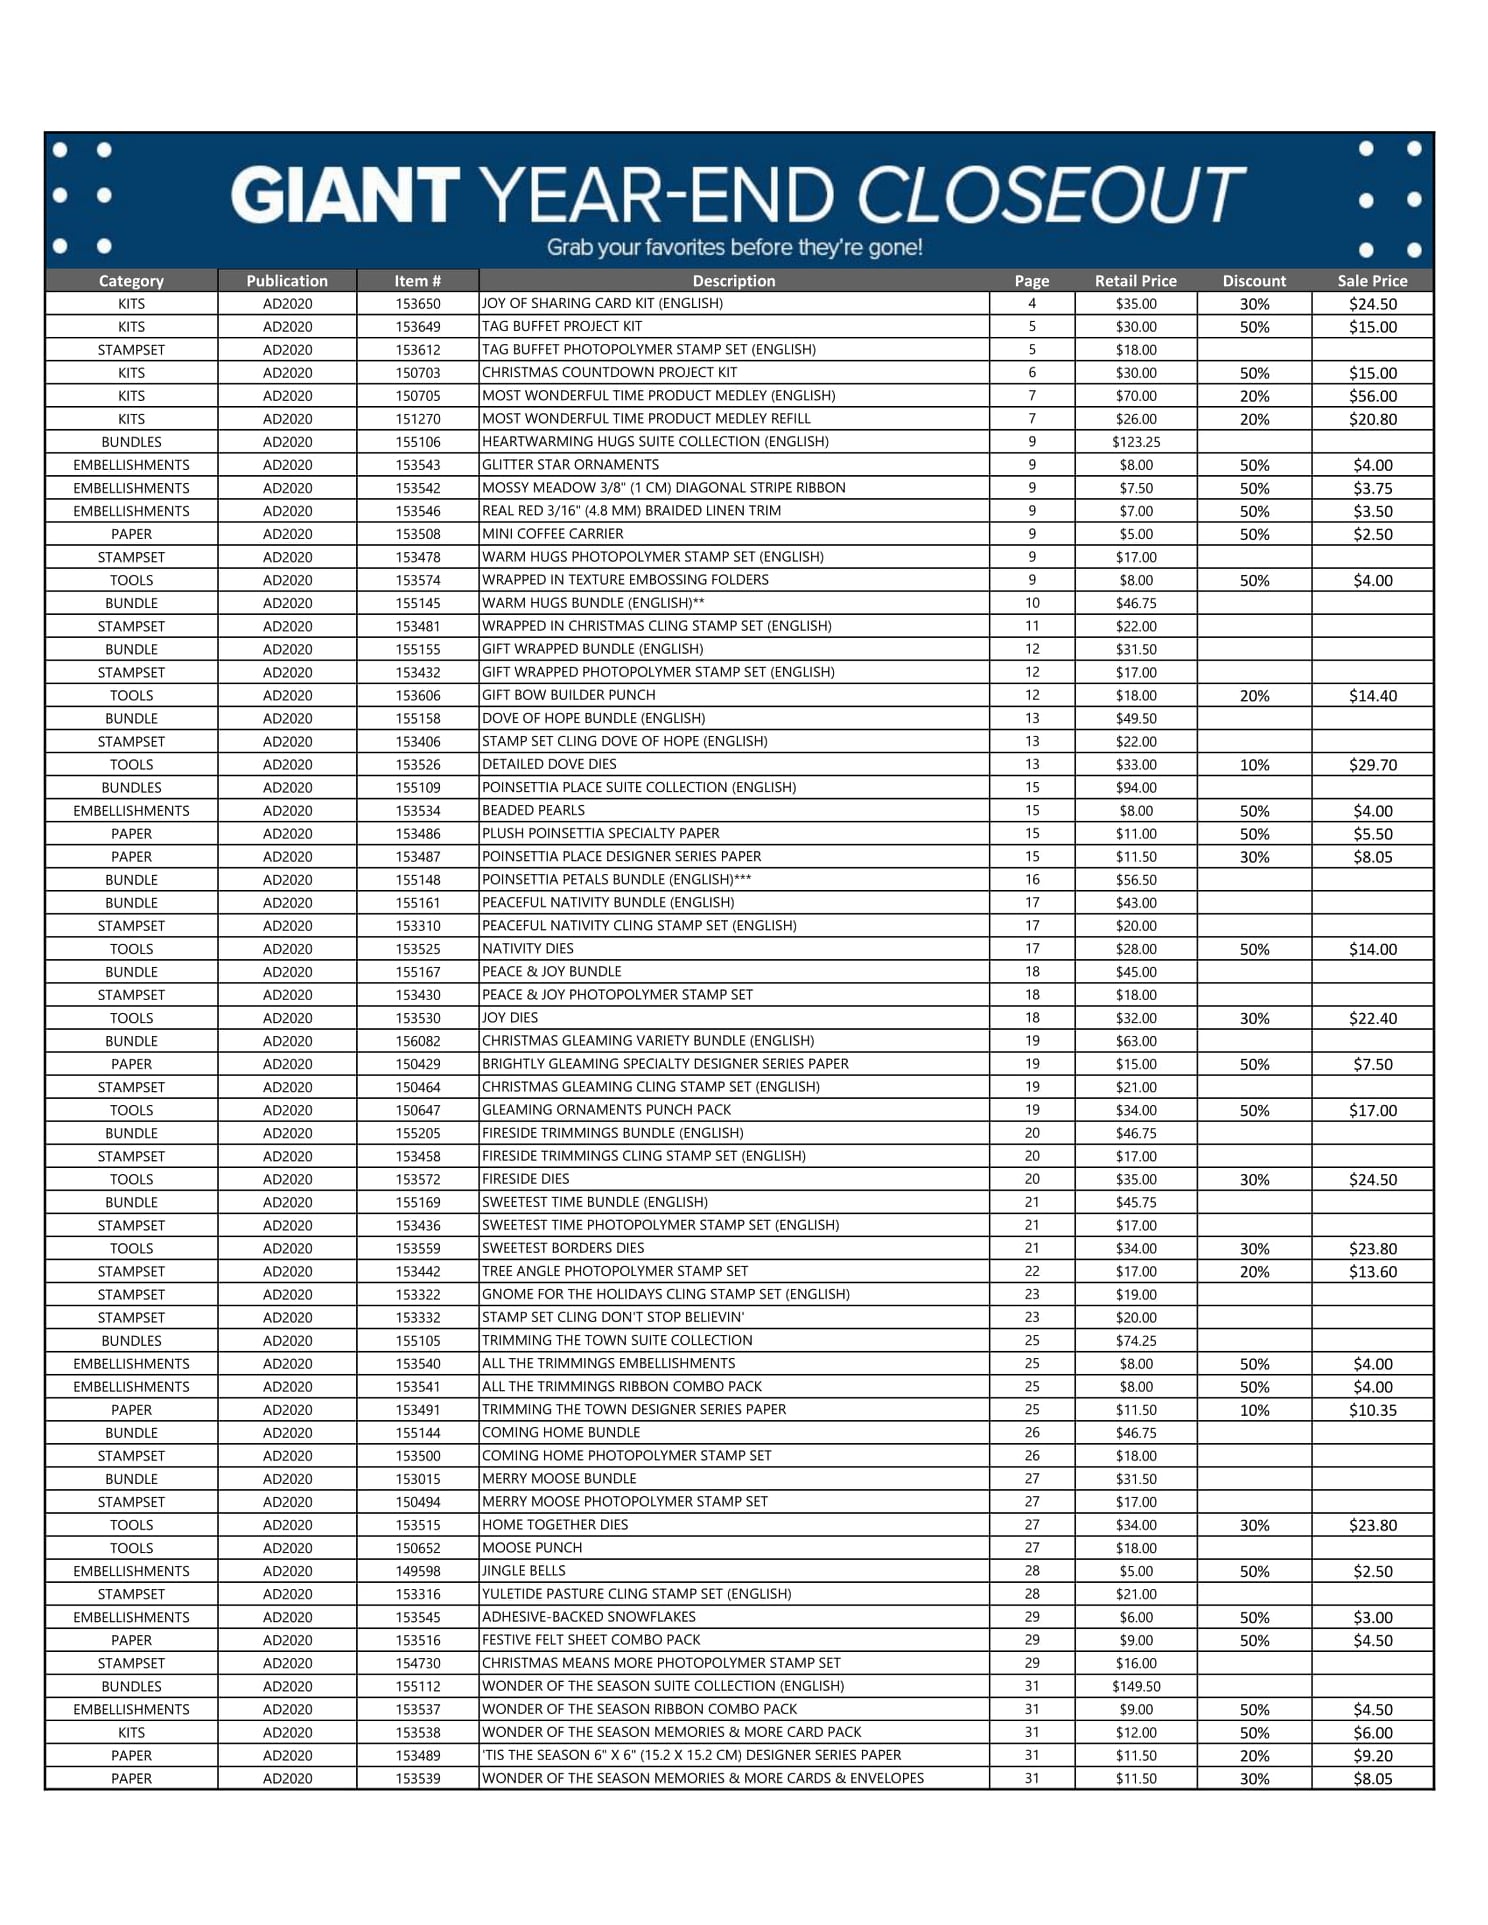
If you are unable to read the list, I recommend looking at the photos of the products available when you click on the Last Chance pop up on my Online Store website HERE.

Supplies

Product List

Thanks for stopping by for the 4th day of my 12 Days of Christmas Card Making Challenge! I hope you will come by for tomorrow’s card!

Theresa

Posted in 2021 Stampin' Up! July-December Mini Catalog, 3D Embossing Folder, Birds, Grunge style, Nature

The Paper Players Color Challenge PP553

Today’s blog is a card I created for The Paper Players Color Challenge PP553 using Real Red, Old Olive and Daffodil Delight. All very festive Holiday colors in my mind!

I choose to use the Happy Holly-Days stamp set from the 2021 Stampin’ Up! Mini Catalog which is currently available for you to order from. You may order from my Online Store here.

The background of the Very Vanilla Card Stock (CS) is embossed with the Timeworn 3D Embossing Folder. The background right behind the bird is stamped with the Gorgeous Leaves stamp set onto a Very Vanilla CS oval. The oval dies are from my stash. I distressed the edges of the Old Olive CS oval.

I used the Stampin’ Blends Alcohol Markers combined with the Stampin’ Write Watercolor Markers to color the images. The bird is colored in Real Red as are the berries for the holly. The yellow is Daffodil Delight and the green is Old Olive.

I hope you stop by The Paper Players to see all of the entries for this color challenge PP553. I really enjoyed the challenge!

Product List

Theresa

Posted in 2020 August-December Mini Catalog, 2020-2021 Stampin' Up! Catalog, beginner stamper, Mini Catalog 2020, Simple stamping, Winter Holiday

Tree Angle Christmas Card Stampin’ Up!

Yay! I may it through the 15-Day Christmas Card Challenge!

Today’s card is pretty simple but festive. The Stampin’ Up! Tree Angle stamp set has several trees to choose from. I just love the bold sentiment “Joy & Cheer”. The Designer Series Paper (DSP) is from the ‘Tis The Season DSP which is currently on sale at 20% off HERE.

Measurements: Whisper White Card Stock (CS) card base: 5 1/2 x 8 1/2 inches with a score line at 4 1/4 inches; Cherry Cobbler CS: 4 x 5 1/4 inches; Whisper White CS: 3 7/8 x 5 1/8 inches, 3 x 5 inches; Shaded Spruce CS: 1 1/4 x 5 1/8 inches; and ‘Tis the Season DSP: 11/2 x 5 1/8 inches.

Using Cherry Cobbler ink, stamp the sentiment “Happy wishes to you and yours” on the inside panel of the Whisper White CS card base. Stamp the sentiment “Joy & Cheer” onto the lower right-hand corner of the 4 x 5 1/4 inch Whisper White CS. Note: Use the Stampin’ Pierce Mat or a catalog with the Photopolymer stamps to get the best image.

Stamp the medium tree in Cherry Cobbler ink on the middle of the 3 x 5 inch Whisper White CS. Turn the card piece 180 degrees. Stamp the other 2 trees in Shaded Spruce ink as shown.

Fussy Cut all of the trees.

Adhere the ‘Tis the Season DSP to the Shaded Spruce CS. Adhere the “Joy & Cheer” card piece to the Cherry Cobbler CS, then to the front of the Whisper White CS card base. Tip: Use the Silicone Craft Sheet to keep from getting glue on your table.

Adhere the Shaded Spruce CS/’Tis the Season DSP to the card front. Adhere the Shaded Spruce tree as shown.

Use Stampin’ Dimensionals to adhere the last two trees as shown.

Time for the Bling! The Star Designer Elements are in the 2020-21 Stampin’ Up! Annual Catalog HERE.

Add one star to the top of each tree.

Viola! You have a nice traditional Christmas card to wish some Joy & Cheer to someone special.

Thank you so much for visiting today. I hope you enjoyed the 15-Day Christmas Card Challenge. You can see all of the cards on my “Home” tab up top. There are links to the blog post under each photo so you can look at the ones you like.

Product List

Have a very nice day! I hope all is well and stays well with you this Holiday Season!

Theresa

Posted in 2020 August-December Mini Catalog, 2020-2021 Stampin' Up! Catalog, Mini Catalog 2020, Religious, Winter Holiday

Dove of Hope and Itty Bitty Christmas Stampin’ Up!®

Welcome to day 13 of my 15-Day Christmas Card Challenge! Today’s card is made mostly with dies and the Stampin’ Cut & Emboss Machine. The sentiments are from the Dove of Hope and the Itty Bitty Christmas stamp sets. The Dove of Hope is in the 2020 Stampin Up! Mini Catalog and the Itty Bitty Christmas is in the 2020-21 Annual Catalog

The dove from the Detailed Dove Dies is definitely the star of the show for this card. The equally elegant layers for the background are from the Ornate Layers Dies.

These Ornate Layers Dies are simply amazing and allow so many possibilities for fancy detailed cards. They are available from the 2020-21 Stampin’ Up! Annual Catalog HERE.

Measurements: Whisper White Card Stock card base: 4 1/4 x 11 inches with a score line at 5 1/2 inches; Whisper White CS: 3 3/4 x 5 1/4 inch Ornate Layer, the Detailed Dove body and 2 wings, and 1/2 x 3 inch strip; Feels Like Frost Designer Series Paper (DSP): 3 1/8 x 4 5/8 inch Ornate Layer; and a double strand bow with the 1/4 inch Seaside Spray Metallic Ribbon.

Using the Seaside Spray ink, stamp the sentiment “May your season be filled with all the wonder and blessings of Christmas” from the Dove of Hope stamp set onto the inside panel of the Whisper White CS card base. Stamp the sentiment “Peace & Happiness” from Itty Bitty Christmas on the 1/2 x 3 inch strip of Whisper White CS.

Trim the sentiment “Peace & Happiness” as shown.

Adhere the back wing onto the body of the dove. Now adhere the front wing. When gluing smaller parts, I use the Silicon Craft Sheet to keep the glue from getting on my table.

I have found that cutting the Foam Adhesive Sheets into 1/4 inch strips is a great way to add dimension on a large card piece.

Adhere the Whisper White CS Ornate Layer frame to the front panel of the Whisper White CS card base. Be sure the inside sentiment is in the right place. Adhere the Feels Like Frost DSP Ornate Layer to the card front. Use Stampin’ Dimensionals to adhere the dove and the sentiment.

Adhere the Seaside Spray bow and Viola! you have an elegant Christmas card to wish some Peace & Happiness to someone special.

Thanks for visiting today. I hope you have mailed off your cards! I am still finishing up the letter I put inside the cards before I can mail them off. I intend to be finished by Monday. Wish me luck!

Click on any photo below to go to my Online Store and start shopping.

Product List

Have a wonderful day!

Theresa

Posted in 2020 August-December Mini Catalog, 2020-2021 Stampin' Up! Catalog, beginner stamper, Faux Shaker Card, Snowman, Winter Holiday

Stampin’ Up!® Snowman Season Christmas Faux Shaker Card

Hello! Well, it is almost Friday. Yay! We made it through another week! I have an extra fun card for you today!

One of the perks of being a Stampin’ Up! Demonstrator is that you are able to attend the Onstage Stampin’ Up! Convention in November of each year. This last Onstage there was a presentation by Rosemarrie Gonzalez on how to make this faux shaker card that I am going to share today.

Snowman Season is an adorable stamp set with this happy snowman. He reminds me of young children putting their faces up in the snowfall to catch snowflakes on their tongue. This is a very simple shaker card to make.

Measurements: Thick Whisper White Card Stock (CS) card base: 4 1/4 x 5 1/2 inches; Green Foil Sheet: 4 1/8 x 5 3/8 inches (I used a rectangle die to cut the center of the green foil so I can save it to use on another card); Whisper White CS: 3 7/8 x 5 1/8 inches and a Stitched Nested Label die cut (the 3rd up from the smallest): and Red Foil Sheet Stitched Nested Label die cut (4th up from the smallest). I also die cut some snowflakes from Silver Foil Sheets with the So Many Snowflakes Dies.

On the back of the Thick Whisper White CS card base, stamp the sentiment “Merry Christmas” in Shaded Spruce ink. Next stamp the sentiment “Hoping this season builds heartwarming memories” in Real Red ink. Add a few snowflakes in Smoky Slate ink. I Stamped Off some of the snowflakes.

Stamp the happy snowman in Memento Black ink. Add some snowflakes in Smoky Slate ink, some full strength and some Stamped Off.

I used the Stampin’ Blends Alcohol Markers to color the happy snowman. The colors are the Light and Dark: Smoky Slate, Pumpkin Pie, Real Red and Shaded Spruce.

Slide the happy snowman card piece into one of the Stampin’ Up! Clear Envelopes (p. 153 in the Annual Catalog, item #102619).

Add a spoon or two of the Snowflake Sequins.

Push the card piece into the lower left corner, flip over and seal the top to be snug on the right hand border.

Fold the excess envelope down and seal with Scotch Tape. Viola! A shaker card!

Using the 1/4 inch Crinkled Seam Binding, wrap it around the shaker card and tie in a bow. Tip: When no one is around to hold the tie, I use tweezers. This bow is made extra special by tying in an extra piece. It is hard to see but the bow has 2 tails on each side.

Adhere the Green Foil rectangle to the Thick Whisper White piece. Be sure you have the sentiment on the back facing the right way. Adhere the shaker card piece to the Green Foil and Thick Whisper White CS with 1/4 inch strips of the Foam Adhesive Sheets. So cute!

Use the Shaded Spruce ink to stamp the sentiment “Let It Snow” onto the Whisper White die cut Stitched Nested Label. Stamp some snowflakes around the border in Smoky Slate ink. Adhere to the Red Foil Stitched Nested Label die cut.

Adhere the Red Foil to the front of the shaker card piece. Add the Silver Foil snowflake die cuts as desired.

Viola! You have a really fun and happy snowman shaker card for Christmas!

I am so glad you stopped by to see this fun and easy Faux Shaker card technique! I was so “Wow’d” when Rosemarrie demonstrated this technique.

The Giant Year-End Closeout is still going on. If you haven’t had a chance to check out the discounts, please download the list below. The closeout will end on January 4, 2021 but as products run out-that is it!

To go directly to my Online Store, select any photo below:

Product List

I hope this happy snowman faux shaker card has brightened your day! Happy crafting!

Theresa

Posted in 2020 August-December Mini Catalog, 2020-2021 Stampin' Up! Catalog, Animals, beginner stamper, Cat, Designer Series Paper, Punch, Winter Holiday

Stampin’ Up!® Peace & Joy for a Cat Lovers Christmas

Good Morning! I hope you are getting started on a lovely day. I have a really cute card today using the Cat Punch and the Peace & Joy stamp set.

I just love the Stampin’ Up! color Pacific Point. It is just so soothing. I am also in love with the Snowflake Splendor Designer Series Paper (DSP) which is the snowy background. Right now you can get the DSP for 20% off during the Giant Year-End Closeout from December 8, 2020 to January 4, 2021. Shop HERE. Download the complete list of retiring products and discounts below.

The Peace & Joy stamp set has several large sentiments along with smaller strip sentiments to design your own personal sentiment. It is also on the retiring list.

Measurements: Whisper White Card Stock (CS) card base: 4 1/4 x 11 inches with a score line at 5 1/2 inches; Pacific Point CS: 4 1/8 x 5 3/8 inches and 3 x 4 inches; Snowflake Splendor DSP: 4 x 5 1/4 inches; and Whisper White CS: 3 x 3 inches, 1 1/2 x 4 inches and 1/2 x 3 inches.

Stamp the “Peace” sentiment in Pacific Point ink onto the 1 1/2 x 4 inch Whisper White CS. Stamp the sentiment “To you and yours” onto the 1/2 x 3 inch Whisper White CS. Note: When using the Photopolymer stamps, you will need something underneath like the Stampin’ Pierce Mat or a catalog to get the best image.

Fussy cut the sentiments with your Paper Snips and set aside.

Use the 2 1/4 inch Circle Punch to punch a circle on the upper portion of the Snowflake Splendor DSP in the middle. The DSP in this photo is upside down. Be sure to push the DSP all the way down into the punch.

Adhere the 3 x 3 inch Whisper White CS to the back of the Snowflake Splendor DSP covering the 2 1/4 inch circle. I am using a Silicon craft Sheet to avoid having the project stick to my table. Flip over and adhere the card piece to the 4 1/8 x 5 3/8 inch Pacific Point CS.

Punch the cat out of the 3 x 4 inch Pacific Point CS with the Cat Builder Punch. Adhere the cat in front of the “moon”.

Use Stampin’ Dimensionals to adhere the “Peace” sentiment under the cat. Adhere the “To you and yours” sentiment under the “Peace”.

Use your Bone Folder to fold the 4 1/4 x 11 inch Whisper White CS card base at the 5 1/2 inch score line. Adhere the cat card piece to the front of the card base.

Viola! You have a soothing card to send some peace to your favorite cat lover.

I really appreciate your visit today. I have been doing a 15-Day Christmas Card Challenge since December 1, 2020 if you would like to go to the previous posts and see lots of handmade Christmas card ideas. Please leave a comment and let me know which is your favorite.

Select any photo below to go directly to my Online Store.

Product List

Have a wonderful and creative day!

Theresa

Posted in 2020 August-December Mini Catalog, Animals, beginner stamper, Guys cards, Nature, Outdoors, Simple stamping, Sponging technique, Winter Holiday

Stampin’ Up!® Merry Moose Christmas #simplestamping card

Today I am returning to some simple stamping for my beginner stampers. The Merry Moose stamp set by Stampin’ Up! will not be available for much longer. It retires at the end of December. So if you would like this beauty, order early. Today is the start of the Giant Year End Close Out Sale. Check out all the sales and discounts at the end of my blog.

The Merry Moose stamp set is really fun and perfect for the outdoors person. I will show you a little technique with sponging & masking today to get the snowdrift.

Measurements: Shaded Spruce Card Stock (CS) card base: 5 1/2 x 8 1/2 inches with a score line at 4 1/4 inches; Whisper White CS: two at 4 x 5 1/4 inches; white copy paper: 4 x 6 inches.

Cut the 4 x 6 inch piece of copy paper as shown. This will be the mask to make the snowdrift.

Place the copy paper over one of the 4 x 5 1/4 inch Whisper White CS card pieces. Use a removable tape runner if needed to hold it in place. Using a sponge and the Balmy Blue ink dab the sponge on the ink. Sponge the ink onto the Whisper White CS in a gentle circular motion along the edge of the mask. Then sponge lightly above that to color the “sky”.

Leaving the mask in place, use the Shaded Spruce ink and the pine tree stamp to stamp two trees. Leave a space between the trees to stamp a third tree. Note: These are Photopolymer stamps and need a little padding from a Stampin’ Pierce Mat or catalog to look best.

Remove the copy paper mask. Stamp the third tree between the other two trees. Leave space under the third tree to put your sentiment.

Stamp the moose in Soft Suede ink. The moose is a Two Step Stamp. Here I stamped the detailed stamp after the plain stamp. However, I stamped the detailed stamp first followed by the plain stamp and felt it was easier for me to see to line everything up. Try it both ways to determine which works well for you. I did Stamp Off the plain moose stamp so that I could see the details on the moose more easily.

Stamp the sentiment “Merry Christmoose” in the Shaded Spruce ink.

Use the Shaded Spruce ink and stamp some pine trees on the other 4 x 5 1/2 inch Whisper White CS. I stamped once at full strength. The other two trees are Stamped Off first. Add the sentiment “enjoy the stillness of the season” over the trees. Adhere the panel to the inside of the Shaded Spruce CS card base.

Use your Bone Folder to fold the card base at the 4 1/4 inch score line. Adhere the front panel to the front of the card base.

Viola! That is all there is to it! This is a great card for the outdoors person and is so fun to make! Plus a little humor is good for the soul!

For those of you who love Bling! as much as I do, here is another version of the Merry Moose card with Rhinestone Basic Jewels added like stars in the sky.

Thanks for visiting today! Please leave me a comment and let me know which card has been your favorite during the first 7 days of my 15-Day Christmas Card Making Challenge.

To download the pdf of the retiring product in the 2020 August-December Stampin’ Up! Mini Catalog select the download button below.

To go to my Online Store select any photo below.

Product List

Have a wonderful Holiday Season and keep crafting!

Theresa

Posted in 2020-2021 Stampin' Up! Catalog, beginner stamper, Nature, Outdoors, Simple stamping, Stamping-off technique, Winter Holiday

Stampin’ Up!® Winter Woods Simple Stamping Seasons Greetings

Welcome to December! It finally got below freezing here in Arizona. It is still very sunny during the day, but Brrrr! Today I am showing a card made only with stamps, ink and paper- aka-#simplestamping.

The Winter Woods Stampin’ Up!® stamp set is in the 2020-21 Stampin’ Up! Annual Catalog on page 61. I love this set because I can create a serene scene with the magnificent trees in this awesome stamp set. And I love the sentiment!

Measurements: Whisper White Card Stock (CS) card base: 5 1/2 x 8 1/2 inches with a score line at 4 1/4 inches; Whisper White CS: 1 5/8 x 2 1/8 inches; Shaded Spruce CS: 4 x 5 1/4 inches and 1 3/4 x 2 1/4 inches; Soft Seafoam CS: 3 3/4 x 5 inches.

Start by stamping the group of trees in Shaded Spruce ink onto the 3 3/4 x 5 inch Soft Seafoam CS. Next stamp the large evergreen tree on the left side slightly covering the first group of trees. Tip: This is a red rubber stamp. You will get the best image by stamping on a smooth hard surface, like the top of a table.

Stamp another evergreen tree on the right-hand side, then without adding more ink, stamp under the bare trees on the left-hand side. Add some ink, stamp onto the scrap paper and then stamp onto the left-hand side slightly above the first evergreen tree. This technique is called Stamping Off and helps to give the tree line a 3D look. Stamp off a few more times to add more fullness under the bare trees on the right.

Stamp some of the smaller evergreen trees on the inside of the Whisper White CS card base in the bottom right-hand corner. Stamp off for one of the trees. Now stamp the sentiment “Thinking Of You This Season” onto the 1 5/8 x 2 1/8 inch Whisper White CS. Stamp two of the pine branches under the sentiment.

Adhere the sentiment to the 1 3/4 x 2 1/4 inch Shaded Spruce CS. Adhere the Soft Seafoam CS with the trees stamped on it to the 4 x 5 1/4 inch Shaded Spruce CS, then adhere it to the front of the Whisper White CS card base.

Use Stampin’ Dimensionals to adhere the sentiment card piece to the card front.

Viola! You have a fabulous seasonal card to let someone know you are thinking of them! And all you needed was stamps, ink and paper!

However, I will show you a few other options for this card if you feel it needs a little Bling! Bling! is my thing!

You could add a few of the Red Rhinestone Basic Jewels to the branches.

You could also use the Rhinestone Basic Jewels to add some stars in the sky. No matter which version you send, you will be spreading some Holiday Cheer!

Thanks for stopping by today! I really appreciate all the wonderful comments! A big thank you to all of you who placed an order.

Select any photo below to connect with my Online Store and start shopping!

Product List

Have a most wonderful and craft-filled Holiday Season!

Theresa

Posted in 2020 August-December Mini Catalog, 2020-2021 Stampin' Up! Catalog, beginner stamper, Punch, Punch Art, Winter Holiday

Stampin’ Up!® Perfectly Plaid Christmas Card

Hello! Happy November! I can’t believe how fast this year is going for me! I am showing a Christmas card today because I am worried I will not be able to create and send all of my Christmas cards on time. It is good to get started early. However, I am not forgetting Thanksgiving. I plan to do a few Thanksgiving cards in the blogs over the next few weeks.

This is a fun and simple Christmas card using the Perfectly Plaid stamp set, the Pine Tree Punch and the ‘Tis The Season Designer Series Paper (DSP). You will find the Perfectly Plaid stamp set and Pine Tree Punch in the 2020-21 Stampin’ Up! Annual Catalog. The ‘Tis The Season DSP is in the 2020 Stampin’ Up! August-December Mini Catalog. Let’s get started!

Measurements: Whisper White Card Stock (CS): 4 1/4 x 11 inches with a score line at 5 1/2 inches and 2 1/4 x 4 inches; Real Red CS: 4 x 5 1/4 inches; and ‘Tis The Season DSP 2 x 5 1/4 inches and 4 different designs at 2 1/4 ix 6 inches.

Using Garden Green ink, stamp the sentiment “Merry Christmas” on the 2 1/4 x 4 inch Whisper White CS leaving space around the sentiment so you can punch it out. Stamp the sentiment “Hoping that your busy year…” on the inside of the 4 1/4 x 11 inch Whisper White CS card base.

Use the Everyday Label Punch to punch out the sentiment “Merry Christmas”. Set aside.

Get together the Pine Tree Punch and the 4 ‘Tis The Season DSP strips that measure 2 1/4 x 6 inches.

Punch out one Pine Tree from each strip of ‘Tis The Season DSP.

Adhere the 2 x 5 1/4 inch strip of the ‘Tis The Season DSP to the 4 x 5 1/4 inch Real Red CS. Fold the 4 1/4 x 11 inch Whisper White CS card base at the 5 1/2 inch score line and use the Bone Folder to make the fold crisp. Adhere the Real Red/DSP card piece to the front of the Whisper White CS card base.

Position all of the Pine Trees and the sentiment on the card front. Adhere two of the Pine Trees flat.

Adhere the third Pine Tree and the sentiment with Stampin’ Dimensionals.

Adhere the fourth Pine Tree to the inside of the card.

Now for the Bling! The Champagne Rhinestone Basic Jewels and the Star Designer Elements can both be found in the 2020-2021 Stampin’ Up! Annual Catalog.

Place a star over each tree and then scatter the Champagne Rhinestone Basic Jewels.

Viola! You have a fun and simple Christmas card!

Thank you so much for stopping by today. Announcements: Be sure to order from the Stampin’ Up! August-December Mini Catalog as soon as possible. Some items will sell out, and once they are on backorder you may not get them before Christmas. Consider purchasing a stamp kit as a gift. There are all inclusive kits in both the Annual and Mini Catalogs. If you would like a paper catalog, shoot me an email at: theresastreasures.az@gmail.com.

To get to my online store, click on any one of the photos below.

Product List

Have a wonderfully creative week!

Theresa