Posted in Occasions Catalog 2019

Amazing Day

Hello fellow stampers! Here in the Warren District of Bisbee Arizona, I am blessed to have an amazing day start with a beautiful sunrise that I can see from my bedroom window quite often. 

 I hope you can have an amazing day as well. To get that started, here is an amazing card!

To make this amazing card you will need the following Stampin’ Up! products: the Incredible Like You stamp set, Pineapple Punch and Granny Apple Green cardstock and ink, Memento ink and Whisper White cardstock.  The Whisper White card base is 8 1/2 x 5 1/2 inches folded in half. You also need a 3 1/4 x 3 1/4 inch square of Whisper White, a 3 1/2 x 3 1/2 inch square of Granny Apple Green and a 1 1/4 x 5 1/4 inch strip of Pineapple Punch.

 In order to get the sentiment straight on the clear block, first lay it on the card and put the clear block over it. Apply light pressure to get it to stick. Apply Memento ink and put the sentiment onto the  bottom of the Whisper White square. 

The poppy is a 2 step stamp. That means you will stamp one image on top of the other to get the full image. In this case, I have found it easier to stamp the detailed image first.

I had to try this several times to get the final image to my liking.

Now you will stamp the less detailed poppy on top of the detailed image. Sometimes it takes practice to be able to get everything lined up. When you do, the image is incredible.

Next, use a sticky note to cover the sentiment. This allows you to put the stems on without getting them over the sentiment.

After adding the leaves remove the sticky note.

In order to cut the banner, you first make a cut down the center about 1/4 inch in. Cut from the left corner to the center, then from the right corner to the center as shown.

Adhere the stamped image onto the Granny Apple Green square. Now adhere the Pineapple Punch banner to the back. Apply adhesive to the whole piece, and adhere to the card base. And there you have it! An amazing card you can send to one of your amazing friends to brighten their day!

Supply specifics: Stamp set: Incredible Like You #148708; Cardstock: Whisper White #100730, Granny Apple Green #146990 and Pineapple Punch #146971; Ink: Memento #132708, Granny Apple Green #147095 and Pineapple Punch #147141; Clear blocks: A #118487, B #117147, D #118485 and H #118490; and  Multipurpose Liquid Glue #110755.

 Remember until March 31, 2019 you can order $50 worth of product and get a free Sale-a-bration item from the Sale-a-bration brochure. When you buy everything on the list above, plus some Stampin’ Dimensionals which we’ll use on the next card, you can pick out 2 free Sale-a-bration items. Select the “Shop Here” button on the top right of this blog and you will be taken to my Stampin’ Up! store so you can start collecting some amazing product!

Posted in cactus, desert, Hello, Occasions Catalog 2019

Beautiful Desert

Living in the desert can be very peaceful and colorful. When the cacti bloom and add color to the usually brown desert, it is breath-taking!

Today I am using the Stampin’ Up! stamp set called Flowering Desert. I have had a great deal of fun with this set! I am using the same colors I have used in previous blog posts, Shaded Spruce and Pineapple punch. I have added Granny Apple Green.

Here is today’s card. In addition to the cardstock and ink in Shaded Spruce, Granny Apple Green and Pineapple Punch you will need Whisper White cardstock and some adhesive. If you would like pink flowers on top of the cacti, you may use Melon Mambo ink.

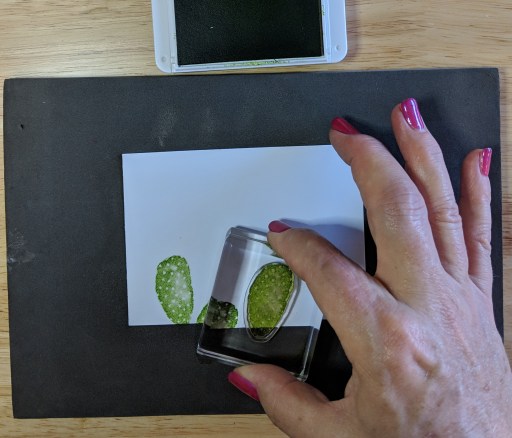
I started with Whisper White cardstock cut at 4 1/2 x 3 1/4 inches using the larger cactus ‘leaf’ stamp in Granny Apple Green ink.

I added a couple more leaves allowing space in between for other smaller cactus leaves.

I added more to the cactus with the smaller leaf.

Keep adding more of the small leaves until you like how it looks.

Next I used the Agave leaves stamp in Shaded Spruce ink.

Top the cactus using the Pineapple Punch ink and the larger flower stamp.

To finish the design, I used Pineapple Punch ink to add the flower branch.

I used the Shaded Spruce ink for the sentiment “Hi There!”.

I am now done with the stamping.

Tip: Some of the ink will get on your Pierce Mat. This can easily be removed with a baby wipe or wet washcloth. Another option is to wrap white copy paper around the mat so the extra ink goes on the paper instead of the mat.

In order to assemble the card I cut a piece of Pineapple Punch cardstock at 5 1/4 x 4 inches and adhered it  to the Whisper White card base. The card base measures 8 1/2 x 5 1/2 and is folded in half.

I cut a piece of Shaded Spruce the same size as the stamped piece of Whisper White, 4 1/2 x 3 1/4 inches.

Place the Shaded Spruce piece at a slight angle and adhere to the card.

Adhere the stamped piece horizontally parallel to the Pineapple Punch piece.

And now you have the completed card! Be sure to send it to someone special. It’s always nice to get a handmade card in the mail from a good friend just saying “Hello”!

Here are some other variations. Have fun creating your own. To order any of the supplies listed below, click on the shop now button at the top of the blog and you will be connected to my store. If you have any questions about ordering please contact me. There is a special sale right now called Sale-a-bration which lasts until March 31, 2019. During Sale-a-bration, for every $50 ordered, you my choose a free item from the Sale-a-bration brochure. So, check out my store and get your deal on stamping supplies today!

Products used included: Stamps: Flowering Desert  #148700; Cardstock: Shaded Spruce #146981, Pineapple Punch #146971, Granny Apple Green #146990 and Whisper White #100730; Ink: Shaded Spruce #147088, Pineapple Punch #147141 and Granny Apple Green #147095; Clear Blocks: A, B, C and D; Multipurpose Liquid Glue #110755 If you wish to have pink flowers on top of the cactus’ you may use Melon Mambo ink # 147051.

Posted in Cling Stamp, Occasions Catalog 2019

New Cling Stamps from Stampin’ Up!

Hello awesome stampers!  I would like to show you how to make this card, but I first want to spend some time on the new type of stamps called Cling Stamps. These are extra sticky so that they will stay on the acrylic block. However, some folks have had problems with them sticking to other things.

The ‘Beauty Abounds’ stamp set by Stampin’ Up! is an example of a Cling Stamp. You will know this by looking above the title of the stamp set.

Inside the case there will be the red rubber stamp attached to foam with a protective paper on the back, and the plastic vinyl sheet with the images on it.

First, gently remove the stamp from the red rubber/foam sheet.

Next, peel the paper off the back.

The plain foam will stick to the acrylic block, but you cannot see the image. Many stampers leave the images off and just use the stamp like this. However, sometimes you cannot see the orientation of the image.

I accidentally put the butterfly on at the wrong angle because I was using the stamp without the image on it.

Carefully peel the protective cover off of the vinyl image and do not let anything touch it. It is very, very sticky!


Taking care to line up the edges, place the rubber stamp over the image and press lightly to adhere them together.


Gently pull the stamp away from the image sheet. Again, it is very sticky!

Place the stamp with the image on it directly onto an acrylic block. DO NOT LAY THE STAMP DOWN ON PAPER, THE DESK OR ANYTHING ELSE!  It will stick to the paper and then be unusable! You may not be able to remove it from the other surfaces.

When you are done stamping, carefully remove the stamp with the image on it from the block and put it back in the stamp case. When removing the stamp with the image on it, be sure the plastic sheet with the image comes off first and does not tear away from the foam layer. The best way to do this is to slide something between the image sheet and the block–like a fingernail or guitar pick.

Join me tomorrow and we will make the card above!

Posted in cactus, desert, Occasions Catalog 2019, Photopolymer

Let’s Get Stamping!

Today I will show you how to use the Photopolymer stamps that Stampin’ Up! has. This set is Flowering Desert and is found in the Occasions Catalog. I just love to give a handmade card to someone to let them know I think they are awesome!

These are the supplies you will need to make this card. In addition to the stamp set, I used Shaded Spruce ink, Whisper White cardstock, Clear Block E, the Stampin’ Pierce Mat, and (not shown- Clear Block H, Gingham Gala Adhesive-Backed Sequins, Multipurpose Liquid Adhesive and Stampin’ Dimensionals)

The first step is to carefully remove the Photopolymer stamp from the sheet and place it on a Clear Block as shown.

Next is to tap the stamp onto the ink pad with a light to moderate pressure. You want to get ink on the image and not around the image. Be sure to press straight down, and lift straight up. If there is ink on your block, try using a lighter pressure.

When using the Photopolymer stamps you will need to have the Pierce Mat or a magazine under it to get the best image. Place the stamp straight down onto the paper and apply light to moderate pressure for about 5 seconds. This allows the ink to transfer onto the paper.  Lift the stamp straight up. It may take some practice to get a nice clear image. If there is ink around the image, that is called a halo, and it means you need to place the stamp on the ink with a lighter touch.

To finish the card, I stamped the sentiment onto a 3/4 inch strip of cardstock and cut a banner on one end. The cactus was cut to measure 4 x 2 1/2 inches and adhered to a 4 1/4 x 2 3/4 inch piece of Shaded Spruce. I then adhered the cactus piece onto a card base which measured 8 1/2 x 5 1/2, folded in half length-wise. The “You’re So Awesome” sentiment was adhered using Stampin’ Dimensionals to give it lift and add dimension to the card. I finished it off with some sequins.

This is a really nice, simple card that can definitely be given to someone to express how you feel about them, and pass on some positive energy!