Welcome to day 13 of my 15-Day Christmas Card Challenge! Today’s card is made mostly with dies and the Stampin’ Cut & Emboss Machine. The sentiments are from the Dove of Hope and the Itty Bitty Christmas stamp sets. The Dove of Hope is in the 2020 Stampin Up! Mini Catalog and the Itty Bitty Christmas is in the 2020-21 Annual Catalog
The dove from the Detailed Dove Dies is definitely the star of the show for this card. The equally elegant layers for the background are from the Ornate Layers Dies.
These Ornate Layers Dies are simply amazing and allow so many possibilities for fancy detailed cards. They are available from the 2020-21 Stampin’ Up! Annual Catalog HERE.
Measurements: Whisper White Card Stock card base: 4 1/4 x 11 inches with a score line at 5 1/2 inches; Whisper White CS: 3 3/4 x 5 1/4 inch Ornate Layer, the Detailed Dove body and 2 wings, and 1/2 x 3 inch strip; Feels Like Frost Designer Series Paper (DSP): 3 1/8 x 4 5/8 inch Ornate Layer; and a double strand bow with the 1/4 inch Seaside Spray Metallic Ribbon.
Using the Seaside Spray ink, stamp the sentiment “May your season be filled with all the wonder and blessings of Christmas” from the Dove of Hope stamp set onto the inside panel of the Whisper White CS card base. Stamp the sentiment “Peace & Happiness” from Itty Bitty Christmas on the 1/2 x 3 inch strip of Whisper White CS.
Trim the sentiment “Peace & Happiness” as shown.
Adhere the back wing onto the body of the dove. Now adhere the front wing. When gluing smaller parts, I use the Silicon Craft Sheet to keep the glue from getting on my table.
I have found that cutting the Foam Adhesive Sheets into 1/4 inch strips is a great way to add dimension on a large card piece.
Adhere the Whisper White CS Ornate Layer frame to the front panel of the Whisper White CS card base. Be sure the inside sentiment is in the right place. Adhere the Feels Like Frost DSP Ornate Layer to the card front. Use Stampin’ Dimensionals to adhere the dove and the sentiment.
Adhere the Seaside Spray bow and Viola! you have an elegant Christmas card to wish some Peace & Happiness to someone special.
Thanks for visiting today. I hope you have mailed off your cards! I am still finishing up the letter I put inside the cards before I can mail them off. I intend to be finished by Monday. Wish me luck!
Click on any photo below to go to my Online Store and start shopping.
Hello! The Christmas Gleaming stamp set and coordinating Gleaming Ornament Punches are so much fun to use to create gorgeous Christmas cards.
The Brightly Gleaming Specialty Designer Series Paper (DSP) is so beautiful with the copper foil accents. The paper is currently 50% off, item #150429. Shop HERE.
Measurements: Very Vanilla Card Stock (CS) card base: 4 1/4 x 11 inches with a score line at 5 1/2 inches, 3 3/4 x 5 inches and 3 x 4 inches; Old Olive CS: 4 x 5 1/4 inches; Brushed Metallic CS in copper: 2 1/2 x 4 inches; Brightly Gleaming DSP: 1 5/8 x 4 7/8 inches for the striped pattern and 3 7/8 x 2 1/4 inches.
Adhere the Brightly Gleaming DSP card pieces to the 3 3/4 x 5 inch Very Vanilla CS as shown. Use Old Olive ink to stamp the sentiment “MERRY Christmas” onto the Very Vanilla CS.
Use a Bone Folder to make a nice crisp fold at the 5 1/2 inch score line on the 4 1/4 x 11 inch Very Vanilla CS card base. Adhere the 4 x 5 1/4 inch Old Olive to the front of the Very Vanilla card base, then adhere the DSP card piece to the Old Olive CS.
Punch a 2-inch circle with the 2-inch Circle Punch and then adhere it to the card front with Stampin’ Dimensionals.
Stamp the ornament on the left in Night of Navy and the ornament on the right in Pretty Peacock. Use the Gleaming Ornament Punch to punch out the 2 stamped ornaments. Note: the Gleaming Ornaments Punch Pack is also 50% off! Item #150647.
Adhere the 2 ornaments to the Brushed Metallic CS circle. Add a bow tied from the Night Of Navy ribbon in the Playing With Patterns Ribbon Combo Pack. I tied my bow using 2 strands of the Night Of Navy ribbon. Adhere the bow with a Mini Glue Dot.
Viola! You have a gorgeous and somewhat masculine card to wish someone a “Merry Christmas”!
I am so glad you were able to stop by today. I hope you have a relaxing and craft-filled weekend!
Click on any photo below to go to my Online Store.
Welcome to Friday! Boy this week seemed to go fast! I have a Christmas Fun Fold for you today.
This Fun Fold Box card is flat for mailing, but when opened stands up as a box dressed up as a Christmas present. The sentiment and holly are from the Sweetest Time stamp set and Sweetest Borders Dies.
Measurements: Shaded Spruce Card Stock (CS) card base: 5 1/2 x 9 inches scored with the 9 1/2 inch side up top at 2 1/8 inches, 4 1/4 inches, 6 3/8 inches and 8 1/2 inches, two 1/2 inch circles (1 1/2 Circle Punch) scored in the center and a stitched oval die cut (Stitched Shapes Dies largest oval); Real Red CS: four at 1 7/8 x 5 1/4 inches and a scalloped oval die cut (Layering Oval Dies 3rd largest); Plaid Tidings Designer Series Paper (DSP): four at 1 5/8 x 5 inches; and Whisper White CS: two at 1 1/2 x 4 1/2 inches, 2 1/2 x 2 1/2 inches and a stitched oval (Stitched Shapes Dies 2nd largest stitched oval).
Stamp the sentiment “for you with Christmas cheer” on the Whisper White CS stitched oval die cut in Real Red ink. On the 2 1/2 x 2 1/2 inch Whisper White CS stamp the berries in Real Red and the holly leaves in Shaded Spruce ink. Remember to use your Stampin’ Pierce Mat so you get the best image with the Photopolymer stamps.
Adhere the Plaid Tidings DSP to the 1 7/8 x 5 1/4 inch Real Red CS.
On two of the Real Red CS/Plaid Tidings panels, adhere the two 1 1/2 x 4 1/2 inch Whisper White CS card pieces as shown. This will be the “back” of the card where you would write your message. It will make more sense once you put everything together.
On another Real Red/Plaid Tidings panel, wrap the Real Red Braided Linen Trim around 3 times as shown. Tie a bow with 2 strands and adhere to the top with Mini Glue Dots. Tip: Sometimes the Glue Dots do not hold the bow so I add a little drop of the Tombow Multipurpose Liquid Glue under the bow.
On the back of the Shaded Spruce CS stitched oval die cut, adhere the scored 1 1/2 inch circles by folding the circle in half, adhering 1/2 of each circle and having them meet in the middle.
Adhere the sentiment “for you with Christmas cheer” to the Real Red scalloped oval die cut. Then use Stampin’ Dimensionals to adhere it to the Shaded Spruce CS stitched scalloped oval die cut.
Fussy cut the holly leaves and berries with Paper Snips. Adhere to the sentiment label. Tie another 2 strand bow with the Real Red Braided Linen Trim and adhere to the sentiment label.
Use your Bone Folder to fold all of the score lines on the Shaded Spruce CS card piece.
With the 1/2 inch panel on the right, adhere all of the Real Red/Plaid Tidings panels as shown.
Here is where we will attach the sentiment panel to the middle of the card front with the two folded 1 1/2 inch circles. Glue the circles on the back of the sentiment panel, still folded, side-by-side along the center line.
Turn the whole card over with the 1/2 inch panel on the left. Apply adhesive to the 1/2 inch panel and fold over to adhere to the opposite side.
You should be able to pop the box open as shown.
Viola! You have a super fun Fun Fold Christmas card that mails flat but looks like a present when opened!
I am so glad you stopped by today. I hope you have a wonderful weekend and are able to spend time crafting.
Hello! Well, it is almost Friday. Yay! We made it through another week! I have an extra fun card for you today!
One of the perks of being a Stampin’ Up! Demonstrator is that you are able to attend the Onstage Stampin’ Up! Convention in November of each year. This last Onstage there was a presentation by Rosemarrie Gonzalez on how to make this faux shaker card that I am going to share today.
Snowman Season is an adorable stamp set with this happy snowman. He reminds me of young children putting their faces up in the snowfall to catch snowflakes on their tongue. This is a very simple shaker card to make.
Measurements: Thick Whisper White Card Stock (CS) card base: 4 1/4 x 5 1/2 inches; Green Foil Sheet: 4 1/8 x 5 3/8 inches (I used a rectangle die to cut the center of the green foil so I can save it to use on another card); Whisper White CS: 3 7/8 x 5 1/8 inches and a Stitched Nested Label die cut (the 3rd up from the smallest): and Red Foil Sheet Stitched Nested Label die cut (4th up from the smallest). I also die cut some snowflakes from Silver Foil Sheets with the So Many Snowflakes Dies.
On the back of the Thick Whisper White CS card base, stamp the sentiment “Merry Christmas” in Shaded Spruce ink. Next stamp the sentiment “Hoping this season builds heartwarming memories” in Real Red ink. Add a few snowflakes in Smoky Slate ink. I Stamped Off some of the snowflakes.
Stamp the happy snowman in Memento Black ink. Add some snowflakes in Smoky Slate ink, some full strength and some Stamped Off.
I used the Stampin’ Blends Alcohol Markers to color the happy snowman. The colors are the Light and Dark: Smoky Slate, Pumpkin Pie, Real Red and Shaded Spruce.
Slide the happy snowman card piece into one of the Stampin’ Up! Clear Envelopes (p. 153 in the Annual Catalog, item #102619).
Add a spoon or two of the Snowflake Sequins.
Push the card piece into the lower left corner, flip over and seal the top to be snug on the right hand border.
Fold the excess envelope down and seal with Scotch Tape. Viola! A shaker card!
Using the 1/4 inch Crinkled Seam Binding, wrap it around the shaker card and tie in a bow. Tip: When no one is around to hold the tie, I use tweezers. This bow is made extra special by tying in an extra piece. It is hard to see but the bow has 2 tails on each side.
Adhere the Green Foil rectangle to the Thick Whisper White piece. Be sure you have the sentiment on the back facing the right way. Adhere the shaker card piece to the Green Foil and Thick Whisper White CS with 1/4 inch strips of the Foam Adhesive Sheets. So cute!
Use the Shaded Spruce ink to stamp the sentiment “Let It Snow” onto the Whisper White die cut Stitched Nested Label. Stamp some snowflakes around the border in Smoky Slate ink. Adhere to the Red Foil Stitched Nested Label die cut.
Adhere the Red Foil to the front of the shaker card piece. Add the Silver Foil snowflake die cuts as desired.
Viola! You have a really fun and happy snowman shaker card for Christmas!
I am so glad you stopped by to see this fun and easy Faux Shaker card technique! I was so “Wow’d” when Rosemarrie demonstrated this technique.
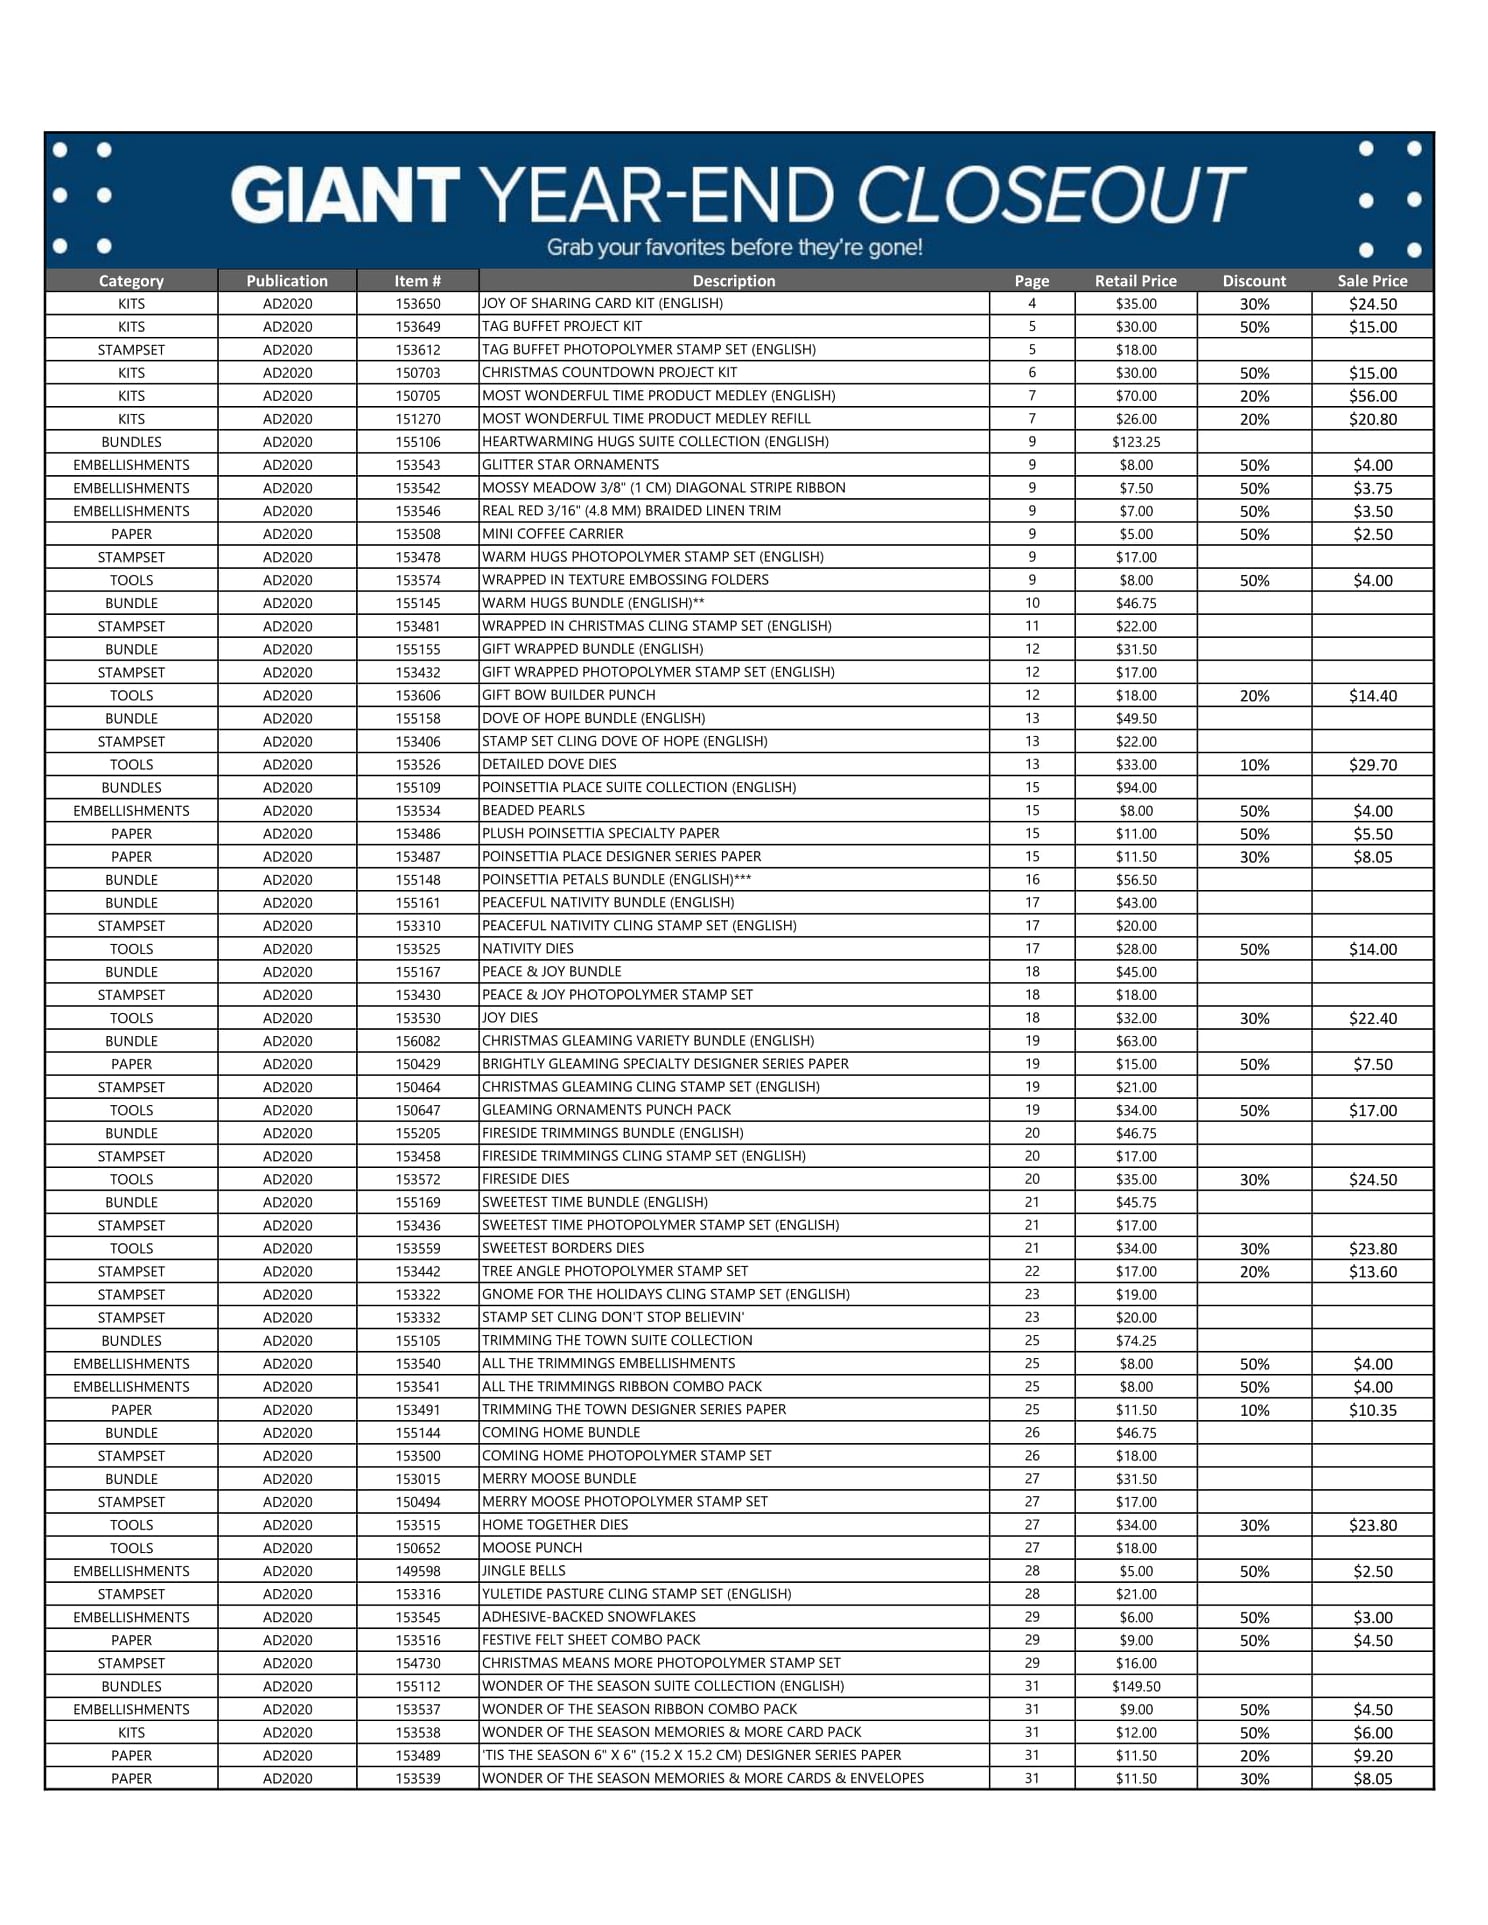
The Giant Year-End Closeout is still going on. If you haven’t had a chance to check out the discounts, please download the list below. The closeout will end on January 4, 2021 but as products run out-that is it!
Good Morning! I hope you are getting started on a lovely day. I have a really cute card today using the Cat Punch and the Peace & Joy stamp set.
I just love the Stampin’ Up! color Pacific Point. It is just so soothing. I am also in love with the Snowflake Splendor Designer Series Paper (DSP) which is the snowy background. Right now you can get the DSP for 20% off during the Giant Year-End Closeout from December 8, 2020 to January 4, 2021. Shop HERE. Download the complete list of retiring products and discounts below.
The Peace & Joy stamp set has several large sentiments along with smaller strip sentiments to design your own personal sentiment. It is also on the retiring list.
Measurements: Whisper White Card Stock (CS) card base: 4 1/4 x 11 inches with a score line at 5 1/2 inches; Pacific Point CS: 4 1/8 x 5 3/8 inches and 3 x 4 inches; Snowflake Splendor DSP: 4 x 5 1/4 inches; and Whisper White CS: 3 x 3 inches, 1 1/2 x 4 inches and 1/2 x 3 inches.
Stamp the “Peace” sentiment in Pacific Point ink onto the 1 1/2 x 4 inch Whisper White CS. Stamp the sentiment “To you and yours” onto the 1/2 x 3 inch Whisper White CS. Note: When using the Photopolymer stamps, you will need something underneath like the Stampin’ Pierce Mat or a catalog to get the best image.
Fussy cut the sentiments with your Paper Snips and set aside.
Use the 2 1/4 inch Circle Punch to punch a circle on the upper portion of the Snowflake Splendor DSP in the middle. The DSP in this photo is upside down. Be sure to push the DSP all the way down into the punch.
Adhere the 3 x 3 inch Whisper White CS to the back of the Snowflake Splendor DSP covering the 2 1/4 inch circle. I am using a Silicon craft Sheet to avoid having the project stick to my table. Flip over and adhere the card piece to the 4 1/8 x 5 3/8 inch Pacific Point CS.
Punch the cat out of the 3 x 4 inch Pacific Point CS with the Cat Builder Punch. Adhere the cat in front of the “moon”.
Use Stampin’ Dimensionals to adhere the “Peace” sentiment under the cat. Adhere the “To you and yours” sentiment under the “Peace”.
Use your Bone Folder to fold the 4 1/4 x 11 inch Whisper White CS card base at the 5 1/2 inch score line. Adhere the cat card piece to the front of the card base.
Viola! You have a soothing card to send some peace to your favorite cat lover.
I really appreciate your visit today. I have been doing a 15-Day Christmas Card Challenge since December 1, 2020 if you would like to go to the previous posts and see lots of handmade Christmas card ideas. Please leave a comment and let me know which is your favorite.
Select any photo below to go directly to my Online Store.
Today I am returning to some simple stamping for my beginner stampers. The Merry Moose stamp set by Stampin’ Up! will not be available for much longer. It retires at the end of December. So if you would like this beauty, order early. Today is the start of the Giant Year End Close Out Sale. Check out all the sales and discounts at the end of my blog.
The Merry Moose stamp set is really fun and perfect for the outdoors person. I will show you a little technique with sponging & masking today to get the snowdrift.
Measurements: Shaded Spruce Card Stock (CS) card base: 5 1/2 x 8 1/2 inches with a score line at 4 1/4 inches; Whisper White CS: two at 4 x 5 1/4 inches; white copy paper: 4 x 6 inches.
Cut the 4 x 6 inch piece of copy paper as shown. This will be the mask to make the snowdrift.
Place the copy paper over one of the 4 x 5 1/4 inch Whisper White CS card pieces. Use a removable tape runner if needed to hold it in place. Using a sponge and the Balmy Blue ink dab the sponge on the ink. Sponge the ink onto the Whisper White CS in a gentle circular motion along the edge of the mask. Then sponge lightly above that to color the “sky”.
Leaving the mask in place, use the Shaded Spruce ink and the pine tree stamp to stamp two trees. Leave a space between the trees to stamp a third tree. Note: These are Photopolymer stamps and need a little padding from a Stampin’ Pierce Mat or catalog to look best.
Remove the copy paper mask. Stamp the third tree between the other two trees. Leave space under the third tree to put your sentiment.
Stamp the moose in Soft Suede ink. The moose is a Two Step Stamp. Here I stamped the detailed stamp after the plain stamp. However, I stamped the detailed stamp first followed by the plain stamp and felt it was easier for me to see to line everything up. Try it both ways to determine which works well for you. I did Stamp Off the plain moose stamp so that I could see the details on the moose more easily.
Stamp the sentiment “Merry Christmoose” in the Shaded Spruce ink.
Use the Shaded Spruce ink and stamp some pine trees on the other 4 x 5 1/2 inch Whisper White CS. I stamped once at full strength. The other two trees are Stamped Off first. Add the sentiment “enjoy the stillness of the season” over the trees. Adhere the panel to the inside of the Shaded Spruce CS card base.
Use your Bone Folder to fold the card base at the 4 1/4 inch score line. Adhere the front panel to the front of the card base.
Viola! That is all there is to it! This is a great card for the outdoors person and is so fun to make! Plus a little humor is good for the soul!
For those of you who love Bling! as much as I do, here is another version of the Merry Moose card with Rhinestone Basic Jewels added like stars in the sky.
Thanks for visiting today! Please leave me a comment and let me know which card has been your favorite during the first 7 days of my 15-Day Christmas Card Making Challenge.
To download the pdf of the retiring product in the 2020 August-December Stampin’ Up! Mini Catalog select the download button below.
Hello and Happy Monday! I hope you all had a crafty weekend!
Today’s card satisfies two challenges: my own 15-Day Christmas Card Challenge and the Cardz4Guyz Challenge #259-Traditional Christmas.
I designed this card with a traditional color combination and slightly modern Christmas trees from the Stampin’ Up!® Tree Angle stamp set.
The Tree Angle stamp set is from the 2020 August-December Stampin’ Up!® Mini Catalog. Tuesday December 8 is the start of the Giant End of Year Close Out Sale!I listed the retiring products and discounts which you can download here:
Measurements: Whisper White Card Stock (CS) card base: 4 1/4 x 11 inches with a score line at 5 1/2 inches; Whisper White CS: 3 1/2 x 5 1/2 inches embossed with the Winter Snow Embossing Folder, 3 x 5 inches to die cut a stitched rectangle from the Stitched Rectangles Dies and also to cut 2 stitched triangles from the Stitched Triangles Dies; and Red Foil Sheet: two strips at 1/2 x 5 1/2 inches and 3 1/2 x 3 1/2 inches to die cut the stitched circle from the Stitched Shapes Dies.
Using the Shaded Spruce ink stamp the sentiment “Joy & Cheer” onto the Stitched Rectangle Die Cut. For the Stitched Triangle Die-Cut Christmas Tree I tried both stamping first then die-cutting and die-cutting then stamping. Lining up the stamp on the cut Stitched Triangle is easier.
Stamp the inside of the Whisper White CS card base with the sentiment “Happy wishes to you and yours” in Shaded Spruce ink. Stamp the small group of ornaments in the upper right-hand corner first in Shaded Spruce ink, then in Real Red ink. Stamp the smaller triangle in Real Red ink on to the smaller Stitched Triangle Die-Cut.
Adhere the Red Foil 1/2 x 5 1/2 inch strips to the back of the Whisper White CS embossed with the Winter Snow Embossing Folder. I use the Silicon Sheet to be sure the excess glue won’t stick to my table. Adhere this card piece to the front of the Whisper White CS card base.
Use Stampin’ Dimensionals to adhere the Red Foil stitched circle and stitched rectangle with the sentiment stamped on it.
To adhere the green Christmas Tree I applied two Stampin’ Dimensionals to the bottom and used the Multipurpose Glue on the top.
Adhere the red Christmas tree to the card front with the Stampin’ Dimensionals.
You guessed it-time for Bling!
I used the pick side of the Take Your Pick tool to transfer the Star Designer Elements and the putty side to transfer the small silver circle sequins in the Snowflake Sequins. I wanted to add a little snow to the snowflake background with the silver sequins.
And Viola! you have a Traditional Christmas card to send to your favorite guy!
Thanks for coming by today. Check out more Traditional Christmas cards at the Cardz4Guyz blog here.
More on the Stampin’ Up!® Year End Closeout Sale. Download the PDF of the retiring products (above) and choose your products noting the item numbers. Then go to my Online Store HERE and start shopping and saving!
I hope you are having a good Holiday Season even though things are so different this year. I just try to stay positive and crafting really helps. I really feel joyful when I am designing and creating cards to send to my friends and family. I hope you do too! Have a great day!
Hello fellow crafters! To continue on with my 15-Day Challenge of making a Christmas card each day, I decided to create a peaceful forest with the Evergreen Forest 3D embossing folder. The “Season’s Greetings” sentiment is from the In The Pines stamp set.
To create the coloring I used the Sponge Brayer and Sponge Dauber so I will try to give you some tips on using those.
Measurements: Shaded Spruce Card Stock (CS) card base: 5 1/2 x 8 1/2 inches with a score line at 4 1/4 inches; Thick Whisper White CS: 4 1/8 x 5 3/8 inches; Whisper White CS: 4 x 5 1/4 inches and 1/2 x 4 inches; Shaded Spruce CS: 3/4 x 4 inches.
The Evergreen Forest 3D Embossing Folder is available in the 2020 August-December Stampin’ Up!® Mini Catalog. Note: The reason mine has a “One Navy Blue Plate” sign on it is because that is what I would use with my Big Shot. I now use the Stampin’ Cut & Emboss Machine which uses a gray plate and is much smoother.
The first step is to roll some Night of Navy ink onto the inside of the embossing folder. Apply the ink to the side that has the “Stampin’ Up!” logo on it. Tip: To get the ink on the Sponge Brayer evenly, push fairly firmly and roll the sponge from near to far, lift, and roll from near to far again. Repeat until there is a nice layer of ink on the sponge. Roll the ink onto the embossing folder with the same motion- near to far, lift, near to far. If needed apply more ink to the Sponge Brayer. Roll ink onto the embossing folder until there is a nice even layer.
Tip: Spritz a little water onto the Thick Whisper White CS to help the paper be easier to emboss and turn out more 3D. Also spritz a wee bit of water onto the ink on the embossing folder. Place the paper on the Evergreen Forest 3D Embossing Folder and close. Run through the Stampin’ Cut & Emboss Machine slowly to allow time for the ink to be absorbed by the paper.
Viola! This is the beautiful scene you have!
Now use the Sponge Dauber to apply Shaded Spruce ink to the trees. Tip: Dab the dauber onto the ink pad, then gently rub onto the embossed trees in a small circular motion applying a light layer of ink. Start light and add more to get a darker shade. Note: I have a different dauber for each color that I keep in a partitioned craft box.
Apply a nice even layer of the Shaded Spruce ink, then add a deeper color to the trees that “stick out” a little more than the others. Tip: Shade the edges of the card piece a little darker for a vignette look.
Continue to add more ink in a small circular motion until the color is deep enough and you are satisfied with the look.
Use the Shaded Spruce ink to stamp the sentiment “Season’s Greetings” onto the 1/2 x 4 inch Whisper White CS. Adhere the sentiment to the 3/4 x 4 inch Shaded Spruce CS.
Use the Timeless Label Punch to make a curved edge.
Use the largest tree in the In The Pines stamp set to stamp onto the 4 x 5 1/4 inch Whisper White CS. Some trees are stamped full strength and others are Stamped Off. This is the inside of the card.
Use your Bone Folder to make a crisp fold at the 4 1/4 score line on the 5 1/2 x 8 1/2 inch Shaded Spruce CS card base. Adhere the inside panel to the inside of the card base.
Adhere the embossed and sponged front panel to the front of the Shaded Spruce CS card base. Use Stampin’ Dimensionals to adhere the sentiment.
Viola! This really turned out to be a fun and soothing Holiday card!
I really appreciate you coming by today. Please leave me a comment to let me know what you think.
Many of the products in the 2020 August-December Stampin’ Up!® Mini Catalog are retiring. If there is anything you wanted, get it now or take you chances starting December 8, 2020 when some products will be discounted. Once the supply of the product is gone, there will be no more! Click here to shop early!
Select any photo below to go my Online Store and add that particular product to your cart.
I am on day 4 of my 15-Day Christmas Card Challenge! Today I have a gorgeous poinsettia card wishing a Merry Christmas!
The Poinsettia Petals stamp set and coordinating Poinsettia Dies create the perfect poinsettia for this card. The background has a Christmas Layers Die which is in the 2020-21 Stampin’ Up Annual Catalog. The Poinsettia Petals and Poinsettia Dies are in the 2020 Aug-Dec Mini Catalog.
Measurements: Very Vanilla CS card base: 4 1/4 x 11 inches with a score line at 5 1/2 inches; Very Vanilla CS: 3 7/8 x 5 1/8 inches, 7/8 x 3 1/4 inches, 5 x 5 inches and 4 x 6 inches; Mossy Meadow CS: 4 1/8 x 5 3/8 inches and 3 x 4 inches; and Real Red: 4 x 5 3/4 inches.
Warning: this blog is a little longer than usual so I can introduce some new products with some tips.
Stamp the sentiment ” Merry Christmas” in Mossy Meadow ink onto the 7/8 x 3 1/4 inch Very Vanilla CS. Set aside.
To make the background a little more interesting I stamped some small dots from the Gather Together stamp set in Real Red and in Mossy Meadow by Stamping Off first. Set aside.
To make it more simple to stamp all the pieces for the poinsettia, berries and leaves I used the Stamparatus. Tip: The Poinsettia Petals stamps are Photopolymer. In order to get a good image, it is helpful to use the Stamparatus Deluxe Foam Mat. The other option which I had used for quite awhile it to use the Stamparatus Foam Mat with a Silicone mat on top.
I placed the card stock I want to stamp on about 1 inch from the inner edge. Tip: If the stamp is too close to the inner edge it will not stamp all the way. Position the two leaves and the berries on one half of the 4 x 6 inch Very Vanilla CS. Trick: I wrapped my magnets in colorful duct tape with a little extra tab to grab onto. This makes it easier to pick the magnets up. It also prevents them from getting stuck together.
Apply Memento Black Ink to the stamps, close the panel and press firmly and evenly.
Turn the Very Vanilla CS and stamp onto the other side. As you can see, there is an area that did not get stamped on the upper right leaf. This is the beauty of the Stamparatus. Just apply more Memento ink, close the panel, press more firmly on the unstamped area, lift the panel and Viola! the problem area is fixed!
Using the second panel, position the three sizes of poinsettia on the 5 x 5 inch Very Vanilla CS. Repeat the process. Note: If you wanted to make, say 25 cards, that were all similar, this is the way to do it quickly. You just keep stamping until you have as many as you want. Can you tell I love my Stamparatus!
When I am done stamping I stamp onto a scrap paper to remove most of the ink. I then use my Simply Shammy moistened with water to clean the stamps. The Simply Shammy can be rinsed out although the ink does stain it a bit.
I used the Stampin’ Blends Alcohol Markers to color the poinsettia, leaves and berries. The colors I used were: Light & Dark: Cherry Cobbler, Real Red, Mossy Meadow and Old Olive. I used Light Mango Melody for the center of the poinsettia. For the berries I used the Bronze and Ivory. The images are cut with the Poinsettia Dies.
The leaves and petals of the poinsettia can be curved with the Bone Folder to add dimension to the card.
The last piece needed is the branch of leaves from the Christmas Layers Dies. I cut the branch into three smaller branches. Now we can put it all together.
Adhere the branches onto the stamped Very Vanilla CS card piece. Use a Stampin’ Dimensional on the center of the largest poinsettia and adhere it to the card piece. Add the berries. Since the petals of the poinsettia are not adhered, the berries slide right under the petals.
Use Stampin’ Dimensionals in the center of the two remaining poinsettias and adhere them to the first poinsettia. Adhere the leaves in place. Use Stampin’ Dimensionals to adhere the sentiment “Merry Christmas”.
Adhere the Cherry Cobbler CS to the front of the Very Vanilla CS card base, then adhere the Mossy Meadow CS. Finish the card by adhering the poinsettia panel to the card front.
Add a little sparkle with the Wink of Stella Glitter Brush.
Of course, I think the card needs a little more Bling! Add the Cherry Cobbler rhinestones that are in the Holiday Rhinestone Basic Jewels for a touch of sparkle in the background.
Viola! You have a gorgeous poinsettia card to wish someone a Merry Christmas!
Thanks for hanging in there today. This one was a little long. I wanted to be sure to introduce some new products and techniques with a few tips & tricks..
All of the products I used to create this card are pictured below. Select any photo to go to my Online Store and start shopping. If you have any questions, please send me an email at theresastreasures.az@gmail.com
I hope you give this one a try. It is a little bit of a challenge, but the end result gives a nice feeling of accomplishment. Have a great day and spend some quality time stamping soon!
Hello! This is day 2 of my 15-day Christmas Card Making Challenge. Today I am using Circle Punches and Designer Series Paper to make a shiny Holiday card.
This brightly gleaming Holiday card is made with the Dove of Hope stamp set (#153406) and the aptly named Brightly Gleaming Designer Series Paper (#150429).
Measurements: Mossy Meadow Card Stock (CS) card base: 5 1/2 x 8 1/2 inches with a score line at 4 1/4 inches; Very Vanilla CS: two at 4 x 5 1/4 inches and 2 1/2 x 4 inches; Brushed Metallic CS in copper: 2 5/8 x 5 1/8 inches and 2 3/4 x 4 inches; Brightly Gleaming DSP: 2 1/2 x 5 inches. The bow is made with the Old Olive ribbon from the All the Trimmings Ribbon Combo Pack.
Use the Mossy Meadow ink to stamp the sentiment “Peace On Earth” onto the 2 1/2 x 4 inch Very Vanilla CS. Stamp the branch below the sentiment as shown.
Use the 2 inch Circle Punch to punch out the sentiment. Set aside.
Stamp a branch onto the upper right-hand corner of one of the 4 x 5 1/4 inch Very Vanilla CS pieces. Add the ornament and the sentiment. This is the inside of the card.
Adhere the Brightly Gleaming DSP to the Brushed Metallic CS, then adhere them to the second 4 x 5 1/4 inch Very Vanilla CS card piece.
Use the Bone Folder to fold the Mossy Meadow CS card base in half at the 4 1/4 inch score line. Open the card base and adhere the 4 x 51/4 inch Very Vanilla inside card piece to the inside of the card base.
Adhere the prepared Very Vanilla CS and DSP card piece to the front of the Mossy Meadow CS card base.
Use the 2 1/4 inch Circle Punch to punch out a circle from the 2 3/4 x 4 inch copper Brushed Metallic CS. Adhere the “Peace On Earth” circle to the copper circle.
Now for the Bling! Even though the Gilded Gems are gold and the card is more copper-colored, I thought the gems would add some more sparkle.
Use the Take Your Pick tool to easily transfer the Gilded Gems from the acetate to the front of your card.
Viola! You have a brightly gleaming Holiday card to wish some “Peace On Earth” to someone this Holiday season!
If this is your first visit to my blog, check out the post from yesterday. I am participating in a 15-day Christmas Card Challenge and I started on December 1st. Thanks for stopping by! Please leave me a comment and let me know how I am doing.
Select any photo below to go to my Online Store and start shopping.