Posted in 2023 Stampin' Up! Holiday Mini Catalog, 2023-2024 Stampin' Up! Annual Catalog, Blending Brushes, Decorative Masks, Hello

Bruno & Kylie Bertucci’s Demonstrator Training Program Blog Hop-October 2023- Abundant Beauty Hello Card

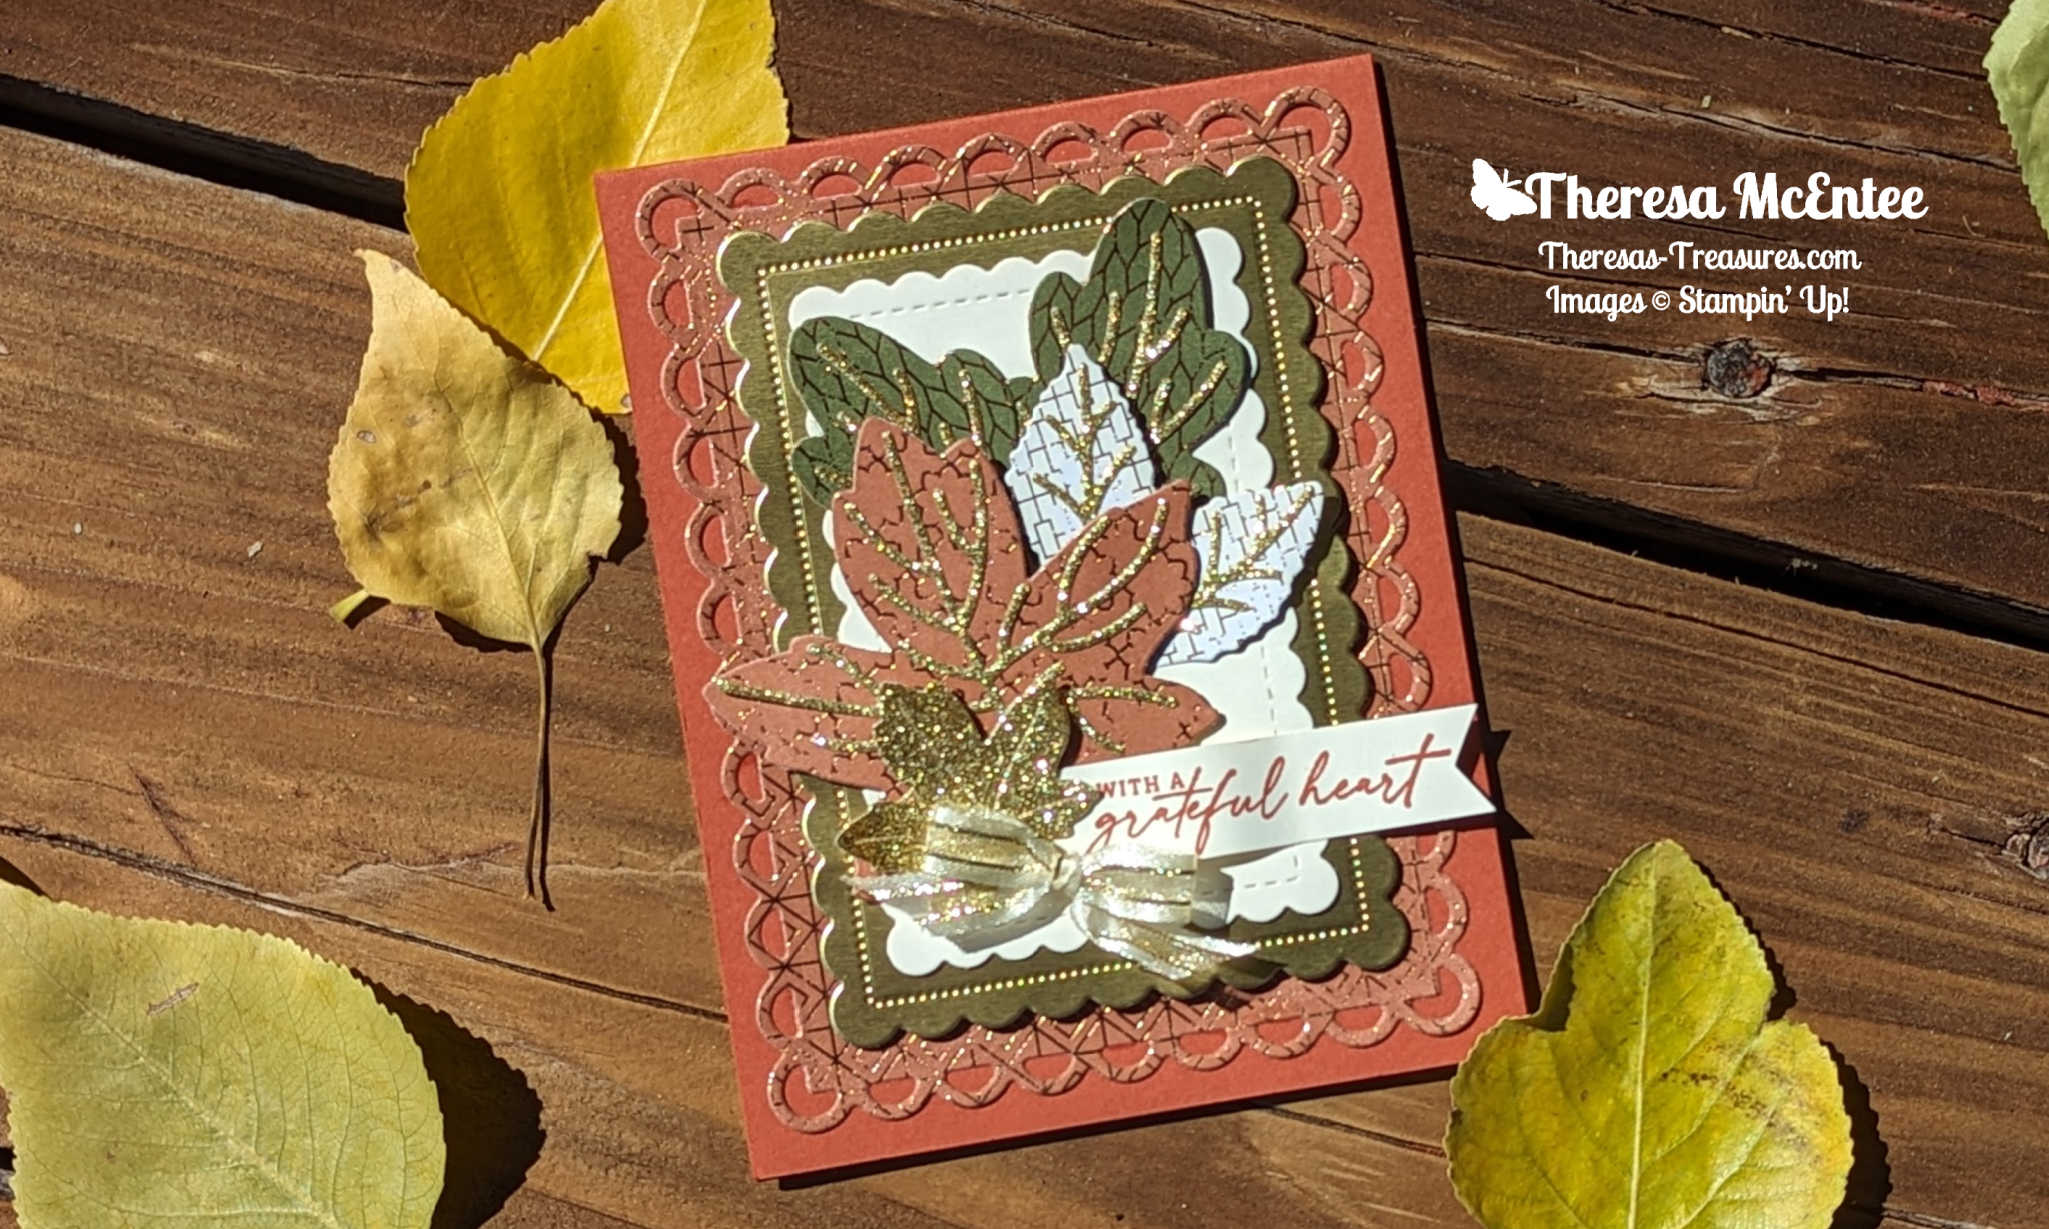
Hello! Welcome to Bruno & Kylie Bertucci’s Demonstrator Training Blog Hop for October 2023. I’m Theresa with Theresa’s Treasures Paper Crafts. I have a Hello card made with the Abundant Beauty Decorative Masks for you today. I am so glad you are joining me!

We are a group of Stampin’ Up! Demonstrators from around the world, interested in building a successful Stampin’ Up! business. My goal this year is to continue to participate in the monthly Blog Hop. I will be showing the card I send my customers when they order from me. This blog hop is full of ideas and creative inspiration! Be sure to visit everyone’s blog by clicking on the links at the end of my blog.

Measurements

  • Cajun Craze cardstock card base: 8 1/2″ x 5 1/2″ scored 4 1/4″
  • Pumpkin Pie cardstock: 4 1/4″x 5 1/2″ (for diecutting the 2nd from the largest Deckled Circles Die)
  • Basic White card stock: 2″ x 3″, 4″ x 5 1/4″ and 4″ x 5 1/4″ (for diecutting the 4th from the largest Deckled Circles Die)

Supplies

  • Abundant Beauty Decorative Masks
  • Layering Leaves stamp set for the sentiment
  • Autumn Leaves Dies
  • Ink: Daffodil Delight, Pumpkin Pie, Cajun Craze, Lemon Lime Twist, Parakeet Party, Granny Apple Green, Pecan Pie and Early Espresso
  • Small Blending Brushes (at least 2 packs)
  • Real Red & Burlap Ribbon Combo Pack
  • Rustic Metallic Adhesive-Backed Dots

Instructions

Blending the Flower Petals

  1. Diecut the Deckled Circle from the Basic White cardstock.
  2. Secure it to a piece of scrap paper with removable adhesive.
  3. Secure the scrap paper to the work space with tape.
  4. Lay the #1 Decorative Mask over your Deckled Circle cardpiece as desired. Take note of where the notch along the edge of the mask is. Use a pen to draw a line along that edge to help with placement of the next masks.
  5. Secure the Decorative Mask with some removable tape (sticky note tape).
  6. Use a Small Blending Brush and the Daffodil Delight Ink to apply ink along the tips of the flower petals. You can make this as light or as dark as you wish. See photo above on left.
  7. Now use another Small Blending Brush and the Cajun Craze Ink. Apply a layer of ink around the center circle.
  8. Lastly blend in Pumpkin Pie Ink with a third blending brush to complete the flower petals.
  9. Carefully remove the mask without disturbing the cardpiece.

Blending the Leaves

  1. Lay the #2 mask with the leaves by matching up the notch on the edge of the mask with the mark you made on the scrap paper.
  2. Secure the mask with removable tape.
  3. Use a clean Small Blending Brush to apply the Lemon Lime Twist Ink to the leaves first. Then apply the Parakeet Party Ink leaving a bit of the Lemon Lime Twist showing on the upper edge of each leaf.
  4. Finish the leaf by blending in some of Granny Apple Green Ink along the bottom edge of each leaf.
  5. Carefully remove the mask.

Blending the Center of the Flower

  1. The last 2 masks will complete the center of the flower.
  2. Lay mask # 3 over the card piece matching the notch. Secure it with the removable tape.
  3. Use a Small Blending Brush to apply the Pecan Pie Ink.
  4. Carefully remove mask #3.
  5. Lay mask #4 over the card piece, matching the notch and securing it to the scrap paper.
  6. Apply Early Espresso Ink.
  7. Remove the mask.
  8. Tip: Be sure to keep the masks away from your cardpieces as they will have residual ink on them. Rinse them in water. Use a mild soap if needed.

Blending the Flower for the Inside

  1. Repeat the above process to blend on a small flower in the lower right-hand corner of the Basic White cardstock for the inside of the card.
  2. Adhere this piece to the inside of the Cajun Craze cardstock card base.

Assemble the Card

  1. Use the Deckled Circles Die to diecut from the Pumpkin Pie cardstock.
  2. Adhere the Basic White cardstock card piece with the flowers on it to the Pumpkin Pie cardstock circle.
  3. Position the circles on the front of the Cajun Craze cardstock card base and trim any excess that is on the left border.
  4. Adhere this to the card base.
  5. Use Early Espresso Ink and the “Hello” sentiment from the Layering Leaves stamp set to stamp onto the 2″ x 3″ Basic White cardstock. Diecut with the label die from the Autumn Leaves Dies. Use Stampin’ Dimensionals to adhere the sentiment to the card front.
  6. Tie a bow with the Burlap Ribbon and adhere to the card front with a few Mini Glue Dots.
  7. Bling! Apply the Rustic Metallic Dots as desired.

Voila!

Remember to visit everyone’s blog. You will see creative inspiration from Demonstrators around the world! You are currently at Theresa McEntee-Theresa’s Treasures-USA. Enjoy!

I appreciate your visit to my blog today. Those who place an order with me during October will receive one of today’s cards as a thank you!

Please subscribe to my blog so you will continue to see these blogs. If you need any assistance with placing an order so you can make your own card, let me know in the comments. Thanks!

Have a most wonderful day! Happy crafting!

Theresa

Order Supplies Here:

Product List
Posted in 2023 Stampin' Up! Holiday Mini Catalog, 2023-2024 Stampin' Up! Annual Catalog, Avid Stamper, Designer Series Paper, Gratitude/ Thanks, Nature, Outdoors

Kylie’s International Blog Highlights Gallery-October 2023: Autumn Leaves Gratitude Card

Hello! Welcome to Theresa’s Treasures Paper Crafts. I am Theresa, an Independent Stampin’ Up! Demonstrator in Arizona, USA. I am excited to be participating in Kylie Bertucci’s International Blog Highlight Gallery with my Autumn Leaves Gratitude card. Today I am sharing my card and blogging along with a very creative group of Stampin’ Up! demonstrators from around the world! Please be sure to see all of the inspirational projects by visiting everyone’s blog. You will need to click on the “Vote” button below to see the Gallery.

The theme for this Gallery is “Thank You”.

It is so important to show appreciation to those who have helped you, supported you and inspired you. One way to express gratitude is to send a handmade thank you card! Discover the joy in making and sending a handmade card for yourself!

This Autumn Leaves Gratitude Card showcases the Autumn Leaves Bundle, All About Autumn Designer Series Paper * and the Online Exclusive-Silver & Gold Self-Adhesive Glimmer Paper.

*The All About Autumn Designer Series Paper is due to be back in stock this week.

Current Host Code: 9EVUAPUT

Measurements

  • Copper Clay cardstock card base: 4 1/4″ x 11″ scored at 5 1/2″
  • All About Autumn Designer Series Paper:
    Copper Clay/Foil design: 4 1/4″ x 5 1/2″ (diecut with the largest Scalloped Contours Die), 3″ x 3 1/4″ (diecut the largest leaf in the Autumn Leaves Dies) and 1/2″ x 5 1/4″(inside)
    Mossy Meadow/Foil design: 2 1/2″ x 3″(diecut with the large narrow leaf die)
    White/Foil design: 2 1/4″ x 2 1/4″( diecut with the leaf duo)
  • Gold Self-Adhesive Glimmer Paper: 3″ x 12″
  • Gold Foil: 3 1/4″ x 4 3/4″ (diecut with the 2nd from the largest Scalloped Contours Die)
  • Very Vanilla cardstock: 5/8″ x 2 3/4″ for the sentiment, 2 3/4″ x 4″(diecut with the 3rd from the largest Scalloped Contours Die) and 4″ x 5 1/4″ for the inside

Supplies

  • Autumn Leaves stamp set & dies
  • Scalloped Contours Dies
  • Copper Clay Ink
  • Gold & Vanilla 3/8″ Satin Edged Ribbon
  • Stampin’ Dimensionals & Mini Dimensionals
  • Mini Glue Dot
  • Stampin’ Cut & Emboss Machine

Instructions

  1. Fold the Copper Clay cardstock card base in half and set aside.
  2. Stamp the sentiment in Copper Clay Ink onto the 5/8″ x 2 3/4″ Very Vanilla cardstock. Cut the right-hand end into a banner.
  3. Die cut all of the leaves, scalloped rectangles and the veins for the leaves.
  4. Remove the protective backing on the Gold Glimmer Paper and adhere the veins to the corresponding leaves.
  5. Adhere the Copper Clay/Foil scalloped rectangle to the front of the Copper Clay cardstock card base.
  6. Stampin’ Dimensionals are used to adhere the Gold Foil scalloped rectangle to the card front.
  7. Use Multipurpose Liquid Glue or the Stampin’ Seal to adhere the Very Vanilla cardstock scalloped rectangle to the Gold Foil layer.
  8. Arrange the leaves on the Very Vanilla cardstock scalloped rectangle. I started with the Mossy Meadow/Foil leaves in the background. A Mini Stampin’ Dimensional was applied to the back of the tip of the right-hand Mossy Meadow/Foil leaf to raise it up a bit.
  9. Add the Copper Clay/Foil leaf using Stampin’ Dimensionals. Slide the White/Foil leaves behind the Copper Clay/Foil leaf. Mini Stampin’ Dimensionals are on the back of the tip of each leaf.
  10. Use a Stampin’ Dimensional on the back of the middle of the sentiment and glue on either end. Adhere to the card front. This gives the sentiment banner a wavy look.
  11. To adhere the small Gold Glimmer Paper maple leaf, apply a Stampin’ Dimensional to it without removing the protective backing. Adhere to the left of the sentiment.
  12. Make a small bow using the Gold & Vanilla 3/8″ Satin Edged Ribbon. Adhere to the card front using a Mini Glue Dot.
  1. Complete the inside by adhering the 1/2″ x 5 1/4″ strip of the Copper Clay/Foil DSP to the right-hand side of the 4″ x 5 1/4″ Very Vanilla cardstock. Adhere 2 oak leaves diecut from the Gold Glimmer Paper. Adhere the panel to the inside of the card base.

Voila!

I hope you enjoyed my gratitude card today using the Autumn Leaves Bundle. I really loved sharing it with you!

Visit my Online Store to order what you need to make this card for yourself. A photographic supply list is at the end of this blog.

Current Host Code: 9EVUAPUT

You are currently at Theresa McEntee-Theresa’s Treasures-USA. When you click on the Vote For Me button above you will see the Gallery of creative inspiration from Demonstrators around the world! Remember to visit everyone’s blog by clicking on the photo of their card in the Gallery.

To vote for your favorite cards, click on the small heart in the upper right-hand corner of each photo. You have 5 votes! Enjoy and come visit Theresa’s Treasures again soon!

Clickable Supply List

Product List

Thanks again for stopping by! Have a most wonderful and crafty day!

Theresa